Tuesday, December 30, 2014

C# 6.0–Null conditional operator

This blog post is part of C# 6.0 Features Series.
As we know there are lots of small features added in C# 6.0 and Null conditional operator is one of them. You can check null with specific conditions with Null conditional operator and this will definitely increase productivity of developers and there will be less lines of code.

Let’s create example. Following are two classes I have created for this example. Address class will contains two properties like Street and City.
namespace NullConditionalOperator
{
    public class Address
    {
        public string Street { get; set; }
        public string City { get; set; }
    }
}
And Same way Person class contains four properties Id,FirstName,Lastname and Address which is of type Address class which we have created.

Share:
Sunday, December 28, 2014

C# 6.0–Static class using statement

This blog post is part of C# 6.0 Features Series.
C# 6.0 version introduced lot of small features and one of that features is  using feature. Now with C# 6.0 you can use using statement which was not possible in earlier versions of  C#. Following is a example of using statement in C#.
using static System.Console;

namespace StaticClassUsing
{
    class Program
    {
        static void Main(string[] args)
        {
            WriteLine("With using statement");
        }
    }
}
And below is output when you run your application.

Share:

C# 6.0–Auto implemented property initializer

This blog post is part of C# 6.0 Features Series.
As we all know C# 6.0 is there in preview mode and Microsoft has added few small features to C# 6.0 which helps  lot while you develop application. In today’s blog post we are going to learn one more small feature called “Auto implemented property initializers”.

Developers working on C# used a automatic properties a lot and there has been lot of demands from developers that automatic properties should a have initializers and Microsoft has listened to that feedback and with C# 6.0 it has been introduced. So now we don’t have to use constructors to initialize automatic properties and there will be less and much cleaner code for Automatic property initializations.

Share:
Saturday, December 27, 2014

Continuous Integration with visualstudio.com,Unit Test(Test Driven Development) and TFS


Before some time I have written a blog post about Continuous integration with visualstudio.com and TFS and It goes quite a good number visits and lots of people are asking for unit test integration with continuous integration too. Today one of colleague also asked for the same. I thought it will be good idea to write a Blog post about it.

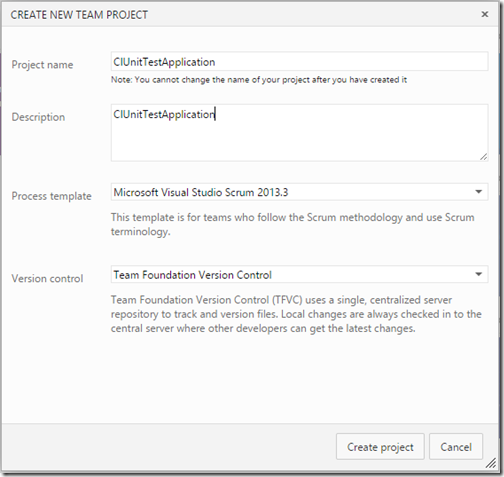
In this blog post we are going to create a new MVC application with a Test Project so that we can run tests and configure unit test with continuous integration. So Let’s first create a new application in visual studio.com.

New-Project-unit-test-continious-integration

Share:
Friday, December 26, 2014

Colorized tooltip in visual studio 2015

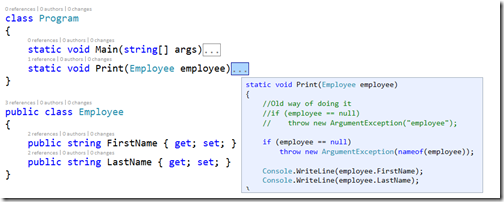
Visual studio 2015 provides lots of new features and Colorized tooltip is one of the features that I really like. As we all know that Visual studio supports automatic collapse of various language constructs like classes, methods.  When you mouse hover it automatically show hidden code presented in that portion.

In earlier version of Visual Studio that tooltip was shown with hidden code but it was in plain text. Now this tooltip is colorized with syntax highlighting so your hidden code is more readable.It’s look like below.

colorized-tooltip-visualstudio2015

Hope you like it. Stay tuned for more. I’m going to post lot more blog post about new Visual Studio 2015 features.
Share:

C# 6.0–nameof Operator

This blog post is part of C# 6.0 Features Series.
Microsoft announced the new version of C# 6.0 at the day of visual studio connect event on November. They have not added any big features to C# 6.0 but they have listened to community and added few small features which comes really handy. One of the that is nameof operator.  In this blog post we learn why nameof operator is very useful.

Let’s create a class Employee with few properties.
public class Employee
{
    public string FirstName { get; set; }
    public string LastName { get; set; }
}
Now what I want to do here is to create a object with object initializer and print values of properties with print method.

Share:
Thursday, December 25, 2014

Custom Windows Layout in Visual studio 2015

Visual studio 2015 preview has been released by Microsoft before some days. So I recently got installed in my machine. It contains a bunch of new features and we are going to explore it one by one. Custom layout windows in visual studio 2015 is a one of the nice features in list. In this blog post we are going to learn about custom windows layout in Visual studio 2015.

As we all use different kind of devices like laptop, desktop and some times we choose our visual studio layouts based on screen size and resolution of monitors.   We generally moved items like solution explorer, Team explorer and toolbox based on space available and resolutions of devices. Personally When I work on desktop where I have 22 Inch monitor I used to prefer my solution explorer and other windows open while when I work on laptop which got 15 inch screen all the windows will be in collapse mode.  In this kind of scenario this features comes quite handy.

Let’s see how its works. Here’s is my laptop layout where I like all the windows in collapse mode and I will open windows as I need them.

Share:
Sunday, December 14, 2014

Continuous integration with visualstudio.com and TFS


As a developer, we all are using some kind of source control provider to maintain versions of our source code.  But another aspects of source control to is to make sure that code committed in source code repositories are  perfect and it will not break the build of particular software. That’s why Continuous integration is very much popular this days.

What is Continuous Integration:


As per wikipedia
Continuous integration (CI) is the practice, in software engineering, of merging all developer working copies with a shared mainline several times a day. It was first named and proposed by Grady Booch in his method, who did not advocate integrating several times a day.
In simple words, when developers checks in or commit code to source code repository a build of software will automatically triggers to check whether current check-in/commit of code breaks code or not.

Share:
Saturday, December 13, 2014

1.5 million page views for my blog- dotnetjalps.com

Ahh, still it’s hard to believe that my blog has achieved this milestone. Yeah my blog got completed 1.5 millions page views. So first all, thank you readers without you guys it’s not possible to achieve such a big milestone.

When I started my blog I was not never sure what I am going to do with this blog. But then it’s become integral part of my life. Now I can’t imaging my self without my blog.
A big thank you to all who supported me and given so much love to my blog.
I would also like to thank you my family without their support it was not possible to achieve such a big milestone.

Before some time I have written a blog post about 1 million view. It took almost four years to achieve 1 million page views mile stone and now this time it cross half million in just about 7 months( May 2014 to Dec 2014). So again thank you very much dear readers for making my blog popular.

Statistics from blogger.com:


I am not super crazy about sharing statistics but this is a special milestone I am sharing my statistics with you guys. Following is a statistics confirmed by blogger built in statistics tool.

Share:
Tuesday, September 16, 2014

Complex type in EFCodeFirst

I have already written a few blog post about EF Code first and it’s features following is a complete list of blog posts.

Entity framework code first and inheritance- Table Per Type
Entity Framework code first and Inheritance–Table per hierarchy
Entity Framework Code First migrations
Different way of mapping with EFCodeFirst
Different way of creating keys in EFCodeFirst

This post will also be part of this EF code first series. In this blog post we are going to learn how we can handle complex type in EF Code First. In our day to day operation we are having different kind of database tables where  there are multiple type of relationships  are defined like one-to-one, one-to-many and many-to-many. This all kind of relationship is handle by complex types.

Share:
Thursday, September 11, 2014

Dependency Injection with ASP.NET MVC and Simple Injector


I have been learning SimpleInjector for few days and it’s just awesome.  I have already written two post about it(see below link) and this post will be third post about it. In this post we are going to learn how we can do Dependency Injection with ASP.NET MVC.

For those who are reading my posts about Simple Injector Following are two previous post I have written about Simple Injector. I highly recommend to read first two post so that you can be aware about how we can configure SimpleInjector container.

Dependency Injection with Simple Injector
Singleton Instance in Simple Injector

So let’s start with creating a ASP.NET MVC Project from Visual Studio.


Share:
Tuesday, September 9, 2014

Singleton Instance in SimpleInjector

Before some time I have written a blog post Dependency Injector with Simple Injector. This is a second blog post in same series. In this blog post we are going to learn How we can create a singleton Instance in Simple Injector.

What is is Singleton:


This is one of the Gang of Four creational pattern. Idea of behind the singleton pattern is to have only one instance of class of at anytime. This pattern ensures that a class will has only one instance of it and provides a global point of access to that instance.

I have already written a global blog post about that. You can find a basic example of Singleton pattern in C# from the following link.

Singleton Class in c#

How we can create Singleton Instance with SimpleInjector:


Here I’m going to create a console application with logger example. So let’s create via creating a new project like below.

Share:
Friday, August 29, 2014

Dependency Injection with Simple Injector

Before some I have written a blog post about how to do dependency injection with StructureMap. In this post we are going to learn Simple Injector IOC library and how we can do dependency injection with Simple Injector.

About Simple Injector:


Simple Injector is a open source dependency injection library developed with C#. Followings are few characteristics of Simple Injector.
  • Simple Injector is very simple to use dependency injection library support .NET 4+ framework, Silverlight 4+, Windows Phone 8, Windows 8 Including Universal apps and Mono.
  • Simple Injector is easily integrated with frameworks like ASP.NET Web Forms, ASP.NET MVC, ASP.NET Web API, WCF and many more.
  • It’s free and always be free. Published under MIT license.
  • Simple Injector is highly optimized for performance and concurrent use.
  • Simple Injector is thread safe and lock free design.
  • Simple Injector has great support for generics and used lot of things of generics then any other dependency injection libraries.
  • Simple Injector has a powerful diagnostic system.Currently it offers following validations
    • Lifestyle Mismatch
    • Short Circuit Dependencies
    • Potential Single Responsibility violations
    • Container Register Types
  • Simple Injector is amazingly fast.
  • Simple Injector is developed using Modern proven development practices such as TDD and Solid Design Principals.

Share:
Saturday, August 23, 2014

Stackoverflow.com like URLs with attribute routing in ASP.NET MVC

Before some time I have blogged about Attribute Routing features of ASP.NET MVC 5.x version.  In this blog we are going to learn how we can create stackoverflow.com like URLs with attribute routing.

As you know www.stackoverflow.com is one of the most popular questions answer site where you can ask questions and almost get the answers of your questions. So to create URLs like www.stackoverflow.com we need to understand structure of URLs of Stackoverflow. Let’s take example of following question URL which I have answered on stackoverflow.com

http://stackoverflow.com/questions/24133693/can-i-use-signalr-2-x-with-net-4-0-if-i-am-using-microsoft-bcl-upgrading-from

and let’s take another example

http://stackoverflow.com/questions/23739256/the-advantage-of-formsauthentication-class-over-session-variable

If you compare and understand structure of this URLs. You will know that there will be a two things which will be dynamic for this URLS.

Share:
Thursday, August 21, 2014

Blog post selected as ASP.NET MVC Official Additional Learning Resources

I have got news before few days that my blog post about CDN is ASP.NET MVC bundling selected as Additional Resources for learning about ASP.NET MVC on official ASP.NET Site.

On this occasion I would like to thank my audience and my family to supporting me. Thank you all without you it would not have been possible. I loved to be part of this amazing community and I promise that I would continue to do community work.

I would also like to thank Rick Anderson and Jon Galloway and whole ASP.NET Team for selecting my post. It’s a honour for me. Thanks you very much guys for encouraging and inspiring me  to do community work!!

Due to all this my blog got high ranking and I’m almost getting more then 80k page views every month. Google is loving my blog more and more!!
CaptureBlog

Thank you very much everything dear readers!!
Share:
Friday, August 1, 2014

Different way of creating keys in EFCodeFirst

Recently I have been playing with Entity Framework Code First and I like it a lot. There are plenty of features given and you can configure all that stuff with code. I have already written couple of post for Entity Framework Code First.

Different way of mapping in EFCodeFirst
Entity Framework code first and Inheritance–Table per hierarchy
Entity framework code first and inheritance- Table Per Type

As you EFCodeFirst generate database table based on the configuration defined in classes. Today we are going to learn about how we can create key with different configurations.

Share:
Tuesday, July 29, 2014

CDN in ASP.NET MVC bundling

ASP.NET MVC contains great features and Bundling is one of them. The Bundling and Minification features allow you to reduce number of HTTP requests that a web page needs to make by combining individual scripts and style sheet files. It can also reduce a overall size of bundle by minifying the content of application.   From ASP.NET MVC 4 bundling also includes CDN support also where you can utilize public CDN available for common libraries. Let’s look this features in details.

CDN Support in Bundling:


Libraries like jQuery, jQuery UI and some other libraries are commonly used in most of the applications. There are available in CDN (Content Delivery Networks) specifying the URL of particular library with specific version.  Bundling now has CDN path as parameter in default bundle functionality where you can specify the path of the CDN library and use that. So when you application run in production environment first it will check whether CDN are available or not if available then it will load it from the CDN itself and If CDN is not available then it will load files hosted on our server.

Share:

CRUD Operation with ASP.NET MVC and Fluent Nhibernate.

Before some time I have written a post about Getting Started with Nhibernate and ASP.NET MVC –CRUD operations. It’s one of the most popular post blog post on my blog. I get lots of questions via email and other medium why you are not writing a post about Fluent Nhibernate and ASP.NET MVC. So I thought it will be a good idea to write a blog post about it.

What is Fluent Nhibernate:


Convection over configuration that is mantra of Fluent Hibernate If you have see the my blog post about Nhibernate then you might have found that we need to create xml mapping to map table. Fluent Nhibernate uses POCO mapping instead of XML mapping and I firmly believe in Convection over configuration that is why I like Fluent Nhibernate a lot. But it’s a matter of Personal Test and there is no strong argument why you should use Fluent Nhibernate instead of Nhibernate.

Fluent Nhibernate is team Comprises of James Gregory, Paul Batum, Andrew Stewart and Hudson Akridge. There are lots of committers and it’s a open source project.

You can find all more information about at following site.

http://www.fluentnhibernate.org/

On this site you can find definition of Fluent Nhibernate like below.
Fluent, XML-less, compile safe, automated, convention-based mappings for NHibernate. Get your fluent on.
They have excellent getting started guide on following url. You can easily walk through it and learned it.
https://github.com/jagregory/fluent-nhibernate/wiki/Getting-started

ASP.NET MVC and Fluent Nhibernate:


So all set it’s time to write a sample application. So from visual studio 2013 go to file – New Project and add a new web application project with ASP.NET MVC.

Share:
Saturday, July 26, 2014

Different way of mapping with EFCodeFirst

Recently I have been working Entity Framework Code First 6.0 and it’s awesome. I am in love with it. It has got great fluent API and we can do anything with that. It’s also promotes Convention over configuration which I love so far.

I have seen people are more confused about how we can map table to class via Entity framework via code first. So this post is going to be in same series. In this post I’m going to write about different ways to mapping table to class. I have already written two post about in details.

Entity Framework code first and Inheritance–Table per hierarchy
Entity framework code first and inheritance- Table Per Type

In this blog post I will give you tips and tricks to map class(type) with database table.

Share:
Thursday, July 24, 2014

HashSet in C#

In this blog post we are going to learn about HashSet collection in C#. It is a cool collection available from C# 3.5. Like any other collection it can be used for representing a set of value. It is an optimized set collection. It helps eliminating duplicate string or elements in collection. Whenever an Item is added in collection it will check whether this items are already there in collection If not then only it will add items.

Let’s take an example for the same.
using System;
using System.Collections.Generic;

namespace CSharpHashSet
{
    class Program
    {
        static void Main(string[] args)
        { 
            HashSet<string> nameHashSet=
                new HashSet<string>
                {
                    "Jalpesh", "Vishal", "Tushar", "Jalpesh"
                };
            foreach (var item in nameHashSet)
            {
                Console.WriteLine(item);
            }
            Console.ReadKey();
        }
    }
}
Now if you see the code carefully I have created HashSet of name(string type) with duplicate name like “Jalpesh” and then enumerate that collection with for loop and print items of collection with Console.WriteLine.

Share:
Wednesday, July 23, 2014

StructureMap–Getting Started

In this post we are going to learn about How we can do dependency injection with StructureMap. Here we are going to take a sample application of shopping cart. This shopping cart can process two type of orders 1. Sales order 2. Purchase Order. We want an abstraction for this. So first we are going to create an interface IOrder which will be implemented by both Purchase Order and Sales Order classes.

Following is a code for that.
public interface IOrder
{
    void Process();
}
And following is a implementation of SalesOrder class.
public class SalesOrder : IOrder
{
    public void Process()
    {
        Console.WriteLine("Sales Order Processed");
    }
}
Same way following is a implementation of PurchaseOrder class.
public class PurchaseOrder : IOrder
{
    public void Process()
    {
        Console.WriteLine("Purchase Order Processed");
    }
}
And following is a code for Shopping Cart.
public class ShoppingCart
{
    private readonly IOrder _order;
    public ShoppingCart(IOrder order)
    {
        _order = order;
    }

    public void CheckOut()
    { 
        _order.Process();
    }
}

Share:
Sunday, July 20, 2014

Entity Framework Code First migrations

In this blog post we are going to learn about entity code first migrations. Entity Framework code first approach will allow you to define model classes as per the domain requirements via POCOs. Hence you have complete control over classes are written. But as application grows and there are some new features to be added and  your classes will change. Entity Framework Code Migrations allows you to handle this migrations.

As we all now that Entity Framework Code First approach allows you to create database based on your classes created. It’s provide you three types of initializers.

CreateDatabaseIfNotExist: This is the default initializer which will create classes if database not exists.

DropCreateDatabasesWhenModelChanges: This initializer is only good when you don’t concern about your database records. If there is any change in class then it will match database will classes and if there is any difference then it will drop and create a new database.

DropCreateDatabaseAlways: This initializer will always create new database whether database exist or not. If database exist then it will drop that database and create it again.

Share:

Visual Studio 2013, Team Explorer and BitBucket

With Visual Studio 2013, Microsoft started supporting Git directly with Team Explorer  and I have written a blog post how we can use git with team explorer and github called Visual Studio 2013, Team Explorer and GitHub. This post gained lots of popularity and also get lots of email about writing a blog post for using Git With BitBucket.org which is similar kind of source code hosting service like GitHub.com. So this post is all about it.

In this post I’m going to use a sample console application where we will put some code and then publish it to BitBucket Git Repository.  In this post I’m going to slightly take different approach then previous post but still you can do same way also previous post also.

In this post first we are going to create repository in BitBucket and then clone it on local. So here people will also get to know how we can create and clone a repository in local.

How to create repository in BitBucket:


If you don’t have account in BitBucket.Org then you need to create a account in BitBucket. You can create account from the following link.

Share:
Thursday, July 17, 2014

How to convert PSD into image file in c# with Magick.NET

Recently in one of project we had a requirement of converting a Adobe Photoshop file (PSD) into image file(.png) file. After digging while on internet I have found a great library which has so many features in can easily convert PSD files into any time of image file.

The Library is Magick.NET. It’s a open source project you can find more information about it from the following codeplex link.
https://magick.codeplex.com/

There are lots of example available for image conversion and other image editing functions. You can find that about that on documentation.
https://magick.codeplex.com/wikipage?title=Convert%20image

There are lots of NuGet package are available also. Following is a one of them.

Share:
Tuesday, July 8, 2014

How to change a profile picture in Visual Studio 2013

With Visual Studio 2013, Microsoft has provided synchronized settings in visual studio 2013 with live account. So all you need to do is to login into your live account and then it will automatically sync the settings of Visual Studio 2013 in different machine. Recently one of the reader of blog has asked me question How I can change the Profile Pic on Visual Studio. So I thought it will be good Idea to write a blog post about it.

Here’s how you can change profile picture of Visual Studio live/outlook account. One you done with sign in with visual studio it will load default image with your firstname first character and last name character like below.

default-pic-on-visual-studio

Now to change the account picture or profile picture click on name load a popup like following.


Share:
Friday, July 4, 2014

Scope to this feature in Solution Explorer- Visual Studio

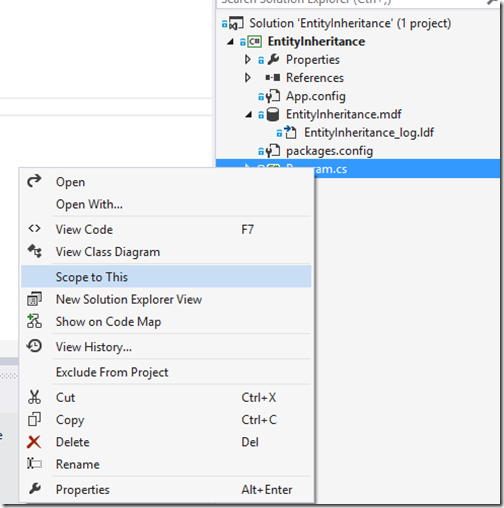
Visual Studio is one of my favourite IDE. I love more and more whenever I’m using it. Recently I have found a very good feature called “Scope to this” so I thought it will be a good idea to write a blog post about it.

This feature comes very handy when you have large solution and you want to work /Concentrate on the only portion of a solution. In solution you can select particular project/folder/file and right click and click on “Scope to this” Menu. It will scope your solution explorer to that particular item.

scope-to-this-visual-studio-solution-explorer

Share:

Entity Framework code first and Inheritance–Table per hierarchy

Before some day I have posted a blog about Entity Framework code first and Inheritance – Table per type and this post in next in series with that.

In previous post we have learned about how entity framework code first handles inheritance and in this part we are going to extend this and modify some of code of the code of data context to see how its creates a “Table per Hierarchy”.

We’re going to use same code as previous post just going to change EDataContext code like below.

public class EDataContext : DbContext
{
    public EDataContext() : base("MyConnectionString") 
    { 
    }
    public IDbSet<Customer> Customers { get; set; }
    public IDbSet<Employee> Employees { get; set; }
    public IDbSet<Person> Persons { get; set; }
}

If you see this code carefully and compare is with previous post. The only difference is persons property. That will force Entity Framework to create a single table for inheritance hierarchy. Now we are going to run this application again and see how it creates table. It will create only one table like this.

Share:
Saturday, June 21, 2014

Entity framework code first and inheritance- Table Per Type

Also see part-2 of this blog post- Entity Framework code first and Inheritance–Table per hierarchy
Recently I am using Entity Framework a lot. So I tried some of advance scenario and this post related to it only. In this post we will learn how entity framework handles inheritance.

In object oriented world, We all use Inheritance for reusability. We create some base classes and inherit those in child classes to facilitate code reuse and we don’t have to write again and again. In this post we will also have same kind of methodology. We are going to create a “Person” class and inherit this in to Employee and Customer class and we are going to see how entity framework code first handles this kind of inheritance by default. I’m going to use entity framework version 6.0 and Visual Studio 2013.

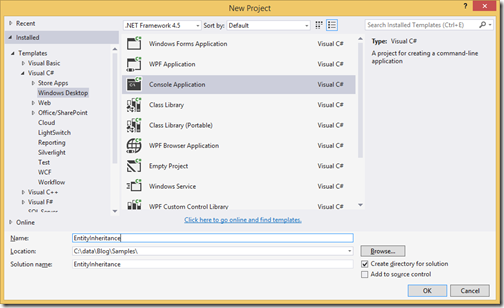
So what we are waiting for. Let’s get started. So create a console application from file menu new project.

New-project-entity-framework-inheritance

Once you are done with creating a application. It’s time to add entity framework via nuget package.

adding-entityframework-nuget-inheritance

Share:

Visual Studio 14 CTP virtual machine on Azure

Recently Microsoft has release a CTP version of Visual Studio 14 with ASP.NET VNext application. So I thought I will download and try it. But due to bad internet connection it was not downloading properly. Then I cam across following post about Visual Studio 14 CTP Virtual Machine on Azure.

http://blogs.msdn.com/b/visualstudioalm/archive/2014/06/04/visual-studio-14-ctp-now-available-in-the-virtual-machine-azure-gallery.aspx

So I thought it’s a good idea to spin a virtual machine instead of downloading and installing that which would cost me a day. While on Azure I can set that virtual machine in minutes.

So Following are steps for creating a virtual machine in Azure.

How to Create a Virtual Machine on Microsoft Azure with Visual Studio 14 CTP:


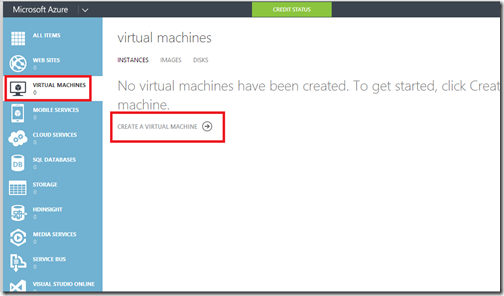
1) Login into your Microsoft Azure Account

2) From dashboard goto virtual machine and select Create Virtual Machine.

Create Virtual Machine

Share:
Wednesday, June 11, 2014

One ASP.NET in Visual studio 2013

This post is part of Visual Studio 2013 features series.
Since first release of ASP.NETMVC 2009, There are lots of type of projects are available for ASP.NET and It’s always been confusion to find all the projects under one hood. So now developer has not to worry about whether I should use Web Forms or ASP.NET MVC and If I need some functionalities of ASP.NET MVC in web forms or anything then how it will work? How we should combine all those different project types?

Now that fuss for developer is over. With Visual Studio 2013 Microsoft has vision called One ASP.NET so when you create a web project there will be a single project in Web Category only.

one asp.net visual studio 2013


Share:
Friday, June 6, 2014

Video Review: Restful Services with ASP.NET Web API by Packt Publishing

If you enjoy seeing videos to learn thing this is the opportunity, Now  Packt publishing is also started providing video courses and tutorial. I’m lucky enough to get an opportunity to review this video and thanks again Sagar Malage and Packt publishing marketing team to providing me opportunity to review this video.

About Video Course:


Course Name : Restful services  with ASP.NET Web API by Packt Publishing.
Total Duration: 2 hours and 4 minutes.
Release Date: Wednesday February 26,2014.
Author: Fanie Reynders

Share:
Friday, May 23, 2014

Visual Studio update 2 is here download now!!

10 days ago Microsoft has release Visual Studio 2013 update 2.  This update includes bug fixes as well as new features and customer feedbacks. Following are some new capabilities included in this updates.

Universal Apps:

With this release you now build Universal Apps that can run on Windows 8.1 and Windows phone 8.1 while sharing code and assets through shared projects.

There are two types of app available 1) Blank app as universal Project and Hub application for that. So now if you already developed the windows phone 8.1 app and want to create same app with windows 8.1 then you can do that very easily Add windows 8.1 and same way you can add windows phone 8.1 if you have already developed windows 8.1 via Add windows phone 8.1.

Share:
Thursday, May 22, 2014

.NET Framework 4.5.2 released by Microsoft

Microsoft has released .NET Framework 4.5.2 before some time see the announcement from It’s .NET Framework team blog. It’s a compatible, in-place update for Microsoft.NET Framework 4.0,4.5 and 4.5.1.  This framework also run side by side with earlier version of .NET framework.

From where I can download .NET Framework 4.5.2?


Following are link from where you can download .NET framework 4.5.2.

.NET framework web installer- Internet required at the time installation. It will download required file runtime.A Boots trapper that pulls in components based on the target OS/platform specs on which the .NET Framework is being deployed.

Share:

One Million page views for my blog–dotnetjalps.com

I have putted blogger statistics from its announcement(July 2010).  Today my statistics are showing that I have completed One million page views from July 2010. I feel honoured I have never assumed my blog will come this way. Earlier I had started this blog just for fun and to reserve my name with blogger subdomain. I was not aware that what is blogging and why we should do it. After some time almost after one year I realized the power of blog then and this 9th year I am continuously doing that. This is a great achievement and I feel honoured and awesome.

Share:
Wednesday, May 21, 2014

Fun with Angela Smith library by James Chambers for C#

AngelaSmith is an awesome library created by James Chambers. This library is used to generate realistic test data. You can find more information about it from the following link.

https://github.com/MisterJames/AngelaSmith

As per documentation on the github, it is.
AngelaSmith is a library you can use to generate realistic test data. It is composed of several property fillers that can populate commonly named properties through reflection using an internal database of values or randomly created data. You can override any of the fillers, give AngelaSmith hints on how to fill them, or easily extend the property fillers using extension methods or MEF.
It’s an awesome realistic data generator library. You can generate object data as well list also. She can fill anything that you throw it to her.You can use it’s static methods to create objects for testing, design time data or seeding a database.

Share:
Tuesday, May 20, 2014

Learning resources for ASP.NET MVC

I am getting lots of question regarding where to learn ASP.NET MVC. So I thought it will beneficial to write a blog post so that everyone get advantages of it. Today there are multiple resources available to learn ASP.NET MVC here I have listed some of the my favorite resources to learn ASP.NET MVC.

Videos:


Videos are great way to learn any technology and there are many video resources are available.

1) Pluralsight free videos on www.asp.net/mvc:

On the official asp.net mvc site Pluralsight has provided 8 free videos It it a great resource for any to get started with ASP.NET MVC. Some videos are there for ASP.NET MVC 3.0 but still it is worth learning it.

Share:
Sunday, May 18, 2014

Important Milestone achieved- 650th blog post

I am not super crazy about achieving mile stones but I just notice that I have completed 649 posts on blog. So I thought it will be good idea to write about few mile stones.
  1. On April 2014, my blog completed 8 years. The first post I have ever written was at April 26,2006.
  2. Today I have completed another important milestone this is 650th post I am writing and still going on. My passion for blogging never dropped I will still continue to write blog on my blog.
On this occasion, I would first like to thank my family who scarifies their time when I am writing blogs without their encouragement It would never possible to write blog and maintained it for almost 8 years.
I would also like to thank my readers. Without their love It would not have been possible to achieve this. Hopefully I will continue to write blog that will help you learn technology in some way.

Thanks again everybody for making this journey possible!!
Share:

What’s new in ASP.NET MVC 5 Part-1 : Attribute Routing

ASP.NET MVC is a new buzz word in Microsoft.NET stack most of people have started learning into it. So recently before some time Microsoft has released a Major new version of ASP.NET MVC with ASP.NET MVC 5.x. There are lots of new features given with ASP.NET MVC 5.x versions and I’m going to write a few series of blog post to explain all the features in details. So stay tuned with that!!

In this blog post I’m going to explain attribute routing in ASP.NET MVC 5.

Routing in ASP.NET MVC:


From the first version of ASP.NET MVC It’s provides a routing out of box. You don’t need to do much about it. Routing is how ASP.NET MVC matches URL in browsers to action. Based on URL a particular action is called on particular controller and result will be provided as view.

Share:
Tuesday, May 13, 2014

Free Get Involved Video from Scott Hanselman and Rob Conery

I have posted Why developer should blog? earlier where I have given various reasons why every developer should have a blog because it’s a great way to give back some thing to community and you can also market your self as a developer across community. Scott Hanselman and Rob Conery has created one of best video regarding same topic call Get Involved. Here they have explained how you can get out there and get involved with community with blogging, twitter, github , stackoverflow, user groups and conference. It will make you happier, more productive developer and inspire you take your career on next level.

Share:
Thursday, May 8, 2014

Visual Studio 2013, Team Explorer and GitHub


Recently Git version controlling system has gained lots of popularity and more and more developers are using it for software development and version controlling. Microsoft also tied with Git with Visual Studio 2013. So if you use Visual Studio as your primary IDE and then its high time to learn about it. With Visual Studio 2013 team explorer you can easily tied code in your git repository so I thought it will be a good idea to write a blog post about How we can create git repository in local with team explorer in Visual Studio 2013 and publish it to github a well know open source a powerfull code hosting site for the open source projects.

Share:
Tuesday, May 6, 2014

Visual Studio Command Window- A useful but unknown feature

All the Microsoft developers love visual studio as Integrated Development Environment(IDE) because it has build with lots and lots of features and developers are more productive then ever. But still there are lots of feature which are not popular among the developers. Visual studio command window is one of the best feature but still lots of developers are not aware about it. In this post we are going to learn about Visual Studio Command Window feature and we will see how we can increase productivity with this command window.

Command windows enables features of visual studio with commands. You can invoke command window via View-> Other windows –> Command window menu or via just pressing(Shortcut) Ctrl + Alt + A.
Share:
Wednesday, April 30, 2014

Book Review : Reporting with Visual Studio and Crystal Reports

Again Marketing Team of Packt Publication (Jay Raval) has contacted me to review a book called “Reporting with Visual Studio and Crystal Reports” and I always have fun to review books so I said yes to them.  This blog post is all about reviewing a book “Reporting with Visual Studio and Crystal Reports”.

reporting-with-visual-studio-and-crystal-report
Share:
Sunday, April 27, 2014

Enum support for views in ASP.NET MVC 5.1

Recently before some time Microsoft has announced release of ASP.NET MVC 5.1. It’s comes with tons of feature and  Enum support is one of them. In the earlier release of ASP.NET MVC there was no direct support for the Enums and in the views but with ASP.NET MVC 5.1 Microsoft is providing directly @html.EnumDropDownList for which directly creates a dropdown from the Enum itself. So What we are waiting for. Let’s take an example.

Example of Enum support for views in ASP.NET MVC 5.1:

Let’s create a new empty project for ASP.NET MVC from Visual Studio 2013 like following from File Menu-> New Project

Share:
Thursday, April 17, 2014

Test Driven Development is your friend

I have seen lots developers are not seeing benefits of Test Driven development. When you do Test Driven development there are lots of benefits. So I thought it will be good idea to write a blog post about it.

What is Test Driven Development:

As per wikipedia Test Driven Development is

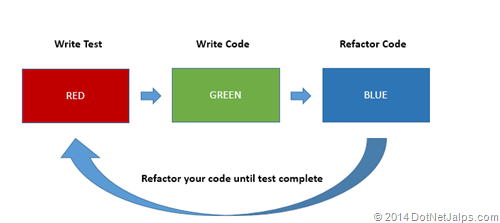
Test-driven development (TDD) is a software development process that relies on the repetition of a very short development cycle: first the developer writes an (initially failing) automated test case that defines a desired improvement or new function, then produces the minimum amount of code to pass that test, and finally refactors the new code to acceptable standards
Kent Ben an American software engineer and creator of extreme programming rediscovered this technique. There are three main indicators of Test Driven development.
TDDDotNetJalps
Share:
Tuesday, April 15, 2014

Creating a WordPress blog on azure websites

In this post we are going to learn how we can create WordPress blog with Azure web sites.

What is Azure Web Sites?

Before some time Microsoft has released Azure web sites for South East Asia region. Windows Azure web sites offers secure and flexible deployment and scaling options for any kind of web application. You can use your existing tools to create and deploy applications to Azure Websites.

Windows Azure web site provides following features.
  • Provision and deploy fast
  • Secure platform that scales automatically
  • Great experience for Visual Studio developers. Even you can edit some code with online visual studio(Monaco).
  • Open and Flexible for anyone
  • Monitor and Alert
  • Auto scale to optimize cost and performance
  • A great gallery of most popular applications and easy direct deployment.
Share:
Friday, April 11, 2014

Visual Studio 2013 Cookbook review

The marketing team from Packt Publication has given opportunity to Review Visual Studio 2013 Cookbook. So, this post is all about  reviewing Visual Studio 2013 Cookbook . It’s total 333 pages of long book with full converge of visual studio features.

1966EN _Cover
About Authors:

This book is written by Jeff Martin and Richards Banks both are quite experience person.

Jeff Martin is well known technology enthusiast and has been contributing writes for InfoQ(www.infoq.com) for over two years focusing on Microsoft .NET and related  platforms.  Readers are encouraged to follow @VSDevTips on twitter to receive updates of books and visual studio related stuff.

Richard Banks have more then 20 years of experience in software development. During his career his gone through various role like developer, team lead, project manager,CIO and CTO. He is a professional scrum trainer and runs Sydney ALT.NET user group and spoken at number of Microsoft events. You can find him on his blog http://www.richard-banks.org/

Share:
Thursday, April 10, 2014

How to convert C# object into JSON string with JSON.NET

Before some time I have written a blog post – Converting a C# object into JSON string in that post one of reader Thomas Levesque commented that mostly people are using JSON.NET a popular high performance JSON for creating for .NET Created by James Newton- King. I agree with him if we are using .NET Framework 4.0 or higher version for earlier version still JavaScriptSerializer is good. So in this post we are going to learn How we can convert C# object into JSON string with JSON.NET framework.

Share:

Dapper Micro ORM Series

Recently before some time I have created a blog post about list of blog post I have written about Petapoco Micro ORM. So one of the friend suggested I should write same kind of series post about Dapper Micro ORM so that reader of my blog can find the all the posts on same page. So that’s why I writing this blog post.

What is dapper:

Dapper is Micro ORM developed by Sam Saffron few years ago while he was working as lead developer at stack exchange. This ORM was developed specially for Stack Exchange QA sites like stackoverflow.com and superuser.com for the performance improvement. It has got a single file where all the code has been written. You can download dapper Micro ORM from the following location.

http://code.google.com/p/dapper-dot-net/

Dapper Micro ORM related posts on dotnetjalps.com:

Following is a list of post related to dapper Micro ORM that I have written on this blog.

Playing with dapper Micro ORM and ASP.NET MVC 3.0
Insert with Dapper Micro ORM and ASP.NET MVC 3
Edit/Update with dapper ORM and ASP.NET MVC 3
Delete with Dapper ORM and ASP.NET MVC 3

If I write blog post about dapper then I will keep adding into this list. That’s it.

Hope you like it. Stay tuned for more!!
Share:
Saturday, April 5, 2014

Converting a C# Object into JSON string

Some people might think why I am writing so much about basics but the things but in reality  I got lot of questions through email and other communities about very basic things. So I thought instead of replying them into single thread. It is a good idea to write blog post about it and as a result I am writing this blog post.

In this post we are going to learn how we can convert a object into JSON string It is very simple. Let’s first see how we can convert C# Object into JSON string.

Converting a C# object into JSON string:


So to demo this, I have created a employee class like following.

public class Employee
{
    public string FirstName { get; set; }
    public string LastName { get; set; }
}

Now let’s create object of this class and assign some value like following.

Employee employee=new Employee
                    {FirstName = "Jalpesh",
                    LastName = "Vadgama"};

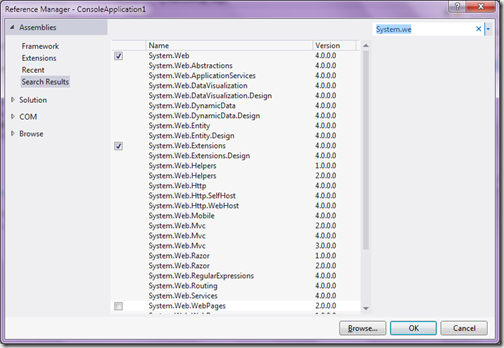
For this demo we are using console application so we have to add System.Web and System.Web.Extensions  reference to access the JavaScript Searilizer class through which we are going to convert this object into JSON string. We are going to add reference like following.

add-reference-serializtion-web-convert-chsarp-object-into-json

Now with JavaScript Searilizer class which belongs to System.Web.Script.Serialization namespace we can easily convert C# object into JSON string. Following is a code for that.

var javaScriptSerializer = new 
    System.Web.Script.Serialization.JavaScriptSerializer();
string jsonString = javaScriptSerializer.Serialize(employee);
Console.WriteLine(jsonString);

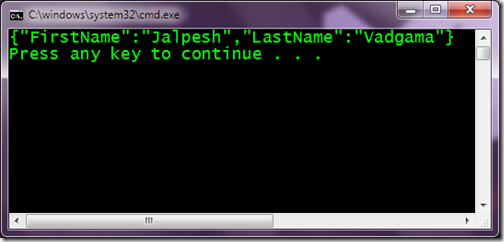
Now when run this console application. Following is a output as expected.

convert-c#-object-to-json-string-javascriptsearializer

Here its serialize object into JSON string. Same you can desterilize the JSON string into C# object with Deserialize function.

That’s it. It’s very easy. Hope you like it. Stay tuned for more..
Share:

ASP.NET Checkbox button Attributes in JavaScript.

This is a follow up post I have just written before some time- Getting tooltip of ASP.NET Radio button in java script. In that post I have explained that to render all properties properly in ASP.NET renders checkbox and radio button surrounded by Span tag. So one of the friend message me on facebook how we can add JavaScript attribute on ASP.NET Controls like checkbox or radio button. So I thought it will be good idea to write a quick blog post about it.

Adding JavaScript attribute to ASP.NET Checkbox and Radio button:


So Let’s see how we can write JavaScript attribute from server side with ASP.NET Checkbox and same will be applied to ASP.NET Radio button also. Following is a HTML code for ASP.NET checkbox.

<asp:CheckBox runat="server" ID="myCheckBox" 
Text="Yes" ToolTip="Yes"/>

Now I want to write a onBlur event for JavaScript so I have written a following function in JavaScript.

function onBlur() {
alert('Onblur Fired');
}

Normally we write JavaScript attribute from server side like below in page load event.

protected void Page_Load(object sender, EventArgs e)
{
myCheckBox.Attributes.Add("onblur", "onBlur();");
}

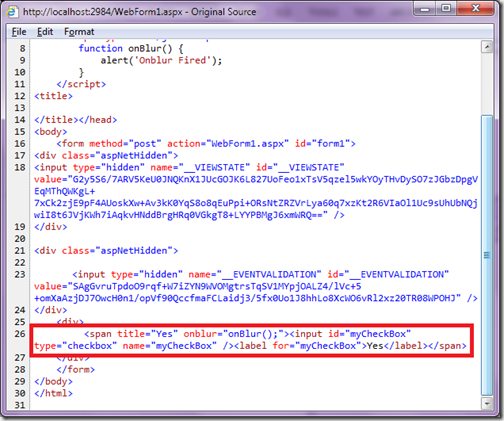
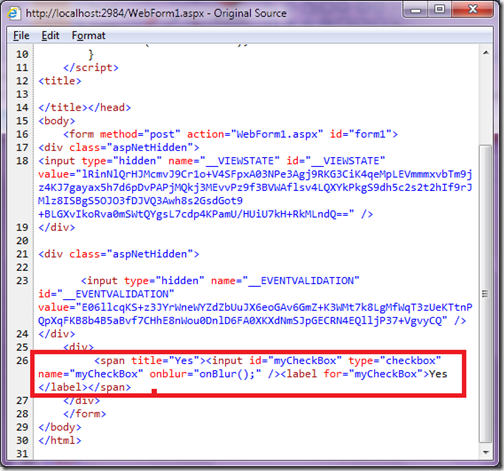
Now when you run this code in browser and see that in browser with View Source it will apply onblur event to span tag.

javascript-css-attribute-of-asp-net-checkbox-control

So it will not fire ‘onblur’ event of checkbox as this event is right now applied to span tag. So what should we do? Here is the fix. ASP.NET Checkbox and Radio Button provides InputAttributes attribute collection. So you can directly assign attributes to checkbox like below.

protected void Page_Load(object sender, EventArgs e)
{
myCheckBox.InputAttributes.Add("onblur", "onBlur();");
}

That's it. If you see in view source now it will assign JavaScript attribute in correct way and now it will fire event also.

javascript-css-attribute-of-asp-net-checkbox-control-correct-way

Note: You can add CSS Attribute in the same way as you do with JavaScript attribute.

Hope you like it. Stay tuned for more..
Share:

Getting tooltip of ASP.NET Radio button in java script.

This post in regards to a question that I have answered on stack overflow. Getting Tool tip of the Radio button in JavaScript. Where user asks why he is not able to get tooltip with document.GetElementById and Client Id of ASP.NET Radio button control like following.

document.getElementById('<%= rbSelectedIds.ClientID %>').title

While answering this question, I have found that there are lots of people not aware about this. So I thought it is a good idea to write a blog post about it.

By default ASP.NET Radio button and check box controls rendered under span when you have attribute like tooltip. Because System.Web.UI.WebControls namespace may render differently in  different browsers and to achieve same functionality in all the browsers they are rendering with span.

There is a complete discussion there one in one of the StackOverFlow.com

Why does ASP.Net RadioButton and CheckBox render inside a Span?

Example : Getting ASP.NET Radio button tooltip in JavaScript:


So let’s take same example as mentioned in that question. Following is my HTML Code. Below is radio button HTML code.
<div>
       <ASP:RadioButton runat="server" ID="myRadioButton" 
            Text="Yes" ToolTip="Yes"/>
</div>

Now when you run this in browser it will render this radio button is render with surrounded by span like follow.

how-to-get-tooptip-of-radio-button-in-java-script

You can see that title attribute is given to span tag instead of radio button. Now let’s create a ASP.NET button to get tooltip of that radio button like below.

<asp:Button runat="server" Text="Get Tooltip" 
        OnClientClick="getToopTip();"/>

So we are done with button now it’s time to write a JavaScript. Following is a code for JavaScript.
function getToolTip() {
    var sParentElement = document.getElementById("<%=myRadioButton.ClientID%>").parentElement;
    var tooltip = sParentElement.title;
    alert(tooltip);
}

So we are done with code. Now it’s time to run this code in browser. And when you click on button it will show alert with tool tip of radio button.

getting-tooltip-in-javascript-asp-net-radio-button-and-checkbox

That’s it. Hope you like it. Stay tuned for more.
Share:

Overriding/set default button in master page in asp.net

Some time ago I have written a blog post about Default focus and default button in ASP.NET. In that post I have explained how we can set default button for form. Recently I got email related to that post asking that how we can set or override default button on a page with master page. 

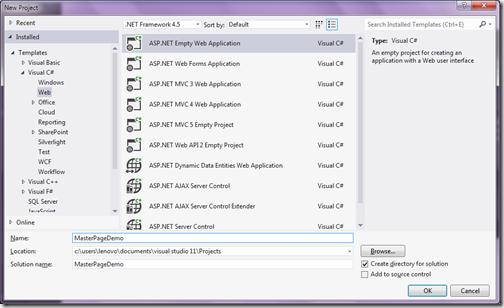
In this page we will learn how we can override default button in master page. So what we are waiting for? Let’s start by creating a an asp.net empty application via File –> New Project –> ASP.NET Empty web application.

overriding-setting-default-button-with-master-page-asp-net

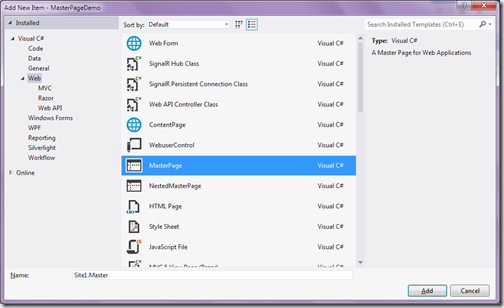
Once You are done with creating project it’s time to add a master page in solution via right click-> Add new Item.

adding-master-page-override-default-button

Following is HTML code ASP.NET master page.

<%@ Master Language="C#" AutoEventWireup="true" CodeBehind="Site1.master.cs"
     Inherits="MasterPageDemo.Site1" %>
<!DOCTYPE html>
<html xmlns="http://www.w3.org/1999/xhtml">
<head runat="server">
    <title></title>
    <asp:ContentPlaceHolder ID="head" runat="server">
    </asp:ContentPlaceHolder>
</head>
<body>
    <form id="form1" runat="server">
    <div>
        <asp:ContentPlaceHolder ID="ContentPlaceHolder1" runat="server">
        
        </asp:ContentPlaceHolder>
    </div>
    </form>
</body>
</html>

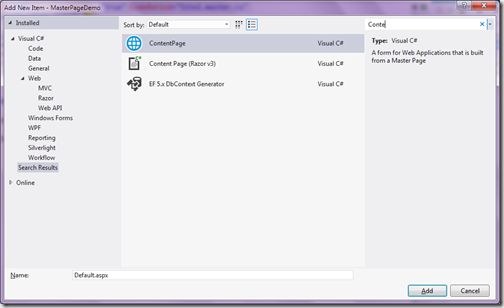
Now it’s time to add new content page with master page and selecting above master page.

adding-content-page-set-default-button-dynamically-master-page

Following is a code for content page.

<%@ Page Title="" Language="C#" MasterPageFile="~/Site1.Master" AutoEventWireup="true"
     CodeBehind="Default.aspx.cs" Inherits="MasterPageDemo.Default" %>
<asp:Content ID="Content1" ContentPlaceHolderID="head" runat="server">
    
</asp:Content>
<asp:Content ID="Content2" ContentPlaceHolderID="ContentPlaceHolder1" runat="server">
    <asp:TextBox runat="server" ID="Message"></asp:TextBox>
    <ASP:Button  runat="server" ID="DefaultButton"
        OnClick="DefaultButton_Click" Text="Default"/>
    <asp:Button runat="server" ID="AnotherButton"
        OnClick="AnotherButton_Click" Text="Another"/>
</asp:Content>
Here I have added two buttons “Default Button” and “Another button” and a textbox. Now I want to make this “Default Button” default dynamically. Below code I have written for both button’s click event. It will only print in textbox which button is clicked.

protected void DefaultButton_Click(object sender, EventArgs e)
{
    Message.Text = "Default Button Clicked";
}

protected void AnotherButton_Click(object sender, EventArgs e)
{
    Message.Text = "Another button clicked";
}

Now I want to make default button as default button of form so whenever I press enter it will fire click event of default button. So to dynamically set / override default button on master page form I have to write following code on content page page_load event.

protected void Page_Load(object sender, EventArgs e)
{
    Form.DefaultButton = DefaultButton.UniqueID;
}

Now when you run and press enter in browser output will be as expected as follows.

default-button-override-asp-net-masterpage-browser

That’s it. Hope you like it. Stay tuned for more..
Share:
Saturday, March 22, 2014

Explicit Keyword in C#

Yesterday, I have written a blog post about Implicit Keyword in C#. In today’s post we are going to learn about Explicit keyword in C#. Like Implicit keyword explicit keyword is also used for typecasting one class into another class. It is also a type conversion operator but rather then directly invoking it will invoke by cast.

As per MSDN, The Explicit keyword declares a user defined type conversation operator that must be invoked with cast.

Usage of explicit operator in C#:

Let’s take a simple example. Following is a code for that.

using System;

namespace ExplicitOperatorDemo
{
    class Program
    {
        static void Main(string[] args)
        {
            User user=new User
            {
                    FirstName = "Jalpesh",
                    LastName = "Vadgama"
            };

            Employee employee = (Employee) user;

            Console.WriteLine(employee.FirstName);
            Console.WriteLine(employee.LastName);
            Console.ReadKey();
        }
    }

    public class Employee
    {
        public string FirstName { get; set; }
        public string LastName { get; set; }
    }

    public class User
    {
        public string FirstName { get; set; }
        public string LastName { get; set; }

        public static explicit operator Employee(User user)
        {
            Employee employee=new Employee
            {
                    FirstName = user.FirstName, 
                    LastName = user.LastName
            };
            return employee;

        }
    }
}

I have written almost same code as we have written for implicit operator. Same two classes “Emplyee” and “User” with first name and last name operator. The only difference is I have written explicit keyword instead of implicit. And same way I have used casting in main function of console application.

In main function I have initialized class “User” with first name and last name and then type cast that in Employee class object.  Following is out put as expected.


That’s it. It is very easy. Hope you like it. Stay tuned for more..
Share:
Friday, March 21, 2014

Launching DotNetJalps Communities

Everyday I got lots of emails asking about technical things and Every time I am trying to give proper answer to them. But due to lack of time it was always not possible to reply all the emails as I have professional commitments also. So that’s why I decided to launch DotNetJalps community where people can ask questions and If I am not there then also another people can answer the question. Another benefit of communities will be the solution given in that particular answer will be visible to all the users of community.
So I have created Google+ community for that. Following is a link for that.

https://plus.google.com/communities/109749681215763540822

I request to ask your questions there instead of sending me emails and I would also encourage you participate in discussion. I am also going to share all my blog post there. You guys can also share your links and discuss various technology related things.

But please make sure there should technology related things only. So please join my community ask question and give answer to people.

Stay tuned for more!!
Share:

Implicit Keyword in C#

In today’s post we are going to learn about implicit operator in C#. Implicit keyword is used for conversation in C#. It is used to declare an implicit user-defined type conversation operator. So with the help of implicit keyword you can convert one class into another class without writing any other syntax.

You can find more information about Implicit from following MSDN link.
http://msdn.microsoft.com/en-us/library/z5z9kes2.aspx

Usage of Implicit Keyword in C#:


Sounds interesting!! Let’s take a example of implicit operator in so that it will be much clear. Following is a code for that.

using System;

namespace ImplicitOpeartorDemo
{
    class Program
    {
        static void Main(string[] args)
        {
            User user=new User
            {
                    FirstName = "Jalpesh",
                    LastName = "Vadgama"
            };

            Employee employee = user;

            Console.WriteLine(employee.FirstName);
            Console.WriteLine(employee.LastName);
            Console.ReadKey();
        }
    }

    public class Employee
    {
        public string FirstName { get; set; }
        public string LastName { get; set; }
    }

    public class User
    {
        public string FirstName { get; set; }
        public string LastName { get; set; }

        public static implicit operator Employee(User user)
        {
            Employee employee=new Employee
            {
                    FirstName = user.FirstName, 
                    LastName = user.LastName
            };
            return employee;

        }
    }
}

In above code I have created two classes “User” and “Employee”. Both contains two properties FirstName and LastName. Also in user class I have defined implicit operator Employee which convert user object into employee object.

In main function I have created object of user with first name as “Jalpesh” and last name as “Vadgama” and then assign it to Employee class. So when you assign object to employee class it will call Employee operator with implicit keyword and convert that user object into employee object.

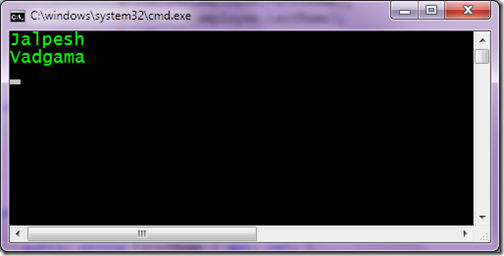
At the end I have printed first name and last name property of Employee class and following is output as expected.

implicit-operator-c#

That’s it. It’s very easy. Hope you like it. Stay tuned for more.. Happy programming.
Share:
Thursday, March 20, 2014

Enhanced debugging with DebuggerDisplay in C#

We all need to debug our projects and for that we need to some visualization to see values of debug data C# has a attribute called ‘DebuggerDisplay’ which helps developers to visualize data in the way developer wants .

As per MSDN, DebuggerDisplay attributes allows developers of the type, who specifies and best understands the runtime behaviour of that type, to also specify what that type will look like when it is display in debugger.

How to use DebuggerDisplay attribute:


Display attribute constructor has one argument, a string will displayed in the value column for instances of type. This string will contain {} braces and this text between {} will evaluate as expression. So what we are waiting for lets try it in Visual Studio. I have written following code for that.
using System.Diagnostics;

namespace ConsoleApplication1
{
    class Program
    {
        static void Main(string[] args)
        {
            var employee =new Employee();
        }
    }

    public class Employee
    {

        [DebuggerDisplay("Id={EmployeeId}")]
        public int EmployeeId = 1;

        [DebuggerDisplay("Name={Name}")]
        public string Name = "Jalpesh Vadgama";
    }
}

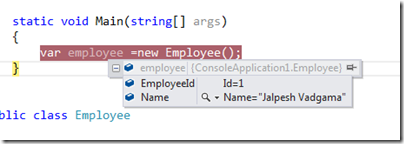
Here you can see I have created a class called “Employee” with two variable with DebuggerDisplay Attribute and from main method I have created a object of employee class. Now let’s create debug the code via pressing F5 and see how its works.

DisplayDeubggerAttribute

As you can see its display data as defined in argument. So now you can format your debugger visualizer screen as per your requirement. That’s it. Hope you like it. Stay tuned for more.
Share:
Wednesday, February 26, 2014

Internet Explorer 11 developer toolbar features

Recently Microsoft has launched new developer tool bar with Internet Explorer 11 with some cool features. In this post we are going to learn about the new features of Internet Explorer Developer toolbar. Microsoft has rewritten whole toolbar and now it loaded with bunch of features.

DOM Explorer:

When you launch Internet Explorer Developer toolbar with F12 by default it will load DOM Explorer and this will have all html and style sheet. You can select any element and modify or change style sheet of live site.

dom-explorer-toolbar-internet-explorer

You modify the existing HTML on left side of pane and you add/modify the style sheet of selected element on the right side of the pane. There is also find functionality given to find any specific element.

It also provides intellisense for modifying and changing HTML and style sheet.
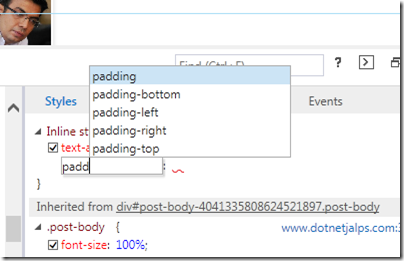
intellisense-html-css-developer-toolbar


Console tool:

Second one on left side is console tool where you can have whole history running JavaScript with console.log statement
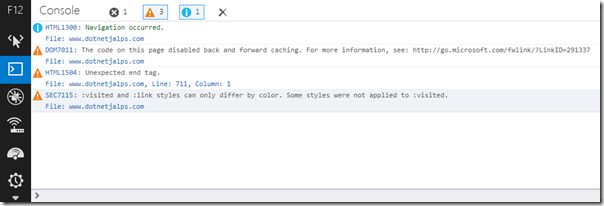
console-log-toolbar-internet-explorer

Here it will show whole errors and exception related to client side code executed for this page.

Debugger tool:

This tool is used for the debugging the your client side code when application running and you can easily debug your code with the help of this tool.

Here you can set your breakpoints just like in your IDE and easily debug loop or any client code.You can also debug the compressed JavaScript here. It’s a great way to debug and find errors.
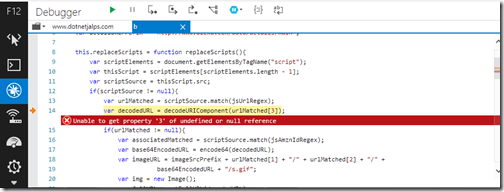
debugger-tool-internet-explorer-developer-tools

Network tool:

Network tool is used for the performance measurement for a web page. It will give you a details of any request network involved in your web page loading. It will tell request completion time in mili seconds. Here you can also find amount data and bandwidth being transferred when your web page loads.

Network-tool-internet-explorer-developer-toolbar

The UI Responsiveness tool:

Next is UI responsiveness tool where you can find if your web page is running slow then what happened which part is consumed more CPU .It will help you identify different source CPU utilization which causes your web page to load slowly in browser.

ui-responsiveness-tool-internet-explorer
With help of this tool you can optimize your web pages performance via changing part/code which causes more CPU Utilization.

Profiler tool:

Profiler tool is used for measuring JavaScript performance. It will show you number of function called during profiling session. From here you can isolate JavaScript which makes your web page slow.

profiler-tool-internet-explorer-toolbar-developer

Memory tool:

With the help of this Memory tool you can easily find the memory leak issues of your web page. The memory tool track memory usage of web page and help you identify where more memory is consumed and where memory leak is happening.
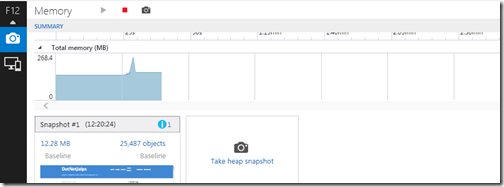
memory-usage-memory-tool-internet-explorer-developer-toolbar

Here is also allows you to take heap snapshot at regular interval and then can analyse via clicking on it.

memory-usage-memory-tool-internet-explorer-developer-toolbar2

With the help of this you can easily identify memory leaks in your code.

Emulation tool:

The emulation tools help you testing your web page on different screen size and hardware's. You can easily emulate different screen size and emulations.

emulation-tool-internet-explorer-developer-toolbar

That’s it. All this awesome features which is provided by developer tool for internet explorer 11. It will definitely going to make your life very easy. Highly recommend this.

Stay tuned for more.. 
Share:

Support this blog-Buy me a coffee

Buy me a coffeeBuy me a coffee
Search This Blog
Subscribe to my blog


My Mvp Profile
Follow us on facebook
Blog Archive
Total Pageviews