Showing posts with label C#.NET. Show all posts
Friday, April 27, 2018

Flexible Object Mapping in Entity Framework Core 2.0

Entity Framework 2.0 is out for some time. If you don’t know Entity Framework 2.0 is a lightweight, extensible and Cross-Platform Object-relational mapper from Microsoft. It is a new version of Entity Framework which is now cross-platform and can now run now operating system like Linux, Mac etc.With Entity Framework Core 2.0, There are tons of ways to create a table and we are going to see one of that. In this blog post, We are going to see how we are going to see how we can create a field for private fields in the table.

So what we are waiting for. Let’s get started.
Flexible Object Mapping in Entity Framework Core 2.0:

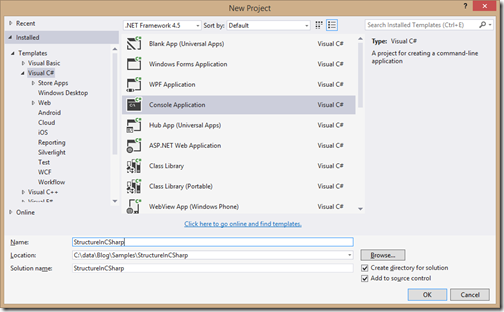
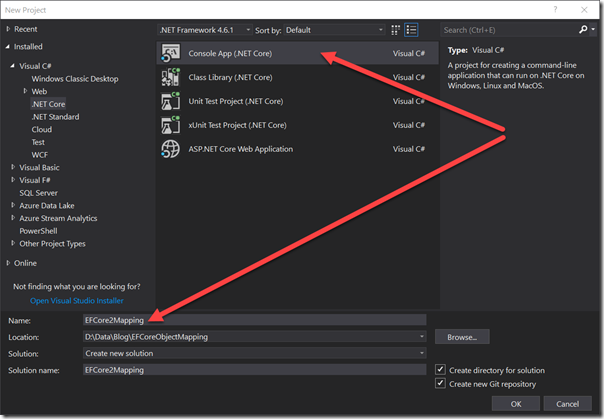
So in this example, We are going to create a Console Application like following.

new-project-entity-framework-core

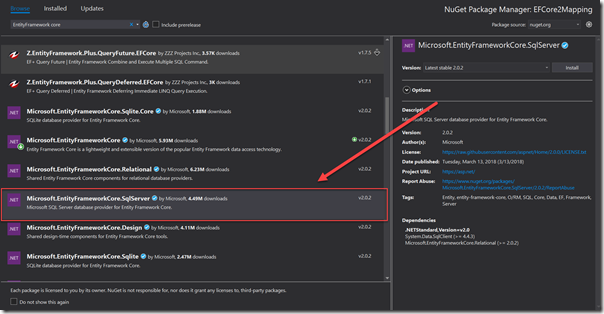
Once we are done with Creating Application We are going to insert NuGet Package for EF Core like below.
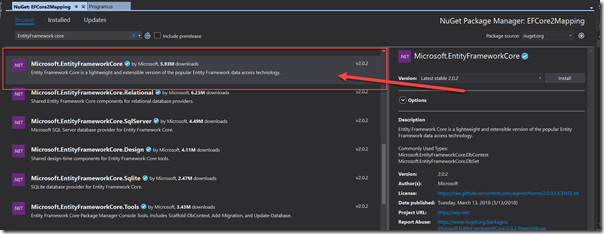
nuget-package-entity-framework-core

You can also install it via running following command.
Install-Package Microsoft.EntityFrameworkCore -Version 2.0.2
Here we are going to install SQL Server Express as a database so we need to install Nuget Package for that also.

enttity-framework-core-sqlserver-nuget-package

You can also install via running following command.
Install-Package Microsoft.EntityFrameworkCore.SqlServer -Version 2.0.2
Now it’s time to write some code. First of all, We are going to create A model called Student and In that, we are going to have two private fields.
namespace EFCore2Mapping
{
    public class Student
    {

        public int StudentId { get; set; }
        public string FirstName { get; set; }
        public string LastName { get; set; }


        private string _standard;
        private string _division;


        public void AssignStandard(string standard)
        {
            _standard = standard;
        }

        public void AssignDivision(string division)
        {
            _division = division;
        }

        public string GetStandard()
        {
            return _standard;
        }

        public string GetDivision()
        {
            return _division;
        }
    }
}

Here in the above code, You have seen that I have created few fields for Student Model. If you see it carefully, You can see that there are two private fields _standard and _division.  And there are two methods for each field to get and set private variables.

Now let’s write our Entity Framework Data Context. That’s where the Magic going to happen.
using Microsoft.EntityFrameworkCore;

namespace EFCore2Mapping
{
    public class StudentContext : DbContext
    {
        public DbSet<Student> Student { get; set; }
        protected override void OnConfiguring(DbContextOptionsBuilder optionsBuilder)
        {
            optionsBuilder.UseSqlServer("Data Source=Your Server;Initial Catalog=Student;User ID=sa;Password=Jalpesh@123");
        }

        protected override void OnModelCreating(ModelBuilder modelBuilder)
        {
            modelBuilder.Entity<Student>().Property<string>("Division").HasField("_division");
            modelBuilder.Entity<Student>().Property<string>("Standard").HasField("_standard");
        }
    }
}

Here in the above code, If you see I have created a dataset for our student model that is a standard way to create a table for the map. There is another method OnCofiguring for giving database connection string. There are is another method called OnModelCreating which Entity framework core uses to create tables. Here If you see that I have written code to map private fields to Table Fields so that two fields Division and Standard will be created with tables.

Now let’s run the migration to create a table like following.

migration-to-create-private-fields-in-table-entity-framework-core

You need to go to the Nuget Package Manager Console and then run the following command.
Add Migration Initial Create
Once you are done with it. It will create the tables in the database like following.

fields-created-in-SQL-Server

Now let’s write some code insert data in the table. So following is code for the same.
using System;
using System.Collections.Generic;
using System.Linq;

namespace EFCore2Mapping
{
    class Program
    {
        static void Main(string[] args)
        {

            List<Student> ExistingStudents = new List<Student>();

            Student student = new Student
            {
                FirstName = "Joe",
                LastName = "Tailor",
            };
            student.AssignStandard("5");
            student.AssignDivision("A");

            using (StudentContext studentConext = new StudentContext())
            {
                ///Adding a new Student;
                studentConext.Student.Add(student);
                studentConext.SaveChanges();


                ///Retriviting newly added student
                ExistingStudents = studentConext.Student.ToList();
                
            }

            foreach(Student s in ExistingStudents)
            {
                Console.WriteLine($"Student Id: {s.StudentId}");
                Console.WriteLine($"First Name: {s.FirstName}");
                Console.WriteLine($"Last Name:{s.LastName}");
                Console.WriteLine($"Standard:{s.GetStandard()}");
                Console.WriteLine($"Division:{s.GetDivision()}");
            }
        }
    }
}

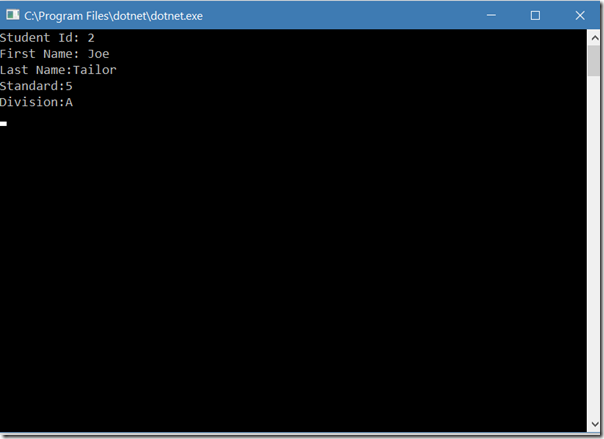
Here you can see that in the above code, I have created Student called Joe Tailor and then I have saved it in the database and then I have written the code for fetching the student data and print it via for loop.

When you run this application It will show like following.
output-entity-framework-core-flexible-column-mapping

That’s it. Here you can see that It’s very easy to Manipulate the Columns with Entity Framework core 2.0. Hope you like it.
This complete blog post source  code available on github at - https://github.com/dotnetjalps/EFCoreFlexibleObjectMapping
Share:
Wednesday, March 29, 2017

New Features–Out Variables in C# 7.0

Prior to C# 7.0,  For out keyword, we need to define that variable earlier and then we were able to pass that variable as out reference arguments. But now with C# 7.0, You don’t need to declare the variable but you can use the variable which you have used in arguments.

Following is a code showing both ways passing out variables.

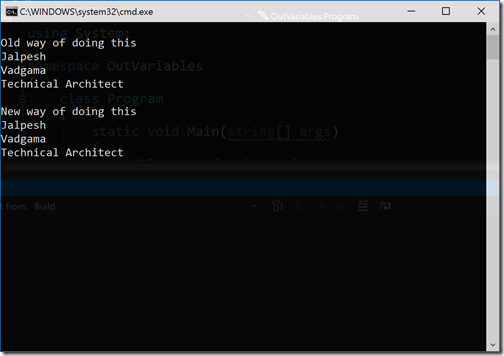
In the above code, You can see that I have created get employee static method which put some values in this out variables. First I have shown the old way of doing this. Where I explicitly defined the variables and then passed it to function while in the new way of doing you don’t need to explicitly define variable. You can write this as an argument and then, later on, you can use the same variable in next statements.  Now when you run the application, the new and old way both produce the same output.


csharp7-out-varibles-example

You can find complete source code of this examples at following location on Github at- https://github.com/dotnetjalps/CSharp7NewFeatures
Share:
Friday, October 2, 2015

Convert C# Object into JSON and vice versa using Jil

I have also written couple of posts about converting C# object into JSON and vice versa. Following is a list of post for the same.

Converting a C# Object into JSON string
How to convert C# object into JSON string with JSON.NET

In this blog post we will learn about how we can convert C# object into JSON with Jil- Fast .NET JSON (De)Serializer, Built On Sigil an open source library by stack exchange team.

What is Jil:


Jil is a open source (De) Serializer library written by Kevin Montrose and stack exchange team. It is built on Sigil- with a number of crazy optimization tricks.Sigil is also a custom fast validation helper for .NET CIL Generation. Jil is one of fastest Serializer and deserializer library. It is also open source. You can find more information about at following link.

https://github.com/kevin-montrose/Jil

Example:

So let's create example which demonstrate both Serializing and Deserializing object. So first we will create JSON string from C# object via serializing with Jil and then we again deserialize that string to C# object. I'm going to create a console application for this.

jil-jason-converter

After creating a application first thing we have to do is to add Nuget package from JIl via following command.

nuget-package-jil-json-serializer

I'm going to use a Employee class for this example which have four properties Employee Id, First Name, Last Name and Designation.
namespace CsharpJSON
{
    public class Employee
    {
        public int EmployeeId { get; set; }
        public string FirstName { get; set; }
        public string LastName { get; set; }
        public string Designation { get; set; }
    }
}
Then I have created a function Get Employee function to initialize Employee class with some data.
private static Employee GetEmployee()
{
    var employee = new Employee
    {
        EmployeeId = 1,
        FirstName = "Jalpesh",
        LastName = "Vadgama",
        Designation = "Technial Architect"
    };
    return employee;
}
Now it's time to serialize that employee class into JSON string so I have created  Serialize Employee function.
private static string SerializeEmployee(Employee employee)
{
    using (var output = new StringWriter())
    {
        JSON.Serialize(
           employee,
            output
        );
        return output.ToString();
    }
}
Here you can see I have use JSON.Serialize function which serialize C# object into string writer. Same way I have created Deserialize Employee function to deserialize JSON string created by previous function.
private static Employee DeserializeEmployee(string employeeString)
{
    return JSON.Deserialize<Employee>(employeeString);
}

Here you can see I have used  JSON. Deserialize function to convert JSON string into C# object. Finally I have called this function in my console application Main method and print it with Console.Writeline method.
static void Main(string[] args)
{
    var employee = GetEmployee();
    string employeeSerializedString = SerializeEmployee(employee);

    Console.WriteLine("Serialize Employee");
    Console.WriteLine(employeeSerializedString);

    Console.WriteLine("\n\nDeserializing Employee");
    var employeeDeserialized = DeserializeEmployee(employeeSerializedString);

    Console.WriteLine(employeeDeserialized.EmployeeId);
    Console.WriteLine(employeeDeserialized.FirstName);
    Console.WriteLine(employeeDeserialized.LastName);
    Console.WriteLine(employeeDeserialized.Designation);

    Console.ReadKey();
}

Now when you run application it will generate output like following.

json-csharp-object


You can find complete source code of this application at following location on GitHub- https://github.com/dotnetjalps/CsharpJsonJil

Hope you like it. Stay tuned for more!
Share:
Wednesday, July 22, 2015

Video - Difference between var and dynamic keyword C#

I have recently produced one video about difference between var and dynamic keyword. Please go through it and let me know how it was.

You can find complete video at following URL.

https://www.youtube.com/watch?v=FPNZ_sTfZBo


Hope you like it. Stay tuned for more!.
Share:
Sunday, April 19, 2015

Structure and Operator overloading in C#

Recently I have been playing with structure and It’s fun. In this blog post we are going to learn how we can use operator overloading with structure in C#.  You can find my blog post that I have already written about structure  at following location.

Structure in C#
Structure with constructor in C#
Structure with Interface in C#

So as usual I've created a console application to demonstrate operator overloading in C#. Here I have created a structure with equals operator overloading and following is a code for that.
Share:

Structure with Interface in C#

Recently I have been playing with Structure and it is fun. I have written couple of blog post about structure. Following are links for that.

Structure in C#
Structure with constructor in C#

In this blog post we are going to learn how we can use structure with interface. So like earlier example I’ve created a console application. Now it’s time to write interface which we can implement with structure. Following is a code for that.
using System;

namespace StructureWithMethodAndInterface
{
    interface IPrintable
    {
        void Print();
    }
}
Here you can see that I have simple interface IPrintable which has simple print method. Now let’s create a structure which implement this interface. Following is a code for that.
Share:
Friday, April 17, 2015

Structure with constructor in C#

Before some time , I have written basic introduction post about Structure in C#. In this blog post we are going to see how we can have constructor with Structure. As we all know structure is a value type so it stored on stack. So let’s create a structure like follow with constructor.
public struct Customer
{
    #region Fields

    public int CustomerId;
    public string FirstName;
    public string LastName;

    #endregion 

    #region Constructor

    public Customer(int customerId, string firstName, string lastName)
    {
        CustomerId = customerId;
        FirstName = firstName;
        LastName = lastName;
    }

    #endregion
}
Here you can see I have created Stucture with parameter. As we all know structure is a value type so when initialize the it at that time we need to give values to its elements so that’s why default constructor without parameter is not supported in C#.

Share:
Wednesday, April 15, 2015

Structure in c#

In this blog post we are going to learn about Structure Data structure in C#. In C# Structure is value type which stores on Stack. It is a composite value type that contain other types. You can also create object of structure like class. In C# structure can  contains fields, properties, constants, constructors, properties, Indexers, operators and even other structure types.

So enough theory. Let’s create a sample console application to learn about structure.

structure-in-csharp

Share:
Thursday, April 2, 2015

Quick Tip–How to get time difference in C#

Recently, One of the reader of this asked me about, how we can get time difference between two dates or two times? So I thought it will be a good idea to write a blog post about that. So that other use can also get benefit from that.

For that I have created sample console application like below.
using System;

namespace TimeDifferenceCSharp
{
    class Program
    {
        static void Main(string[] args)
        {
            DateTime firstDate = DateTime.Parse("12:50");
            DateTime secondDate = DateTime.Parse("10:40");

            TimeSpan difference = TimeSpan.Parse(firstDate.Subtract(secondDate).ToString());

            Console.WriteLine(difference.Hours);
            Console.WriteLine(difference.Minutes);
        }
    }
}
In above example, If you see it carefully I have taken two dates with different time. Then I have used subtract method DateTime class to find different of both and then I parse it to TimeSpan class. After that I have printed hours and minutes for  via Console.Writeline method.

Now let’s run this application. You will see output as following.

time-difference-in-csharp

That’s it.Hope you like it.

You can find complete source code of this blog post at github on- https://github.com/dotnetjalps/TimeDifferenceInCSharp
Share:
Saturday, January 24, 2015

Recent updates to C# 6.0 syntax with new version of Visual Studio 2015 CTP

This blog post is part of C# 6.0 Features Series.
Recently, Microsoft has announced new version of Visual Studio 2015 and I have downloaded it. At the same time I was checking what’s new in Visual Studio 2015 CTP newer version and and I have found that suddenly my c# 6.0 new features solutions  stopped working.

The first problem it got is with static class using features. Following was my code.
using System.Console;

namespace StaticClassUsing
{
    class Program
    {
        static void Main(string[] args)
        {
            WriteLine("With using statement");
        }
    }
}

Now when you run this it was giving error like following.

Share:
Thursday, January 8, 2015

C# 6.0–Dictionary Initializers

This blog post is part of C# 6.0 Features Series.
As we know c# 6.0 provides some cool new features and syntax sugar. Dictionary Initializers is one of them.  Till C# 5.0 we used to have collection initializers for collections but now C# 6.0 provides new way of initializing dictionary . This initialization features is available for there collections which supports index.

Following is a code for new way of initializing dictionary.
using System;
using System.Collections.Generic;

namespace DictionaryInitializer
{
    class Program
    {
        static void Main(string[] args)
        {
            Dictionary<int, string> Person = new Dictionary<int, string>()
            {
                [1] = "Jalpesh Vadgama",
                [2] = "Vishal Vadgama"
            };
            foreach (var person in Person)
            {
                Console.WriteLine("Key:{person.Key}, Value={person.Value} ");
            }
        }
    }
}

Share:
Wednesday, January 7, 2015

C# 6.0–Expression Bodied Members

This blog post is part of C# 6.0 Features Series.
There are lots of great features added to C# 6.0 and Expression bodied members are one of them. It’s provide great syntax sugar which will help you make your code more beautiful and readable.  In earlier versions of C# type definitions were always been tedious and we need to provide a curly braces and return type even if that function contains one single line. Expression bodied function will help you in such scenarios.

Let’s take a example to understand it. Following is a code to understand it.
using System;

namespace ExpressionBodiedMemebers
{
    class Program
    {
        static void Main(string[] args)
        {
            Person person = new Person
            {
                FirstName = "Jalpesh",
                LastName = "Vadgama"
            };
            Console.WriteLine(person.GetFullName());
        }
    }

    public class Person
    {
        public string FirstName { get; set; }
        public string LastName { get; set; }

        public string GetFullName()
        {
            return string.Format("{FirstName} {LastName}");
        }
    }
}

Share:
Sunday, January 4, 2015

Assembly Neutral Interface in ASP.NET 5(vNext)


Recently Microsoft has open sourced it’s entire ASP.NET next version stack on GitHub and I have been closely watching this for a quite a some time to understand how they have created architecture of it and how they organize everything in such a large stack.

I have seen  [AssemblyNeutral] attribute in few of interfaces and I was curious why it was required. So I dig into it and learned about it.

Why we need Assembly Neutral Interfaces?

In earlier version of ASP.NET and Microsoft.NET Interfaces are bind to a assembly where it is declared. Let’s say I have written a interface under DotNetJalps namespace for my framework.
namespace DotNetJalps
{
    public interface ILogger
    {
        DoAmazingStuff();
    }
}
Now after some time this framework is super popular and everybody loves abstraction I have created and now they wants same abstraction so there are two ways we can do this.

  1. Convenience me to write this abstraction.
  2. Write implementation themself and maintain that.
Share:

C# 6.0–New feature series

This post will be aggregator post for all C# 6.0 feature series. Here you can find all of my blog posts about what’s new in C# 6.0.

Till now, I have written following blog posts.

C# 6.0–nameof Operator
C# 6.0–Auto implemented property initializer
C# 6.0–Static class using statement
C# 6.0–String Interpolation
C# 6.0- Null Conditional Operator
C# 6.0–Exception Filters
C# 6.0–String Interpolation
C# 6.0–Expression Bodied Members
C# 6.0–Dictionary Initializers
Recent updates to C# 6.0 syntax with new version of Visual Studio 2015 CTP

Hope you like it. Stay tuned for lot more about new Microsoft.NET technologies!!
Share:
Saturday, January 3, 2015

C# 6.0–String Interpolation

This blog post is part of C# 6.0 Features Series.
As we all know, C# 6.0 provides lots of small enhancements to the language and string interpolation is one of them. In this blog post we are going to learn how this small new feature can help us for string concatenation.

So let’s take small example, Where I have created a new example of string concatenation. Following is a code for that.
using System;
namespace StringInterpolation
{
    class Program
    {
        static void Main(string[] args)
        {
            string name = "Jalpesh Vadgama";

            //Old way of string concentaionation 
            Console.WriteLine("My name is" + name);
            Console.WriteLine("My name is {0}", name);

            //New way of doing this
            Console.WriteLine("My name is {name}");
        }
    }
}
Share:
Thursday, January 1, 2015

C# 6.0–Exception Filters

This blog post is part of C# 6.0 Features Series.
C# 6.0 contains lots of small features and one of them is Exception filters. It is already there with VB.NET earlier but now it is available in C# also. In exception filters now if exception is combined with Exception statement and If condition of if satisfy then it will execute that block.

Let’s take a simple example to understand it better. Following is a code for a simple console application. Before exception filters we were able to write a code like following.
using System;

namespace ExceptionFilters
{
    class Program
    {
        static void Main(string[] args)
        {
            try
            {
                throw new Exception("Jalpesh");
            }

            catch (Exception ex)
            {
                if(ex.Message =="Jalpesh")
                    Console.WriteLine("Exception with Message Jalpesh is executed");
                else
                    Console.WriteLine("Exception with Message DotNetJalps executed");
            }
        }
    }
}
In above example, I have thrown a exception in try block and in catch block I have written if-else block to check message and based on that it will print some method.

Share:
Tuesday, December 30, 2014

C# 6.0–Null conditional operator

This blog post is part of C# 6.0 Features Series.
As we know there are lots of small features added in C# 6.0 and Null conditional operator is one of them. You can check null with specific conditions with Null conditional operator and this will definitely increase productivity of developers and there will be less lines of code.

Let’s create example. Following are two classes I have created for this example. Address class will contains two properties like Street and City.
namespace NullConditionalOperator
{
    public class Address
    {
        public string Street { get; set; }
        public string City { get; set; }
    }
}
And Same way Person class contains four properties Id,FirstName,Lastname and Address which is of type Address class which we have created.

Share:
Sunday, December 28, 2014

C# 6.0–Static class using statement

This blog post is part of C# 6.0 Features Series.
C# 6.0 version introduced lot of small features and one of that features is  using feature. Now with C# 6.0 you can use using statement which was not possible in earlier versions of  C#. Following is a example of using statement in C#.
using static System.Console;

namespace StaticClassUsing
{
    class Program
    {
        static void Main(string[] args)
        {
            WriteLine("With using statement");
        }
    }
}
And below is output when you run your application.

Share:

C# 6.0–Auto implemented property initializer

This blog post is part of C# 6.0 Features Series.
As we all know C# 6.0 is there in preview mode and Microsoft has added few small features to C# 6.0 which helps  lot while you develop application. In today’s blog post we are going to learn one more small feature called “Auto implemented property initializers”.

Developers working on C# used a automatic properties a lot and there has been lot of demands from developers that automatic properties should a have initializers and Microsoft has listened to that feedback and with C# 6.0 it has been introduced. So now we don’t have to use constructors to initialize automatic properties and there will be less and much cleaner code for Automatic property initializations.

Share:
Friday, December 26, 2014

C# 6.0–nameof Operator

This blog post is part of C# 6.0 Features Series.
Microsoft announced the new version of C# 6.0 at the day of visual studio connect event on November. They have not added any big features to C# 6.0 but they have listened to community and added few small features which comes really handy. One of the that is nameof operator.  In this blog post we learn why nameof operator is very useful.

Let’s create a class Employee with few properties.
public class Employee
{
    public string FirstName { get; set; }
    public string LastName { get; set; }
}
Now what I want to do here is to create a object with object initializer and print values of properties with print method.

Share:

Support this blog-Buy me a coffee

Buy me a coffeeBuy me a coffee
Search This Blog
Subscribe to my blog


My Mvp Profile
Follow us on facebook
Blog Archive
Total Pageviews