Thursday, April 27, 2017

Global Azure Bootcamp 2017 by Ahmedabad User Group, Ahmedabad–A great event

The last Sunday on 22nd April 2017, We had great event 5th Annual Global Azure Bootcamp.

What is Global Azure Bootcamp:

If you have not heard about Global Azure Boot. It is the great event for learning and understanding Microsoft Cloud Platform Azure. There were more than 250 locations in the world where this event took place. Each user group or community has organized their own one day deep dive seminars on Azure to see how it can be useful to develop great applications.


You can find more about Particular event on the following location-
https://global.azurebootcamp.net/

About Global Azure Bootcamp 2017 Organized By Ahmedabad User Group:

First of all, I would like to thank our local sponsor Aptus who provided us the Venue for organizing the event. Thank you so much!

The Day was started by Keynote presentation from Mahesh Dhola by introducing what is Global Azure Bootcamp and how any developer can get benefited from this. He explained how great azure is and what is Agenda for this event.

IMG_20170422_102745

Then It’s my time to be on stage. I have taken session about Introduction to BOT Framework. It is the latest offering from Microsoft. I have explained all the bits of BOTS evolution and How easily we can create a great BOT in minutes. Even I have shown How we can make our BOT intelligent via adding LUIS which is a language understanding service from Microsoft.


IMG-20170424-WA0001
IMG-20170424-WA0002

Following is my presentation about events.


I had a great time presenting this topic and Audience was quite interested in this topic. We had some great question and answers.
IMG_20170422_105335
 IMG_20170422_105329

You can find source code that particular session at https://github.com/dotnetjalps/GAB2017
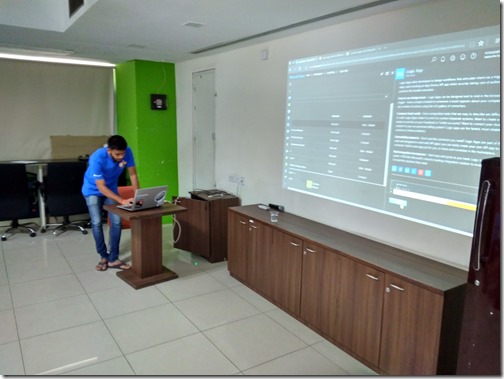
After that, There was a Session from Nirav Madariya. He has taken a session about Logic Apps and Azure Functions. Here he has explained how we can easily create logic apps. Then he has explained Azure functions. He explained how we can create a server-less architecture with Azure Functions.

IMG_20170422_120011_HDR
IMG_20170422_114220_HDR

After that, there was a session from Kalpesh Satasiya. He has taken session about Microsoft Cognitive Services. Where he explained various services provided by Microsoft Cognitive services i.e. Vision, Language, Knowledge, Speech, and Search.

IMG_20170422_123938_HDR
IMG_20170422_123957_HDR

And here you can find his presentation


After that there was a time for Lunch and we had great opportunity to have networked with each other.

IMG-20170424-WA0005
IMG-20170424-WA0008
IMG-20170424-WA0003
IMG_20170422_131614

We had great fun doing networking with each other. Also enjoyed lunch. Thank you, Microsoft for sponsoring it.

After that, there was a session from well known Microsoft Regional Director and MVP Prabjhot Baxi. He explained about Azure IOT suite. How we can add devices into Azure IOT hub. He also explained Azure IOT hub and stream analytics and how to store data in Azure Document DB.

IMG_20170422_133720_HDR

Then we had a great session from Kaushal Bhavsar about Log Analytics. It is not a popular feature of Azure But after attending his session I found it is quite useful. He explained about how we can enable various kind of logs with Logs analytics. Even he showcased a demo with adding agent in Linux server and seeing what logs are there.

IMG_20170422_143433
IMG_20170422_143430

After that Ahmedabad User Group president Mahesh Dhola. He had taken session about Open Source Technology at Microsoft, Azure Virtual Machines. He also showed a demo how we can host elastic search on Azure Linux Virtual machine.
IMG_20170422_153021
IMG_20170422_153030

Overall, It was a great event and Audience was also good.

IMG_20170422_114202
IMG_20170422_120021_HDR

It was one of the successful events we have. Thank your all the sponsors and Audience.
If you want to be part of such event or want to be a speaker at the event please contact me or AhemdabadUserGroup twitter handle.

https://twitter.com/AhmedabadUsrGrp

We are soon going to organize the Visual Studio community launch stay tuned for the same. #GlobalAzure
Share:
Sunday, April 2, 2017

Explicit loading in Entity Framework Core

In this blog post, We are going to learn about Entity Framework feature. Explicit loading means that related data is explicitly loaded from the database at a later time. As you might know, that lazy loading is still not possible with Entity Framework core but there is a way to explicit load related data in a transparent manner.  We are going explore how we can load data explicitly with entity framework in this blog post in detail.

How to do Explicit loading in Entity Framework Core?

To demonstrate how we can use explicit loading in Entity Framework core. We are going to create a console application with two entities Student and Department. A department can have multiple students. Here we are going to see how we can load students for each department explicitly.

So let’s create a console application like following.

new-console-app-entity-framework-core-explicit-loading

Now once you click “Ok” it will create a console application. Now let’s add nuget package for entity framework core in console application like following. You need to run following command in Package Manager Console.

Install-Package Microsoft.EntityFrameworkCore.SqlServer
entity-framework-core-nuget-package

Now it’s time to create our models for Student and Department like below.

Department:
using System.Collections.Generic;

namespace EFCoreExplicitLoading
{
    public class Department
    {
        public int DepartmentId { get; set; }
        public string Name { get; set; }
        public ICollection<Student> Students { get; set; }
    }
}
Student:
namespace EFCoreExplicitLoading
{
    public class Student
    {
        public int StudentId { get; set; }
        public string FirstName { get; set; }
        public string LastName { get; set; }
        public int DepartMentId { get; set; }
        public Department Department { get; set; }
    }
}
Now let’s create an Entity Framework Core context like below.
using Microsoft.EntityFrameworkCore;

namespace EFCoreExplicitLoading
{
    public class StudentContext: DbContext
    {
        public DbSet<Student> Students { get; set; }
        public DbSet<Department> Departments { get; set; }

        protected override void OnConfiguring(DbContextOptionsBuilder optionsBuilder)
        {
            optionsBuilder.UseSqlServer(@"Data Source=SQLServerName;Initial Catalog=YourDatabase;User ID=UserName;Password=Password;MultipleActiveResultSets=true");
        }
    }
}
Here in the above code, you see that A department can have multiple students and A student can have only one department so there is one to many relationships between department and student.

Now let’s create a migration to create the database for the same. To enable migration we need to install following nuget package for entity framework core tools.
Install-Package Microsoft.EntityFrameworkCore.Tools
entity-framework-core-migration-console-application

Now let’s create a migration with the following command.
Add-Migration InitialDatabase
entity-framework-core-migration-initial-database

Now let’s create a database with “Update-database” in Package manager console. It will create a database.

Now we need some initial data to demonstrate the explicit loading feature so I’ve added following data into Departments table.

department-data-entityframework-core

Same way I have added data into Students table like following.

student-data-entity-framework-core

Now it’s time to write some code that demonstrates the explicit loading feature of entity framework core. Following is a code for the same.
using System;
using System.Linq;

namespace EFCoreExplicitLoading
{
    class Program
    {

        static void Main(string[] args)
        {
            using(StudentContext studentConext= new StudentContext())
            {
                var deaprtments = studentConext.Departments.ToList();
                foreach(var department in deaprtments)
                {
                    Console.WriteLine("Before explicit loading");
                    Console.WriteLine(department.Students==null);

                    //loading student explicitly
                    studentConext.Entry(department).Collection(s => s.Students).Load();

                    Console.WriteLine("After explicit loading");
                    Console.WriteLine(department.Students == null);
                    Console.WriteLine(department.Students.Count);
                    Console.WriteLine("------------------------------------------------");

                }
                Console.ReadLine();
            }
        }
    }
}
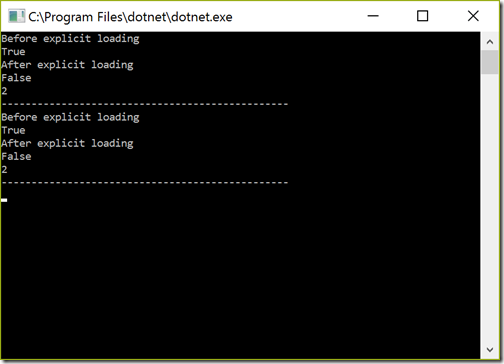
Here in the above code, you can see I have created student context object and then I have got all the databases. After that, I have checked that whether each department is having students or not. In the next statement, I have loaded the students explicitly with the student with collection load method and then again I checking whether it got students and also printing count of a student.

Now let’s run this application and here is the output as expected.

out-put-entity-framework-core-explicit-loading

So it is loading student data after the department is loaded with the help of explicitly. That’s it. Hope you like it. There are so many scenarios where this explicit loading can be quite useful. Stay tuned for the more!!.

The complete source code of this sample application is available on github at - https://github.com/dotnetjalps/EFCodeExplicitLoading
Share:

How to integrate HangFire with ASP.NET Core 1.1

Hangfire is one of the easiest ways to perform background processing in.NET and.NET Core Applications. In this application we are going to learn how we are can integrate Hangfire with ASP.NET Core application.

About Hangfire:

Hangfire allows you to create background task in.NET applications. It’s extremely easy to integrate. It allows you to kick off method calls outside of the request processing pipeline in very easy but reliable way. You can store those jobs in on premise SQL Server, SQL Azure, Redis, MSMQ or Redis.

You can find more information Hangfire on the following link.
http://hangfire.io/

Hangfire also contains one of very maintained documentation at the following link.
http://docs.hangfire.io/en/latest/

Integrating HangFire with ASP.NET Core 1.1:

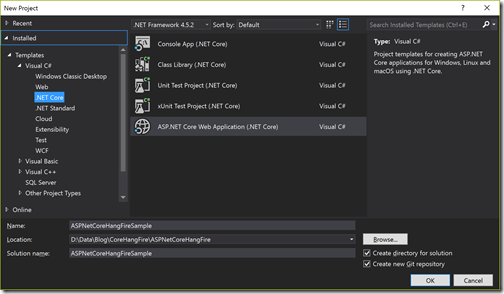
To demonstrate how we can integrate with ASP.NET core, I’m going to create a new ASP.NET Core application in Visual Studio 2017 like below.

new-aspnet-core-application-hangfire

Once click on it will ask for the selection of Application task we are going to select Web Application like below.

aspnet-core-hang-fire-web-application

As our application is not ready, We are going to install Hangfire nuget package in the application.

install-hangfire-nuget-package

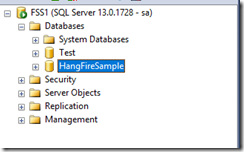
Now we are done with adding Hangfire to our asp.net core application. We need to create a SQL Server database for Hangfire application. Here I’m going to use SQL Server for Job storage but there are various Job Storage options available as mentioned above.

hangfire-sample-database

Now we need to have ConnectionString for the database. Let’s put it on appsetting.json like below.
{
  "ConnectionStrings": {
    "HangFireConnectionString": "Data Source=SQLServer;Initial Catalog=HangFireSample;User ID=YourUserName;Password=YourPassword;MultipleActiveResultSets=true"
  },
  "Logging": {
    "IncludeScopes": false,
    "LogLevel": {
      "Default": "Warning"
    }
  }
}

Now in Startup.cs file configure services method we need to integrate hangfire like below. Here I’ve added hangfire to our application and also indicated that we are going to use SQL Server for Job storage and provided connection string for the same.
public void ConfigureServices(IServiceCollection services)
{
    // Add framework services.
    services.AddMvc();
    services.AddHangfire(config=>config.UseSqlServerStorage(Configuration.GetConnectionString("HangFireConnectionString")));
}
Now Hangfire integration is easy to use. When you run it will automatically create tables related to Hangfire configuration and storage as below.


hangfire-tables-sql-server

Now you can easily add background task like below at any place.
  BackgroundJob.Enqueue(() => Console.WriteLine("BackGroundJob"));
Even you can add recurring job which will run at a specific time like below.
 RecurringJob.AddOrUpdate(() => Console.WriteLine("RecurringJob"), Cron.Daily);
That’s it. You can see it’s very easy to use and You can integrate Hangfire very easily. Hope you like it. Stay tuned for more!.
You can find complete source code of this application at following on github.com : https://github.com/dotnetjalps/ASPNetCoreHangFire
Share:

Support this blog-Buy me a coffee

Buy me a coffeeBuy me a coffee
Search This Blog
Subscribe to my blog


My Mvp Profile
Follow us on facebook
Blog Archive
Total Pageviews