Showing posts with label ASP.NET MVC. Show all posts
Saturday, April 7, 2018

Video Recording : Webinar on ASP.NET Core on Linux

I have done a Webinar for DotNetTricks.com about ASP.NET Core on Linux. There were lots of curiosity about it and lots of people asked for the recording of Webinar so here we go Following is a link of recording of Webinar for ASP.NET Core on Linux. You can watch the full webinar on youtube at following.

https://www.youtube.com/watch?v=Hf0F7nZCTXM&t=706s


I would also like to Thanks Shailendra and Whole DotNetTricks team for the having me on this webinar.

Thank you. Stay tuned there were lots of stuff coming from ASP.NET core and Node.js.
Share:
Sunday, April 2, 2017

How to integrate HangFire with ASP.NET Core 1.1

Hangfire is one of the easiest ways to perform background processing in.NET and.NET Core Applications. In this application we are going to learn how we are can integrate Hangfire with ASP.NET Core application.

About Hangfire:

Hangfire allows you to create background task in.NET applications. It’s extremely easy to integrate. It allows you to kick off method calls outside of the request processing pipeline in very easy but reliable way. You can store those jobs in on premise SQL Server, SQL Azure, Redis, MSMQ or Redis.

You can find more information Hangfire on the following link.
http://hangfire.io/

Hangfire also contains one of very maintained documentation at the following link.
http://docs.hangfire.io/en/latest/

Integrating HangFire with ASP.NET Core 1.1:

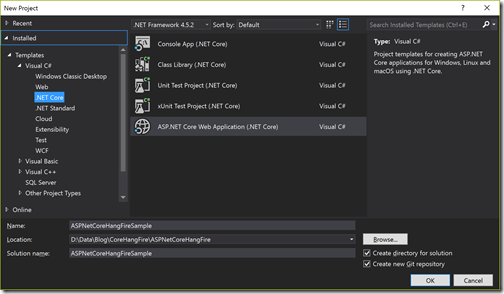
To demonstrate how we can integrate with ASP.NET core, I’m going to create a new ASP.NET Core application in Visual Studio 2017 like below.

new-aspnet-core-application-hangfire

Once click on it will ask for the selection of Application task we are going to select Web Application like below.

aspnet-core-hang-fire-web-application

As our application is not ready, We are going to install Hangfire nuget package in the application.

install-hangfire-nuget-package

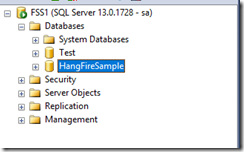
Now we are done with adding Hangfire to our asp.net core application. We need to create a SQL Server database for Hangfire application. Here I’m going to use SQL Server for Job storage but there are various Job Storage options available as mentioned above.

hangfire-sample-database

Now we need to have ConnectionString for the database. Let’s put it on appsetting.json like below.
{
  "ConnectionStrings": {
    "HangFireConnectionString": "Data Source=SQLServer;Initial Catalog=HangFireSample;User ID=YourUserName;Password=YourPassword;MultipleActiveResultSets=true"
  },
  "Logging": {
    "IncludeScopes": false,
    "LogLevel": {
      "Default": "Warning"
    }
  }
}

Now in Startup.cs file configure services method we need to integrate hangfire like below. Here I’ve added hangfire to our application and also indicated that we are going to use SQL Server for Job storage and provided connection string for the same.
public void ConfigureServices(IServiceCollection services)
{
    // Add framework services.
    services.AddMvc();
    services.AddHangfire(config=>config.UseSqlServerStorage(Configuration.GetConnectionString("HangFireConnectionString")));
}
Now Hangfire integration is easy to use. When you run it will automatically create tables related to Hangfire configuration and storage as below.


hangfire-tables-sql-server

Now you can easily add background task like below at any place.
  BackgroundJob.Enqueue(() => Console.WriteLine("BackGroundJob"));
Even you can add recurring job which will run at a specific time like below.
 RecurringJob.AddOrUpdate(() => Console.WriteLine("RecurringJob"), Cron.Daily);
That’s it. You can see it’s very easy to use and You can integrate Hangfire very easily. Hope you like it. Stay tuned for more!.
You can find complete source code of this application at following on github.com : https://github.com/dotnetjalps/ASPNetCoreHangFire
Share:
Tuesday, October 6, 2015

What's new in View Component : ASP.NET MVC 6

There are lots of new features added with ASP.NET MVC 6 and View components is one of them.  In this blog post we are going to learn about View Component in ASP.NET MVC 6 in detail.

What is View Components and how it is different from partial views:


As per ASP.NET official web site
New to ASP.NET MVC 6, view components (VCs) are similar to partial views, but they are much more powerful. VCs include the same separation-of-concerns and testability benefits found between a controller and view. You can think of a VC as a mini-controller
So the first question comes in our mind is why we need a View Component as all? As partial views are there and its serving its purpose very well.  But if you have worked with partial views you know that there is a limitation for partial views you can not have controller associated with it. You have to use Child actions with partial views and as you now when you mark any actions with child actions it will only allow for child you can not use that as a complete action. Also it will make a extra server trip which could make your application slow if you have a very complex view.  That where View Component can help.  It's contains a view and backing class It's not a 100% controller but it acts like a controller.

Let's create a View component that can be reused at multiple places. Think about a ECommerce application where you have multiple product categories which can be displayed multiple places in ECommerce application. We are going to create a view component that will list multiple categories.

How to create View Component in ASP.NET MVC 6 Application:


So to create a View component we need a ASP.NET 5 ASP.NET MVC 6 application. So have created web application from Visual Studio 2015.

mvc-view-component-application

Then created a model class category for storing categories information.
namespace ViewComponentMVC.Models
{
    public class Category
    {
        public int CategoryId { get; set; } 
        public string Name { get; set; }
        public string Description { get; set; }
    }
}
Then created a View component with following code.
using System.Collections.Generic;
using Microsoft.AspNet.Mvc;
using ViewComponentMVC.Models;

namespace ViewComponentMVC
{
    [ViewComponent(Name = "ProductCategoriesComponent")]
    public class CategoryViewComponent : ViewComponent
    {
        public IViewComponentResult Invoke()
        {
           var categories = new List<Category>()
           {
               new Category {CategoryId = 1, Name = "Clothes",Description = "Men and women's clothes"},
               new Category {CategoryId = 2, Name = "Elentronics", Description = "Eletronics"}
           };
            return View(categories);
        }

    }
}
Here there are three things to notice

  1. I have inherited class from ViewComponent from Microsoft.AspNet.MVC name space
  2. I have created a invoke method which will return data for the view. In our case we have created manual list as we don't need database for this example. But you can write any code for the same.
  3. See view component attribute on the top of class. We need to use same name when call this view component.
Now it's time to create a view for the view component. I have created this component under /Views/Home/Components/ProductCategoriesComponent/default.html as we have given same name in attribute. As this view component is used home/index.cshml I have putted there but if you have generic view than you can put that in share component also. Following is a code for the same. A simple ul-li listing.
@model IEnumerable<Category>
<ul>
   @foreach (var category in Model)
   {
       <li>@category.Name </li>
   }
</ul>
Now it's time to use this view component in one of view. I have putted following code in Views/Home/Index.cshtml.
<div>
    @Component.Invoke("ProductCategoriesComponent")
</div>
When you run this application, It will look like following in browser

view-component-mvc6-brower-rendering.

So you can see how our hard code categories renders under view. Even you can passed argument with view component invocation that we will see in future blog post.
You can find complete source code of this application at following location on github- https://github.com/dotnetjalps/ViewComponentMVC6
Hope you like it. Stay tuned for more!!
Share:
Friday, October 2, 2015

A Better Solution to create PDF with Rotativa and ASP.NET MVC

In most of the line of business application we need some kind of reports. Now days we need those reports as PDF format as it is the most convenient way of storing documents. I have written a post about creating a PDF in ASP.NET MVC with Razor PDF and it is one of the top visited page on my blog.

Creating PDF with ASP.NET MVC and RazorPDF

But now I have found a better way to create a PDF with ASP.NET MVC so I thought it will be a good idea to write a blog post about it. So in this blog post we are going to learn about creating PDF with ASP.NET MVC with the use of Rotativa as open source framework for creating PDF with ASP.NET MVC.

What is Rotativa:


It is a framework created by Giorgio Bozio with the purpose of creating PDF in ASP.NET MVC extremely easy way. It is based on wkhtmltopdf tool to create PDF from html content rendered on browser. It uses the web kit engine which is used by Safari and Chrome browser to render html. And support most of HTML tags and styles. It is a open source command line tools so Giogio has created a nuget package to use this tool as PDF creator. You can find more information about Rotativa from the following links.

http://letsfollowtheyellowbrickroad.blogspot.it/
http://www.codeproject.com/Articles/335595/Rotativa-how-to-print-PDF-in-Asp-Net-MVC

You can find source code of rotativa-

https://github.com/webgio/Rotativa

Now let's create example to demonstrate the power of Rotativa with ASP.NET MVC

Creating PDF with ASP.NET MVC and Rotativa:


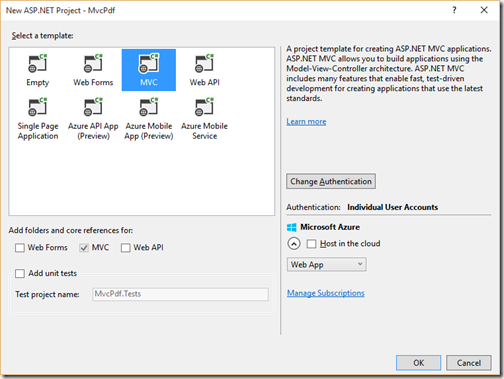
So to create example, I have created a ASP.NET MVC application.

asp-net-mvc-pdf-application

The first thing we need to do is to add Rotativa Nuget Package in our application.

nuget-package-for-rotativ-asp-net-pdf
Here is the model class I have used to demonstrate power or Rotativa.
namespace MvcPdf.Models
{
    public class Customer
    {
        public int CustomerId { get; set; }
        public string FirstName { get; set; }
        public string LastName { get; set; }
        public string ProfileImage { get; set; }
    }
}
In this example, we are not going to use any database so we are going to hardcode data in customer. so We have done is hardcode list of customer in controller and returning it to a view.
using MvcPdf.Models;
using Rotativa;
using System.Collections.Generic;
using System.Web.Mvc;

namespace MvcPdf.Controllers
{
    public class CustomerController : Controller
    {
        private List<Customer> _customers;

        public CustomerController()
        {
            var imagePath = "profile.jpg";
            _customers = new List<Customer>()
            {
                new Customer {CustomerId = 1, FirstName = "Jalpesh",
                               LastName = "Vadgama", ProfileImage = imagePath},
                new Customer {CustomerId = 1, FirstName = "Vishal", 
                               LastName = "Vadgama", ProfileImage = imagePath}
            };
        }

        // GET: Customer
        [HttpGet]
        public ActionResult Index()
        {
            return View(_customers);

        }
    }
}
And in view we has displayed this list as table like following.
@model List<MvcPdf.Models.Customer>

@{
    ViewBag.Title = "PDF Title";
  
}

<h2>Convert to  PDF</h2>

<table class="table">
    <tr>
        <td class="alert-success">First Name</td>
        <td class="alert-info">Last name</td>
        <td style="background-color: yellow;">Profile Image</td>
    </tr>
    @foreach (var item in Model)
    {
        <tr>
            <td>@item.FirstName</td>

            <td>@item.LastName</td>
            <td><img src="@Url.Content("~/content/" + Path.GetFileName(item.ProfileImage))" alt="" width="100" height="100" /></td>
        </tr>
    }

</table>    
          
@Html.ActionLink("Print", "Print", "Customer")
If you see in above code, I have used a image to display profile pic. I have also used different styles for td element in table to display power of Rotativa. Even I have used hardcoded style directly.  At bottom I have created  Html Action link to print this view as PDF and following is a code the printing this view as PDF in Action Result.
public ActionResult Print()
{
    return new ActionAsPdf("Index", _customers);
}
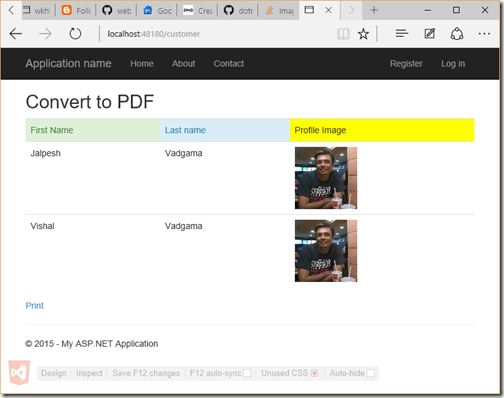
And when we run this application it looks like following.

browser-demo-pdf

Now when you click on Print it will create a PDF like following.

pdf-created-with-rotativa-with-browser

This was pretty basic demo but there are lots of options also available with Rotativa you can find that options in documentation on Github as well. I have shared same link above.
You can find source code of this sample application on github at following location - https://github.com/dotnetjalps/AspNetMvcPdfRotativa
Hope you like it. Stay tuned for more!!
Share:
Sunday, January 4, 2015

Understanding KRE,KVM,KLR and KPM in ASP.NET 5(vNext)

ASP.NET 5(vNext) is a new upcoming version of ASP.NET that Microsoft has redesigned from the scratch. Recently Microsoft has released Visual Studio 2015 Preview and with that they have released ASP.NET VNext.  In ASP.NET 5 (vNext) it comes with new runtime environment called KRE(K Runtime Environment) . With this version you can also run your application through command prompt using various commands. In this blog post we are going to learn about all terms related K Runtime Environment.

KVM(K Version Manager):

K version manager is one of the first thing you need to run command . KVM is responsible for installing and updating different version of KRE. It’s a PowerShell script used to get and manage multiple version of KRE being it on same time on same machine. So one application can now have one version of KRE and another application can have another version of KRE on same time. You can find more information at https://github.com/aspnet/Home/wiki/version-manager
Share:
Thursday, September 11, 2014

Dependency Injection with ASP.NET MVC and Simple Injector


I have been learning SimpleInjector for few days and it’s just awesome.  I have already written two post about it(see below link) and this post will be third post about it. In this post we are going to learn how we can do Dependency Injection with ASP.NET MVC.

For those who are reading my posts about Simple Injector Following are two previous post I have written about Simple Injector. I highly recommend to read first two post so that you can be aware about how we can configure SimpleInjector container.

Dependency Injection with Simple Injector
Singleton Instance in Simple Injector

So let’s start with creating a ASP.NET MVC Project from Visual Studio.


Share:
Saturday, August 23, 2014

Stackoverflow.com like URLs with attribute routing in ASP.NET MVC

Before some time I have blogged about Attribute Routing features of ASP.NET MVC 5.x version.  In this blog we are going to learn how we can create stackoverflow.com like URLs with attribute routing.

As you know www.stackoverflow.com is one of the most popular questions answer site where you can ask questions and almost get the answers of your questions. So to create URLs like www.stackoverflow.com we need to understand structure of URLs of Stackoverflow. Let’s take example of following question URL which I have answered on stackoverflow.com

http://stackoverflow.com/questions/24133693/can-i-use-signalr-2-x-with-net-4-0-if-i-am-using-microsoft-bcl-upgrading-from

and let’s take another example

http://stackoverflow.com/questions/23739256/the-advantage-of-formsauthentication-class-over-session-variable

If you compare and understand structure of this URLs. You will know that there will be a two things which will be dynamic for this URLS.

Share:
Tuesday, July 29, 2014

CDN in ASP.NET MVC bundling

ASP.NET MVC contains great features and Bundling is one of them. The Bundling and Minification features allow you to reduce number of HTTP requests that a web page needs to make by combining individual scripts and style sheet files. It can also reduce a overall size of bundle by minifying the content of application.   From ASP.NET MVC 4 bundling also includes CDN support also where you can utilize public CDN available for common libraries. Let’s look this features in details.

CDN Support in Bundling:


Libraries like jQuery, jQuery UI and some other libraries are commonly used in most of the applications. There are available in CDN (Content Delivery Networks) specifying the URL of particular library with specific version.  Bundling now has CDN path as parameter in default bundle functionality where you can specify the path of the CDN library and use that. So when you application run in production environment first it will check whether CDN are available or not if available then it will load it from the CDN itself and If CDN is not available then it will load files hosted on our server.

Share:

CRUD Operation with ASP.NET MVC and Fluent Nhibernate.

Before some time I have written a post about Getting Started with Nhibernate and ASP.NET MVC –CRUD operations. It’s one of the most popular post blog post on my blog. I get lots of questions via email and other medium why you are not writing a post about Fluent Nhibernate and ASP.NET MVC. So I thought it will be a good idea to write a blog post about it.

What is Fluent Nhibernate:


Convection over configuration that is mantra of Fluent Hibernate If you have see the my blog post about Nhibernate then you might have found that we need to create xml mapping to map table. Fluent Nhibernate uses POCO mapping instead of XML mapping and I firmly believe in Convection over configuration that is why I like Fluent Nhibernate a lot. But it’s a matter of Personal Test and there is no strong argument why you should use Fluent Nhibernate instead of Nhibernate.

Fluent Nhibernate is team Comprises of James Gregory, Paul Batum, Andrew Stewart and Hudson Akridge. There are lots of committers and it’s a open source project.

You can find all more information about at following site.

http://www.fluentnhibernate.org/

On this site you can find definition of Fluent Nhibernate like below.
Fluent, XML-less, compile safe, automated, convention-based mappings for NHibernate. Get your fluent on.
They have excellent getting started guide on following url. You can easily walk through it and learned it.
https://github.com/jagregory/fluent-nhibernate/wiki/Getting-started

ASP.NET MVC and Fluent Nhibernate:


So all set it’s time to write a sample application. So from visual studio 2013 go to file – New Project and add a new web application project with ASP.NET MVC.

Share:
Sunday, May 18, 2014

What’s new in ASP.NET MVC 5 Part-1 : Attribute Routing

ASP.NET MVC is a new buzz word in Microsoft.NET stack most of people have started learning into it. So recently before some time Microsoft has released a Major new version of ASP.NET MVC with ASP.NET MVC 5.x. There are lots of new features given with ASP.NET MVC 5.x versions and I’m going to write a few series of blog post to explain all the features in details. So stay tuned with that!!

In this blog post I’m going to explain attribute routing in ASP.NET MVC 5.

Routing in ASP.NET MVC:


From the first version of ASP.NET MVC It’s provides a routing out of box. You don’t need to do much about it. Routing is how ASP.NET MVC matches URL in browsers to action. Based on URL a particular action is called on particular controller and result will be provided as view.

Share:
Thursday, April 10, 2014

Dapper Micro ORM Series

Recently before some time I have created a blog post about list of blog post I have written about Petapoco Micro ORM. So one of the friend suggested I should write same kind of series post about Dapper Micro ORM so that reader of my blog can find the all the posts on same page. So that’s why I writing this blog post.

What is dapper:

Dapper is Micro ORM developed by Sam Saffron few years ago while he was working as lead developer at stack exchange. This ORM was developed specially for Stack Exchange QA sites like stackoverflow.com and superuser.com for the performance improvement. It has got a single file where all the code has been written. You can download dapper Micro ORM from the following location.

http://code.google.com/p/dapper-dot-net/

Dapper Micro ORM related posts on dotnetjalps.com:

Following is a list of post related to dapper Micro ORM that I have written on this blog.

Playing with dapper Micro ORM and ASP.NET MVC 3.0
Insert with Dapper Micro ORM and ASP.NET MVC 3
Edit/Update with dapper ORM and ASP.NET MVC 3
Delete with Dapper ORM and ASP.NET MVC 3

If I write blog post about dapper then I will keep adding into this list. That’s it.

Hope you like it. Stay tuned for more!!
Share:
Sunday, September 29, 2013

Getting Started with NHibernate and ASP.NET MVC- CRUD Operations

In this post we are going to learn how we can use NHibernate in ASP.NET MVC application.

What is NHibernate:


Nhibernate
ORMs(Object Relational Mapper) are quite popular this days. ORM is a mechanism to map database entities to Class entity objects without writing a code for fetching data and write some SQL queries. It automatically generates SQL Query for us and fetch data behalf on us.

NHibernate is also a kind of Object Relational Mapper which is a port of popular Java ORM Hibernate. It provides a framework for mapping an domain model classes to a traditional relational databases. Its give us freedom of writing repetitive ADO.NET code as this will be act as our database layer. Let’s get started with NHibernate.

How to download:


There are two ways you can download this ORM. From nuget package and from the source forge site.
  1. Nuget - http://www.nuget.org/packages/NHibernate/
  2. Source Forge-http://sourceforge.net/projects/nhibernate/

Creating a table for CRUD:


I am going to use SQL Server 2012 express edition as a database. Following is a table with four fields Id, First Name, Last name, Designation.
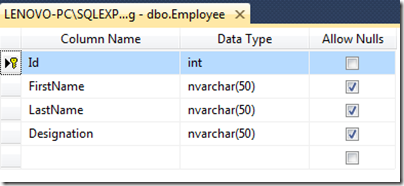
NhibernateASPNETMVCTable

Creating ASP.NET MVC project for NHibernate:


Let’s create a ASP.NET MVC project for NHibernate via click on File-> New Project –> ASP.NET MVC 4 web application.
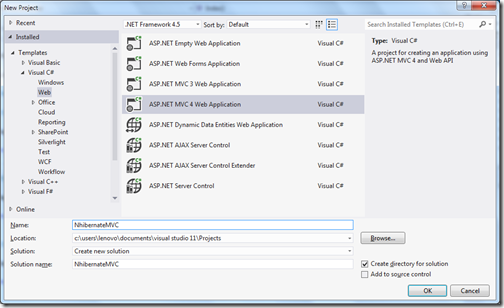
NhibernateASPNETMVCProject

Installing NuGet package for NHibernate:


I have installed nuget package from Package Manager console via following Command.

NhibernateNugetPackage

It will install like following.

PackageManagerConsoleNhibernate

NHibertnate configuration file:


Nhibernate needs one configuration file for setting database connection and other details. You need to create a file with ‘hibernate.cfg.xml’ in model Nhibernate folder of your application with following details.
<?xml version="1.0" encoding="utf-8" ?>
<hibernate-configuration xmlns="urn:nhibernate-configuration-2.2">
  <session-factory>
    <property name="connection.provider">
      NHibernate.Connection.DriverConnectionProvider
    </property>
    <property name="connection.driver_class">
      NHibernate.Driver.SqlClientDriver
    </property>
    <property name="connection.connection_string">
      Server=(local);database=LocalDatabase;Integrated Security=SSPI;
    </property>
    <property name="dialect">
      NHibernate.Dialect.MsSql2012Dialect
    </property>
  </session-factory>
</hibernate-configuration>

Here you have got different settings for NHibernate. You need to selected driver class, connection provider as per your database. If you are using other databases like Orcle or MySQL you will have different configuration. ThisNHibernate ORM can work with any databases.

Creating a model class for NHibernate:


Now it’s time to create model class for our CRUD operations. Following is a code for that. Property name is identical to database table columns.
namespace NhibernateMVC.Models
{
    public class Employee
    {
        public virtual int Id { get; set; }
        public virtual string FirstName { get; set; }
        public virtual string LastName { get; set; }
        public virtual string Designation { get; set; }
    }
}

Creating a mapping file between class and table:


Now we need a xml mapping file between class and model with name “Employee.hbm.xml” like following in Nhibernate folder.
<?xml version="1.0" encoding="utf-8" ?>
<hibernate-mapping xmlns="urn:nhibernate-mapping-2.2" auto-import="true" assembly="NhibernateMVC" namespace="NhibernateMVC.Models">
  <class name="Employee" table="Employee" dynamic-update="true" >
    <cache usage="read-write"/>
    <id name="Id" column="Id" type="int">
      <generator class="native" />
    </id>
    <property name="FirstName" />
    <property name="LastName" />
    <property name="Designation" />
  </class>
</hibernate-mapping>

Creating a class to open session for NHibernate:


I have created a class in models folder called NHIbernateSession and a static function it to open a session for NHibertnate.
using System.Web;
using NHibernate;
using NHibernate.Cfg;

namespace NhibernateMVC.Models
{
    public class NHibertnateSession
    {
        public static ISession OpenSession()
        {
            var configuration = new Configuration();
            var configurationPath = HttpContext.Current.Server.MapPath(@"~\Models\Nhibernate\hibernate.cfg.xml");
            configuration.Configure(configurationPath);
            var employeeConfigurationFile = HttpContext.Current.Server.MapPath(@"~\Models\Nhibernate\Employee.hbm.xml");
            configuration.AddFile(employeeConfigurationFile);
            ISessionFactory sessionFactory = configuration.BuildSessionFactory();
            return sessionFactory.OpenSession();
        }
    }
}

Listing:


Now we have our open session method ready its time to write controller code to fetch data from the database. Following is a code for that.
using System;
using System.Web.Mvc;
using NHibernate;
using NHibernate.Linq;
using System.Linq;
using NhibernateMVC.Models;

namespace NhibernateMVC.Controllers
{
    public class EmployeeController : Controller
    {

        public ActionResult Index()
        {
            using (ISession session = NHibertnateSession.OpenSession())
            {
                var employees = session.Query<Employee>().ToList();
                return View(employees);
            }
           
        }
    }
}

Here you can see I have get a session via OpenSession method and then I have queried database for fetching employee database. Let’s create a new for this you can create this via right lick on view on above method.We are going to create a strongly typed view for this.
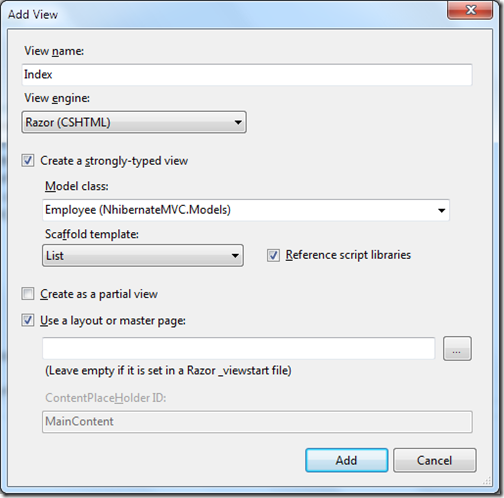
Getting Started with NHibernate and asp.net mvc

Our listing screen is ready once you run project it will fetch data as following.
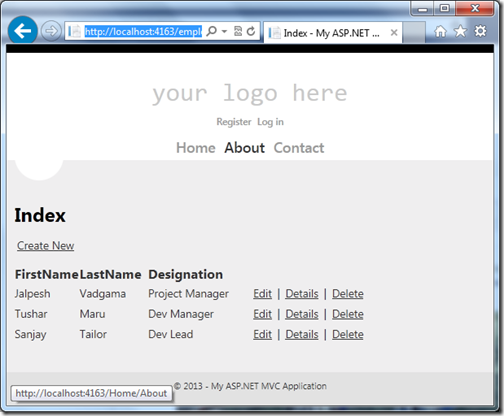
EmployeeListingusingNhibernateandaspnetmvc

Create/Add:


Now its time to write add employee code. Following is a code I have written for that. Here I have used session.save method to save new employee. First method is for returning a blank view and another method with HttpPost attribute will save the data into the database.
public ActionResult Create()
{
    return View();
}

      
[HttpPost]
public ActionResult Create(Employee emplolyee)
{
    try
    {
        using (ISession session = NHibertnateSession.OpenSession())
        {
            using (ITransaction transaction = session.BeginTransaction())
            {
                session.Save(emplolyee);
                transaction.Commit();
            }
        }

        return RedirectToAction("Index");
    }
    catch(Exception exception)
    {
        return View();
    }
}

Now let’s create a create view strongly typed view via right clicking on view and add view.
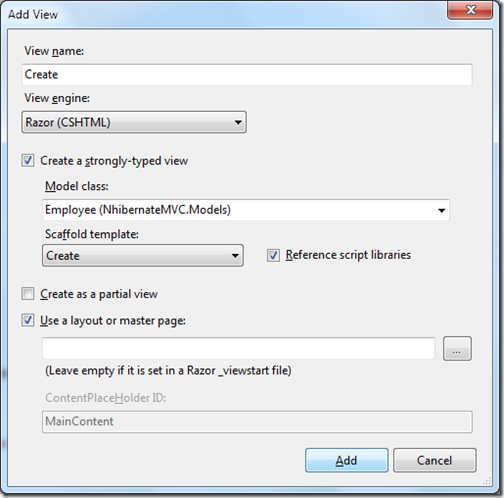
AddViewwithNhibertnateandaspnetmvc

Once you run this application and click on create new it will load following screen.
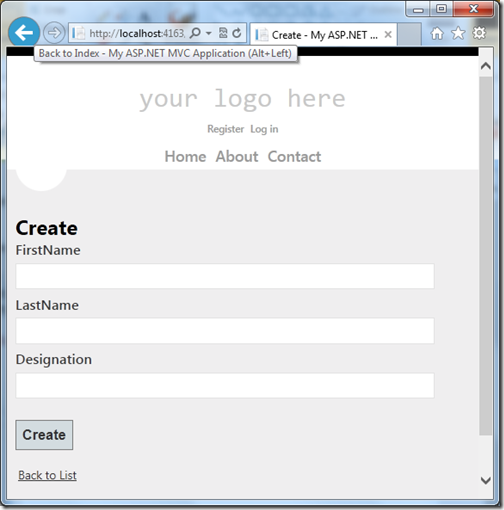
AddViewScreenwithNhibernateandaspnetmvc

Edit/Update:


Now let’s create a edit functionality with NHibernate and ASP.NET MVC. For that I have written two action result method once for loading edit view and another for save data. Following is a code for that.
public ActionResult Edit(int id)
{
    using (ISession session = NHibertnateSession.OpenSession())
    {
        var employee = session.Get<Employee>(id);
        return View(employee);
    }
   
}


[HttpPost]
public ActionResult Edit(int id, Employee employee)
{
    try
    {
        using (ISession session = NHibertnateSession.OpenSession())
        {
            var employeetoUpdate = session.Get<Employee>(id);

            employeetoUpdate.Designation = employee.Designation;
            employeetoUpdate.FirstName = employee.FirstName;
            employeetoUpdate.LastName = employee.LastName;

            using (ITransaction transaction = session.BeginTransaction())
            {
                session.Save(employeetoUpdate);
                transaction.Commit();
            }
        }
        return RedirectToAction("Index");
    }
    catch
    {
        return View();
    }
}

Here in first action result I have fetched existing employee via get method of NHibernate session and in second I have fetched and changed the current employee with update details. You can create view for this via right click –>add view like below. I have created a strongly typed view for edit.
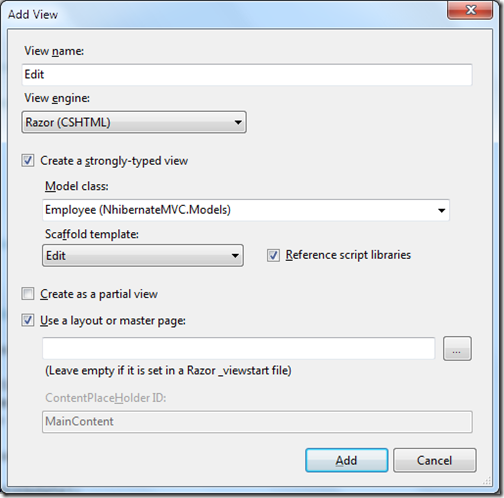
EditViewwithNhibernateandaspnetmvc

Once you run code it will look like following.

EditViewScreenwithNhibernateandaspnetmvc

Details:


Now it’s time to create a detail view where user can see the employee detail. I have written following logic for details view.
public ActionResult Details(int id)
      {
          using (ISession session = NHibertnateSession.OpenSession())
          {
              var employee = session.Get<Employee>(id);
              return View(employee);
          }
      }

You can add view like following via right click on actionresult view.
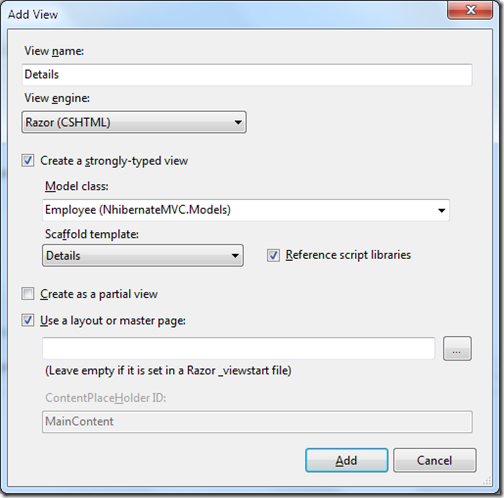
Detailsviewwithnhibernateandaspnetmvc

now once you run this in browser it will look like following.

Delete:


Now its time to write delete functionality code. Following code I have written for that.
public ActionResult Delete(int id)
{
    using (ISession session = NHibertnateSession.OpenSession())
    {
        var employee = session.Get<Employee>(id);
        return View(employee);
    }
}

       
[HttpPost]
public ActionResult Delete(int id, Employee employee)
{
    try
    {
        using (ISession session = NHibertnateSession.OpenSession())
        {
            using (ITransaction transaction = session.BeginTransaction())
            {
                session.Delete(employee);
                transaction.Commit();
            }
        }
        return RedirectToAction("Index");
    }
    catch(Exception exception)
    {
        return View();
    }
}

Here in the above first action result will have the delete confirmation view and another will perform actual delete operation with session delete method.
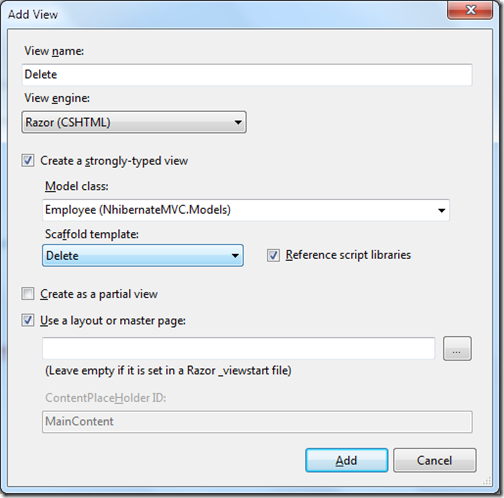
Deleteviewwithaspnetmvcandnhibernate

When you run into the browser it will look like following.
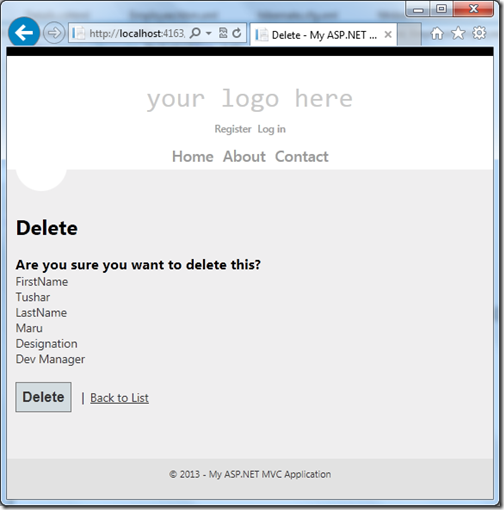
DeleteScreenwithaspnetmvcandnhibernate

That’s it. It’s very easy to have crud operation with NHibernate. Stay tuned for more.
Share:
Thursday, March 14, 2013

CRUD operations with PetaPoco and ASP.NET MVC

In this post we are going to see how we can do CRUD operations with ASP.NET MVC and PetaPoco Micro ORM.

What is PetaPoco?


Petapoco is a tiny ORM developed by topten software. As per them it’s a tiny, fast, single-file micro-ORM for .NET and Mono.
  • Like Massive it's a single file that you easily add to any project
  • Unlike Massive it works with strongly typed POCO's
  • Like Massive, it now also supports dynamic Expandos too - read more
  • Like ActiveRecord, it supports a close relationship between object and database table
  • Like SubSonic, it supports generation of poco classes with T4 templates
  • Like Dapper, it's fast because it uses dynamic method generation (MSIL) to assign column values to properties

Features of PetaPoco:


As per topten software it contains following features.
  • Tiny, no dependencies... a single C# file you can easily add to any project.
  • Works with strictly undecorated POCOs, or attributed almost-POCOs.
  • Helper methods for Insert/Delete/Update/Save and IsNew
  • Paged requests automatically work out total record count and fetch a specific page.
  • Easy transaction support.
  • Better parameter replacement support, including grabbing named parameters from object properties.
  • Great performance by eliminating Linq and fast property assignment with DynamicMethod generation.
  • Includes T4 templates to automatically generate POCO classes for you.
  • The query language is SQL... no weird fluent or Linq syntaxes (yes, matter of opinion)
  • Includes a low friction SQL builder class that makes writing inline SQL much easier.
  • Hooks for logging exceptions, installing value converters and mapping columns to properties without attributes.
  • Works with SQL Server, SQL Server CE, MySQL, PostgreSQL and Oracle.
  • Works under .NET 3.5 or Mono 2.6 and later.
  • Experimental support for dynamic under .NET 4.0 and Mono 2.8
  • NUnit unit tests.
  • OpenSource (Apache License)
  • All of this in about 1,500 lines of code
Share:
Wednesday, April 11, 2012

Dynamically creating meta tags in asp.net mvc

As we all know that Meta tag has very important roles in Search engine optimization and if we want to have out site listed with good ranking on search engines then we have to put meta tags. Before some time I have blogged about dynamically creating meta tags in asp.net 2.0/3.5 sites, in this blog post I am going to explain how we can create a meta tag dynamically very easily.

To have meta tag dynamically we have to create a meta tag on server-side. So I have created a method like following.

Share:
Monday, April 9, 2012

Creating dynamic breadcrumb in asp.net mvc with mvcsitemap provider

I have done lots breadcrumb kind of things in normal asp.net web forms I was looking for same for asp.net mvc. After searching on internet I have found one great nuget package for mvpsite map provider which can be easily implemented via site map provider. So let’s check how its works. I have create a new MVC 3 web application called breadcrumb and now I am adding a reference of site map provider via nuget package like following.
Share:
Sunday, October 9, 2011

ASP.NET MVC 4.0 Mobile Template

Microsoft has released the much awaited ASP.NET MVC 4.0 developer preview and there are lots of features bundle with it. One of the greatest features is a mobile website. Yes, Now with ASP.NET MVC 4.0 you can create mobile site also. So let’s create a simple application and let’s see how it works.

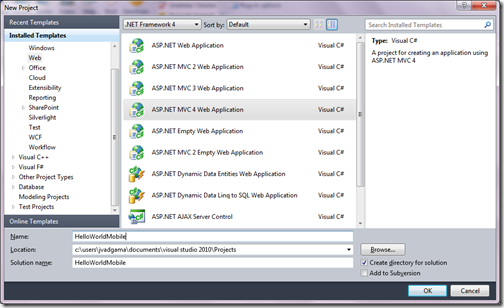
To create mobile site first you need to click File->New Project->ASP.NET MVC 4.0 Web application. Like following.

Hello world ASP.NET MVC 4.0 Mobile site-www.dotnetjalps.com

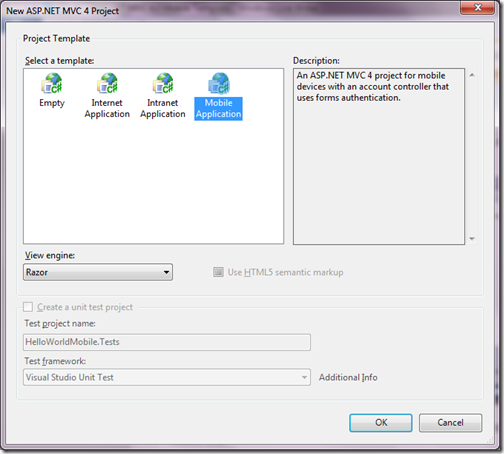
Now once you click OK it will open a new another dialog like following where we have to choose the Mobile site.

Mobile Application with asp.net mvc 4.0-www.dotnetjalps.com

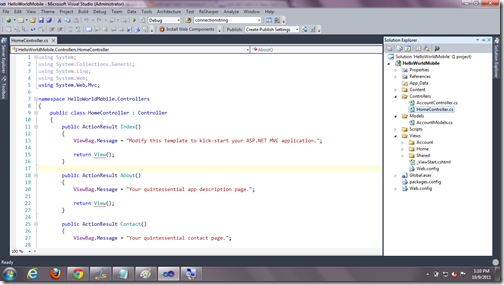
As you can see in above post I have selected Razor view Once you click it will create a new application like following. As you can see similar structure as normal MVC Application application below.

ASP.NET MVC 4.0 Mobile Structure-http://www.dotnetjalps.com

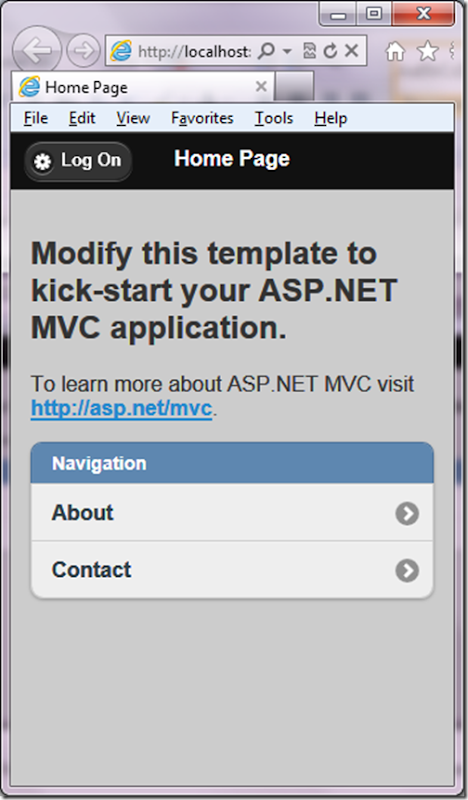
This view are based on the standard jQuery Mobile. So this can be viewed in any tablet or mobile device. So if you have IPad and IPhone both then it will work on both. You need not to different application for both. see the browser first I have selected standard IPad size of browser.

Ipad

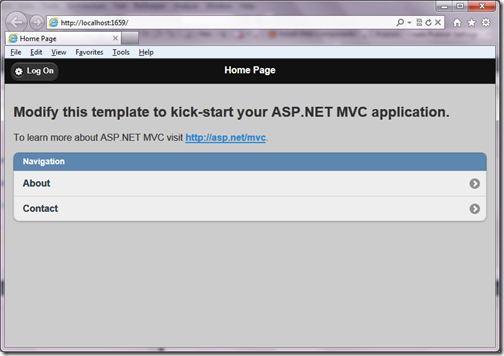
Now lets see how it look in mobile. So I have made my browser same site as mobile. As you can see its working in both.

Mobile View with ASP.NET MVC 4.0-http://www.dotnetjalps.com

If you see the code of view you can see the razor syntax over there. Nothing change in razor syntax. But as you can see in below code you need to use Jquery mobile attributes like data-Role and other stuff which will convert standard HTML into mobile or device compatible website.

<ul data-role="listview" data-inset="true">
<li data-role="list-divider">Navigation</li>
<li>@Html.ActionLink("About", "About", "Home")</li>
<li>@Html.ActionLink("Contact", "Contact", "Home")</li>
</ul>

That's it. It’s very easy you can create mobile compatible site in few hours. Hope you like it. Stay tuned for more.. Till then happy programming.

Namaste!!

kick it on DotNetKicks.comShout it
Share:
Monday, October 3, 2011

First Review of ASP. NET MVC 4.0 Developer Preview

After so much buzz Microsoft has launched some of the new tools at build conference and ASP.NET MVC 4.0 Developer preview is one of them.

How I can install ASP.NET MVC 4.0 Developer preview?


There are three ways to install ASP.NET MVC 4.0 Developer preview
  1. You can download from following link-
  2. You can install ASP.NET MVC 4.0 Developer preview with web platform installer from following link-
  3. You can also install ASP.NET MVC 4.0 Developer Preview from following link-. If you don’t know about what is NuGet Package. Please visit following link of my blog.

ASP.NET MVC 4.0 and Visual Studio 2010:


There are lots of people thinking that for asp.net mvc 4.0 developer preview, you need to install Visual Studio11 Developer Preview. But that is not true.It works with both. You can also run ASP.NET MVC 4.0 developer preview with side by side with ASP.NET MVC 3.0. You can use any of above method to install asp.net mvc 4.0 developer preview on either of Visual Studio Version.
Creating ASP.NET MVC 4.0 Project with Visual Studio 2010
You can create new asp.net mvc project as same old method like File->New Project and ASP.NET MVC 4 Web Application.

ASP.NET MVC 4.0 Create Project Dialog- First Review
Once you click OK It will open a dialog where it will open a dialog like following.

Internet Application,Mobile Application with ASP.NET MVC 4.0

As you can see now there one more option for mobile application too. So this is one best thing in asp.net mvc 4.0. Now you can create mobile base application also. I will going to post about that in future posts.

Now I want to create Internet application I have selected and Clicked ‘OK’ and created new application. This will create basic mvc application. Now lets run application via F5 and it will look like following in browser.

New Template for ASP.NET MVC 4.0- First Review of ASP.NET MVC 4.0

As you can see in above image in browser Microsoft has given new template for asp.net mvc 4.0. Also there is new contact page in application. I will also going to post about this in future post.

That’s it. This was just a introduction post to ASP.NET MVC 4.0 Developer preview. There are lots of features are available in ASP.NET 4.0. I am going to explorer all this features in future posts. Hope you like it…Stay tuned for more.. Till then Happy programming.

Namaste!!

Shout it

kick it on DotNetKicks.com
Share:
Sunday, September 4, 2011

ReCaptcha in ASP.NET MVC3

As a web developer we know what is captcha is. It’s way to confirm users as they are human.Following is captcha definition per WikiPedia.
A CAPTCHA (play /ˈkæpə/) is a type of challenge-response test used in computing as an attempt to ensure that the response is generated by a person. The process usually involves one computer (a server) asking a user to complete a simple test which the computer is able to generate and grade. Because other computers are assumed to be unable to solve the CAPTCHA, any user entering a correct solution is presumed to be human. Thus, it is sometimes described as a reverse Turing test, because it is administered by a machine and targeted to a human, in contrast to the standard Turing test that is typically administered by a human and targeted to a machine. A common type of CAPTCHA requires the user to type letters or digits from a distorted image that appears on the screen.
You can find more details about that on following link.

http://en.wikipedia.org/wiki/CAPTCHA.

Google ReCaptcha Service:

Google provide Recaptcha service free of charge to confirm users whether they are human or computer. We can directly use the recaptcha service with there api. You have to create a private key for that and that key will validate domains against it. Even we can create the global key for all the keys. You can find more information about it from below link.

http://www.google.com/recaptcha/learnmore

ReCaptcha Web helpers in ASP.NET MVC 3:

As per I have also written in my previous post. ASP.NET Web helpers from Microsoft comes inbuilt with tools update. If you not installed it then you have to download NuGet package for it. You can refer my previous post for this.

Now we have all things ready its time to write ReCaptcha code in ASP.NET MVC. First we have create key for recaptcha service. I have created it via following link. It’s very easy.

https://www.google.com/recaptcha

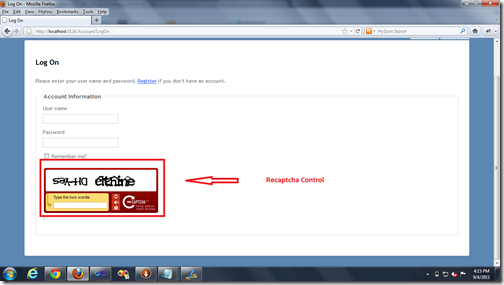
Now let’s start coding. Recaptcha web helper renders a captcha control in your web form so you can validate this. Following is code which will render captcha control.
@ReCaptcha.GetHtml(theme: "red")
It's take four argument
  1. Theme- theme specify the color and look for ReCaptcha control. You can have to put theme name over there
  2. Language- You need to specify the captcha challenge language
  3. TabIndex- Tab Index for this control
  4. PublicKey- A unique public key which we have created for our domain.

Following is a code how to use above code in real time. I have updated standard logon control template for ASP.NET MVC.
@model CodeSimplifiedTest.Models.LogOnModel

@{
    ViewBag.Title = "Log On";
    ReCaptcha.PublicKey=@"6LedqMcSAAAAAJgiIjKlyzzV2czbGOPvij1tc39A";
}

<h2>Log On</h2>
<p>
    Please enter your user name and password. @Html.ActionLink("Register", "Register") if you don't have an account.
</p>

<script src="@Url.Content("~/Scripts/jquery.validate.min.js")" type="text/javascript"></script>
<script src="@Url.Content("~/Scripts/jquery.validate.unobtrusive.min.js")" type="text/javascript"></script>
<script src="@Url.Content("~/Scripts/jquery-1.5.1.min.js")" type="text/javascript"></script>
@Html.ValidationSummary(true, "Login was unsuccessful. Please correct the errors and try again.")

@using (Html.BeginForm()) {
    <div>
        <fieldset>
            <legend>Account Information</legend>
            <div class="editor-label">
                @Html.LabelFor(m => m.UserName)
            </div>
            <div class="editor-field">
                @Html.TextBoxFor(m => m.UserName)
                @Html.ValidationMessageFor(m => m.UserName)
            </div>

            <div class="editor-label">
                @Html.LabelFor(m => m.Password)
            </div>
            <div class="editor-field">
                @Html.PasswordFor(m => m.Password)
                @Html.ValidationMessageFor(m => m.Password)
            </div>

            <div class="editor-label">
                @Html.CheckBoxFor(m => m.RememberMe)
                @Html.LabelFor(m => m.RememberMe)
            </div>

            <p>
               @ReCaptcha.GetHtml(theme: "red")
            </p>
           
        </fieldset>
    </div>
}

As you can see in above code for recaptcha public key and Recaptcha.GetHtml part. Now its time to captcha validation in server side code in controller. As I have used standard logon template for this.I have modified Logon Action Result in Account controller like following.

[HttpPost]
public ActionResult LogOn(LogOnModel model, string returnUrl)
{
    if(!ReCaptcha.Validate(privateKey:"6LedqMcSAAAAAJgiIjKlyzzV2czbGOPvij1tc39A"))
    {
        return Content("Failed");
    }
  
    if (ModelState.IsValid)
    {
        if (Membership.ValidateUser(model.UserName, model.Password))
        {
            FormsAuthentication.SetAuthCookie(model.UserName, model.RememberMe);
            if (Url.IsLocalUrl(returnUrl) && returnUrl.Length > 1 && returnUrl.StartsWith("/")
                && !returnUrl.StartsWith("//") && !returnUrl.StartsWith("/\\"))
            {
                return Redirect(returnUrl);
            }
            else
            {
                return RedirectToAction("Index", "Home");
            }
        }
        else
        {
            ModelState.AddModelError("", "The user name or password provided is incorrect.");
        }
    }

    // If we got this far, something failed, redisplay form
    return View(model);
}

Here I have validated the captcha control with public key and if validation failed then it will sent failed message. Now it’s time to run that in browser and let’s see output.

RecapthaControlOuput

That’s it. Its easy to integrate. Hope you like it..Stay tuned for more.. Till then Happy Programing..Namaste!!

Shout itkick it on DotNetKicks.com
Share:
Tuesday, August 30, 2011

Chart Helpers in ASP.NET MVC3- Create chart with asp.net mvc3

I am exploring ASP.NET MVC3 and everyday I am learning something new. In today’s post I am going to explain how we can create chart with ASP.NET MVC3.

Chart is one of greatest way of expressing figures. We all need that functionality in any commercial application. I am still remembering old days with ASP.NET  where we have to use the third party controls for charts or we have to create it with the use of CSS and Server side controls. But now with ASP.NET MVC Helpers you can very easily create chart in few lines of code.

ASP.NET MVC Chart helper and other helpers comes inbuilt with the latest ASP.NET Tools update. If you don’t have ASP.NET MVC Chart helpers then you can find more information about it from here.

http://haacked.com/archive/2011/04/12/introducing-asp-net-mvc-3-tools-update.aspx

But still if you have not updated it then don’t worry about it. There is nuget package called “ASP.NET Webhelper Library”. You can add that package like following and still use same functionality.

ChartHelper-ASP.NET Web Helpers Library Pacakge

Now once you have all set for reference. We can start working on coding part. So draw a chart I have taken simple example like number of records vs time take chart. This Chart Helper support there types of cjart.
  1. Bar Chart
  2. Pie Chart
  3. Column Chart
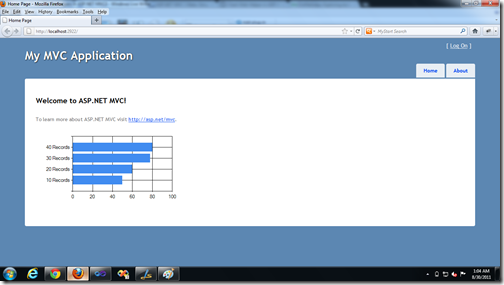
In this example we are going to use Bar Chart. Following is code for that. I have create one simple action result called “DrawChart” which will return chart as PNG format.

using System;
using System.Collections.Generic;
using System.Linq;
using System.Web;
using System.Web.Mvc;
using System.Web.Helpers;

namespace CodeSimplifiedTest.Controllers
{
    public class HomeController : Controller
    {
        public ActionResult Index()
        {
            ViewBag.Message = "Welcome to ASP.NET MVC!";

            return View();
        }

        public ActionResult About()
        {
            return View();
        }

        public ActionResult DrawChart()
        {
            var chart = new Chart(width: 300, height: 200)
                .AddSeries(
                            chartType: "bar",
                            xValue: new[] { "10 Records", "20 Records", "30 Records", "40 Records" },
                            yValues: new[] { "50", "60", "78", "80" })
                            .GetBytes("png");
            return File(chart, "image/bytes");
        }
    }
}

Here you can see that first I have included System.Web.Helper name space on top and then in DrawChart Action Result I have created chart variable where I have specified the height and width of chart and in add series method of it I have provided the chart type and x axis and y axis value. Now as we have to display it as image so for that I have used @URL.Action to point src to our Action Result DrawChart like following.
<img src="@Url.Action("DrawChart")" alt="Drawing chart with HTML Helper" />

Now let’s run this application in browser via pressing Ctrl+F5 and following is the output as expected.

Output

That’s it. You can see its very to create any kind of chart with Chart Helpers in ASP.NET MVC 3. Hope you like it. Stay tuned for more.. Till then happy programming and Namaste!!

Shout itkick it on DotNetKicks.com
Share:
Wednesday, July 6, 2011

CRUD Operation with ASP.NET MVC and EFCodeFirst Part-2

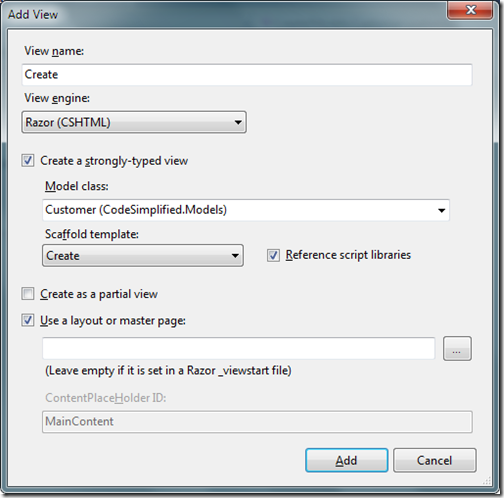
In the previous post I have already explained How we can list data from database easily with the help of EFCodeFirst . In this post I am going to explain How we can complete Create,Edit,Delete and Details operations within 10 minutes. So let’s first Start with Create a new Customer.I am going use same example of customer from previous post. So we have customer controller there so Let’s first create a new view for Create via Selecting View in Create() method of Customer Controller and Clicking on Add View and dialog box will open for add view like following.

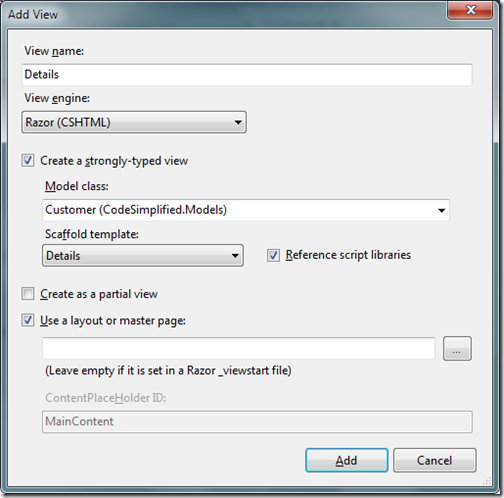
CreateView

As you can see in the above template I have selected Customer Model Class for strongly typed view and Selected Scaffold template as Create once you click Add your view will be ready. Now its time to write for code in customer controller to Add Customer. So I have modified Create Method of customer controller which we have created like following.

[HttpPost]
public ActionResult Create(Models.Customer customer)
{
  try
  {
      using (var databaseContext = new Models.MyDataContext())
      {
          databaseContext.Customer.Add(customer);
          databaseContext.SaveChanges();
      }
    
      return RedirectToAction("Index");
  }
  catch
  {
      return View();
  }
}

That's it. We have done with Create Customer now. In the above databasecontext add method will add customer and SaveChanges method will save changed to database.
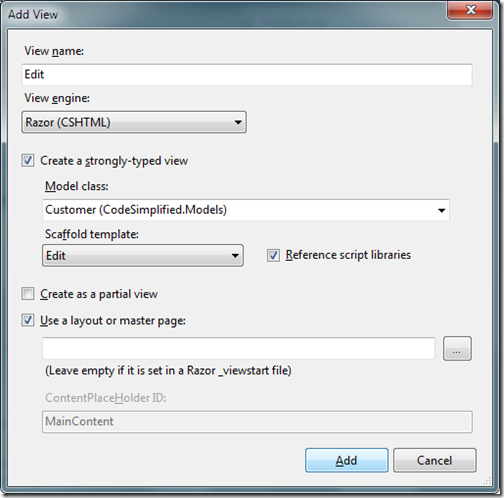
Now once we are done with Add its time to create edit and update functionality. Let’s first Add a view via Selecting view with Edit Method in clicking on Add view. Once you click a dialogbox for add View will open for that like following.

EditView

As you can see you I have selected scaffold template as Edit and I have Created Strongly typed view with Customer class. Once you click add it will create a new view for Edit. Now our Edit View is ready so let’s write code for Edit/Update in database. So first we have to modify Edit(int Id) method like following which will return specific customer with View. Following is a code for that.

public ActionResult Edit(int id)
{
  using (var databaseContext = new Models.MyDataContext())
  {
      return View(databaseContext.Customer.Find(id));
  }
}

Now let write code to update the changes to database. So for that I have modified another ActionResult Edit of customer controller like following.

[HttpPost]
public ActionResult Edit(int id, Models.Customer customer)
{
  try
  {
      using (var databaseContext = new Models.MyDataContext())
      {
          databaseContext.Entry(customer).State= System.Data.EntityState.Modified;
          databaseContext.SaveChanges();
      }
      return RedirectToAction("Index");
  }
  catch
  {
      return View();
  }
}

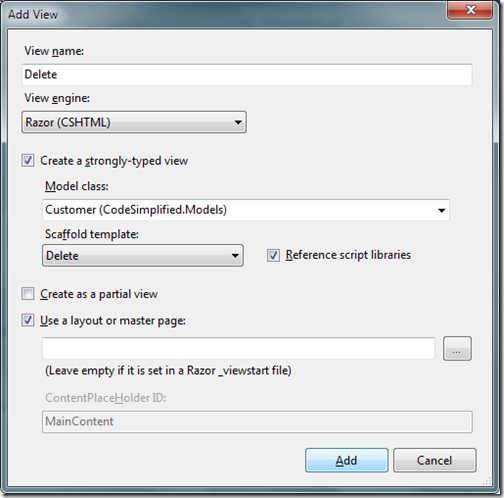
That's it we are done with the edit stuff.In above code the state modified will tell databasecontext that customer details is modified and savechanges will save changed to database. Now its time to create view for delete functionality. So I have clicked on Add View and Created a view for delete like following.

DeleteView

Here I have create Strongly typed view with Delete Scaffold Template. Now let’s modified both Delete Action Result in Customer Controller class. First Action result will return customer which we are going to delete and another delete action result with id will delete the customer from database and then it will return to main customer page. I have modified the code for both as following.

// GET: /Customer/Delete/5

public ActionResult Delete(int id)
{
  using (var databaseContext = new Models.MyDataContext())
  {
      return View(databaseContext.Customer.Find(id));
  }

}

//
// POST: /Customer/Delete/5

[HttpPost]
public ActionResult Delete(int id,Models.Customer customer)
{
  try
  {
      using (var databaseContext = new Models.MyDataContext())
      {
          databaseContext.Entry(databaseContext.Customer.Find(id)).State = System.Data.EntityState.Deleted;
          databaseContext.SaveChanges();
      }

      return RedirectToAction("Index");
  }
  catch
  {
      return View();
  }
}

Here I have done something different then editing stuff to demonstrate the feature of Entity framework. You can also use Id for finding the current customer and then change its state to delete and SaveChanges will save that to in database. So now we are done with delete also. It’s now time to create details part. So same as above I have create a view with scaffold template details with customer model like following.

DetailView

Once we are done with creating view . It’s time to change the code for Details Action Result like following to return current customer detail.

public ActionResult Details(int id)
{
  using (var databaseContext = new Models.MyDataContext())
  {
      return View(databaseContext.Customer.Find(id));
  }
}

So that's it. We are done with all the stuff. So with Entity Framework code first. You can create basic CRUD application within 30 minutes without writing so much code. Hope you liked it. Stay tuned for more.. Till that Happy programming.

Shout it

kick it on DotNetKicks.com
Share:

Support this blog-Buy me a coffee

Buy me a coffeeBuy me a coffee
Search This Blog
Subscribe to my blog


My Mvp Profile
Follow us on facebook
Blog Archive
Total Pageviews