Showing posts with label ASP.NET. Show all posts
Sunday, December 11, 2011

Easy URL routing in ASP.NET 4.0 web forms

In this post I am going to explain URL routing in greater details. This post will contain basic of URL routing and will explain how we can do URL routing in fewer lines of code.

Why we need URL routing ?

Let’s consider a simpler scenario we want to display a customer details on a ASP.NET Page so how our page will know that for which customer we need to display details? The simplest way of doing is to use query string we will pass a customer id which uniquely identifies customer in  query string. So our url will look like this.
Customer.aspx?Id=1
This will work but the problem with above URL is that its not user friendly and search engine friendly. who is going to remember that what query string parameter I am going to pass and why we need that parameter. Also when search engine will crawl this site it will going to read this URL blindly as this url is not informative because it query string is not readable for search engine crawlers. So your search engine will be ranked lower as this URL is not readable to search engine crawlers.Now when do a URL routing our URL will be cleaner shorter and simpler like this.
Customers/Id/1/
Here anybody in world can understand it talking about customer and this page will used to show customer details.Even search engine crawler will also know that you are talking about customers. That is why we need URL routing.

URL routing and ASP.NET

In earlier versions of ASP.NET we have to write lots of code for URL routing but Now with ASP.NET 4.0 you can easily route in fewer lines of code.

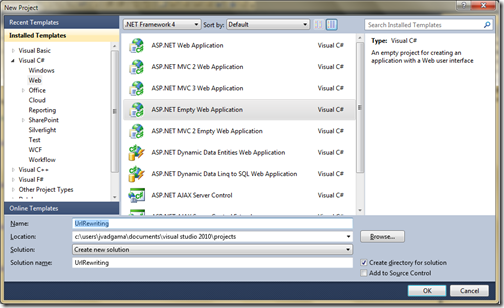
So let’s start a Demo where I will demonstrate you how we can easily route URLs. So let’s first create a ASP. NET web form application via File->New->Project and a dialog box will open just like below and then created a empty project called URL rewriting.

Add new project for URL rewriting in asp.net 4.0

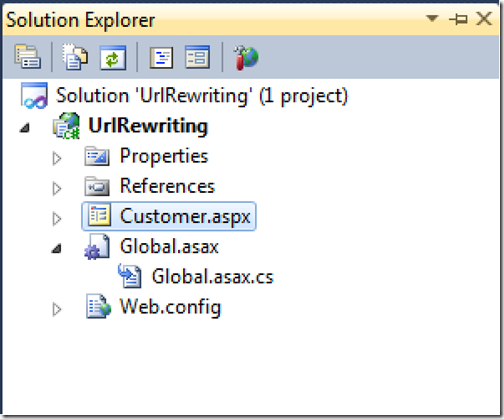
After creating a project I have added global.asax – where we are going to write url mapping logic and then I have added an asp.net page called which will display customer information just like below.

Project for URL rewriting in asp.net 4.0

So everything is now ready let’s start writing code. First thing we need to do is to define routes. Route will map a URL to physical page.First I will create static function called Register route which map route to particular file and then I am going to call this from application_start event of global.asax. Following is code for that.

using System;
using System.Web.Routing;

namespace UrlRewriting
{
public class Global : System.Web.HttpApplication
{

protected void Application_Start(object sender, EventArgs e)
{
RegisterRoutes(RouteTable.Routes);
}

public static void RegisterRoutes(RouteCollection routeCollection)
{
routeCollection.MapPageRoute("RouteForCustomer", "Customer/{Id}", "~/Customer.aspx");
}

}
}


Now as mapping code has been done let’s right code for customer.aspx page. I have have following code in page_load event of customer.aspx

using System;

namespace UrlRewriting
{
public partial class Customer : System.Web.UI.Page
{
protected void Page_Load(object sender, EventArgs e)
{
string id = Page.RouteData.Values["Id"].ToString();

Response.Write("<h1>Customer Details page</h1>");
Response.Write(string.Format("Displaying information for customer : {0}",id));

}
}
}


Here in above code you can see that I am getting value from page route data and then just printing it. In real world it will fetch customer data from database and show customer details on page.

Now let’s run that application. It will print a details of customer as I have passed Id in URL suppose you pass 1 as id in URL then it will look like following.
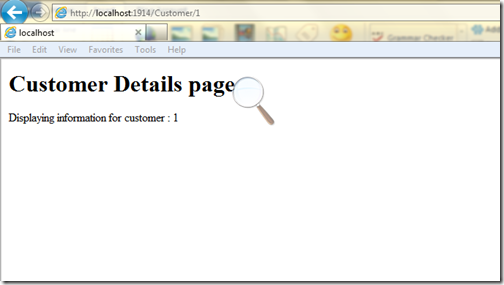
Customer details via URL rewriting in asp.net 4.0

Now if you put 2 in url it will print information about customer 2.

Customer two details via URL rewriting in asp.net 4.0

That’s it. So we have enabled URL routing in asp.net in fewer lines of code. In next post I am going to explain redirection with URL routing.

Hope you like this post. Stay tuned for more.. Till then Happy programming
Share:
Saturday, October 8, 2011

NuGet with multiple projects part-2

Before some days I have posted one post about how we can add NuGet package other than start project. In this post I am going to explain another way of doing that.

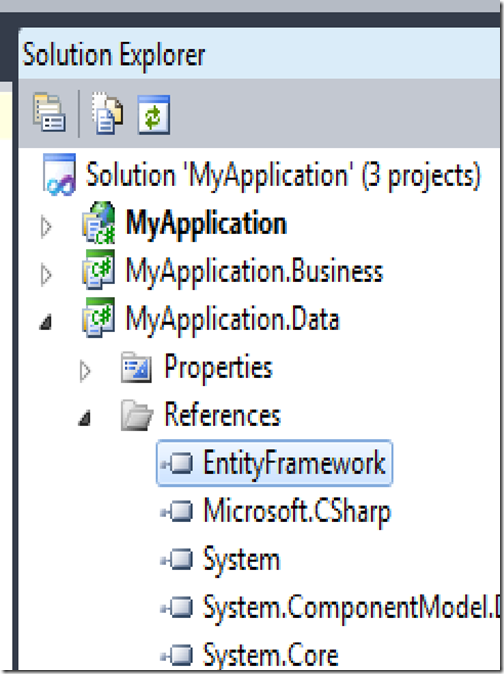
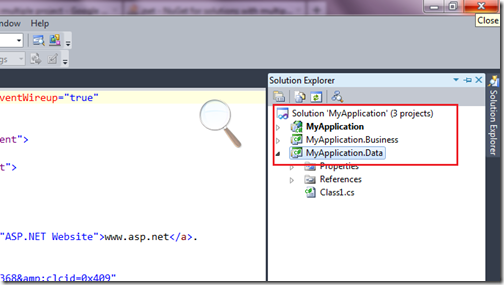
Earlier we have use ‘Manage NuGet Package’. Today I am going to use Package Manager Console for that. So let’s take same example which we have used in the earlier post. I have a sample application which have three projects.

MyApplication- Nuget with multiple projects. www.dotnetjalps.com

As you can see in above post there are three projects.
  1. MyApplication-Main Web application project
  2. MyApplication.Business- This project has business logic classes for application
  3. MyApplication.Data- This project has database access layer classes for application
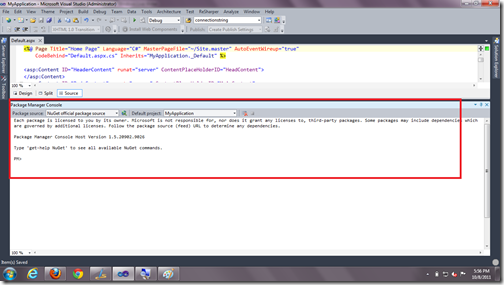
Now I want to add Entity Framework MyApplication.Data Project. As we have to use Package Manager Console. We need to open package manager console you have click Tools->Library Package Manager –>Package Manager Console. Once you click that it will open a console in visual studio like following

.
PackageManagerConsole

Now as I have to type following command in NuGet Package Manager Console to install EntityFramework Package to MyApplication.Data project

Get-Project MyApplication.Data | Install-Package EntityFramework

Here in above command Get-Project will get the project where we have to install the project and Install-Package will install the required package. As you can see entityframework reference added in MyApplication.Data Project in below image.

EntityFrameworkReference

That’s it. Hope you like it. Stay tuned for more.. Till then Happy programming
Namaste!!
Share:
Thursday, September 8, 2011

Jquery and ASP.NET- Set and Get Value of Server control

Yesterday one of my reader asked me one question that How can I set or get values from Jquery of server side element for example. So I decided to write blog post for this. This blog post is for all this people who are learning Jquery and don’t know how to set or get value for a server like ASP.NET Textbox. I know most of people know about it as Jquery is very popular browser JavaScript framework. I believe jquery as framework because it’s a single file which has lots of functionality.

For this I am going to take one simple example asp.net page which contain two textboxes txtName and txtCopyName and button called copyname. On click of that button it will get the value from txtName textbox and set value of another box. So following is HTML for this.

<%@ Page Language="C#" AutoEventWireup="true" CodeBehind="Index.aspx.cs" Inherits="Experiment.Index" %>

<!DOCTYPE html PUBLIC "-//W3C//DTD XHTML 1.0 Transitional//EN" "http://www.w3.org/TR/xhtml1/DTD/xhtml1-transitional.dtd">

<html xmlns="http://www.w3.org/1999/xhtml">
<head runat="server">
    <title></title>
       
</head>
<body>
    <form id="form1" runat="server">
    <div>
            <asp:TextBox ID="txtName" runat="server" />
            <Br />
            <asp:TextBox ID="txtCopyName" runat="server"/>
            <Br />
            <asp:button ID="btnCopyName" runat="server" Text="Copy"  OnClientClick="javascript:CopyName();return false;"/>
    </div>
    </form>
</body>
</html>

As you can see in following code there are two textbox and one button which will call JavaScript function called to CopyName to copy text from one textbox from another textbox.Now we are going to use the Jquery for this. So first we need to include Jquery script file to accomplish the task. So I am going link that jquery.js file in my header section like following.

<head >
    <title></title>
    <script src="http://ajax.aspnetcdn.com/ajax/jquery/jquery-1.6.2.js"></script>  
</head>

Here I have used the ASP.NET Jquery CDN. If you want know more about Jquery CDN you can visit this link.

http://www.asp.net/ajaxlibrary/cdn.ashx

Now it’s time to write query code. Here I have used val function to set and get value for the element. Following is the code for CopyName function.

function CopyName() {
    var name = $("#<%=txtName.ClientID%>").val(); //get value
    $("#<%=txtCopyName.ClientID%>").val(name); //set value
    return false;
}

Here I have used val function of jquery to set and get value. As you can see in the above code, In first statement I have get value in name variable and in another statement it was set to txtCopy textbox. Some people might argue why you have used that ClientID but it’s a good practice to have that because when you use multiple user controls your id and client id will be different. From this I have came to know that there are lots of people still there who does not basic Jquery things so in future I am going to post more post on jquery basics.That’s it. Hope you like it.Stay tuned for more.. Happy programming and Namaste!!
Shout itkick it on DotNetKicks.com
Share:
Saturday, September 3, 2011

www.dotnetjalps.com new domain for personal blog

After more then 4 years of blogging I have decided to migration my personal blog to its own domain http://www.dotnetjalps.com. There are few reasons why I have migrated my blog to new domain.
  1. Custom domain is your own identity. So you can create your brand.
  2. Now all page ranks and All SEO belongs to my custom domain instead of blogger platform.
  3. SEO will be more easy then standard custom domain.
  4. I want to reach more people and its easy with your custom domain
  5. People will share bookmarks with my custom domain. So If I migrated my blog to another plate all things will remain same.
  6. PageRank was increasing with subdomains very slowly. While with custom it will increase faster.
  7. In lots of companies I have seen block blog word with custom domain its will removed. So more people can reach at my blog when they need me.
Here is a great link which inspired me a lot for migrating my blog to http://jalpesh.blogspot.com to http://www.dotnetjalps.com.

Note: I have not change my feeds address for personal blog. So RSS feeds will remain same at- http://feeds.feedburner.com/blogspot/DotNetJalps.

On this opportunity once again I would like thanks my reader and my supporters for making me whatever I am. Without you guys it would not have been possible. You are the real hero for me. So please keep reading my blogs and send me suggestions to make better and better.

One another great news is that DZone people send me a certificate for my DZone MVB. So I would like to take this opportunity to  share with you guys.

DZoneCertificate

That’s it. Please comment your views about my blog. Stay tuned for more..Till then Happy Programming.. Namaste!!!

Shout it
Share:
Wednesday, August 17, 2011

Creating Basic RSS Reader in ASP.NET MVC 3

In this post I am going to explain you how we can create a basic RSS Reader with the help of Linq-To-Xml and ASP.NET MVC3 Razor. Those who are writing or reading Blogs already knows what is RSS Reader. But those who does not know What is RSS. Below is the definition for RSS as per Wikipedia.


RSS (originally RDF Site Summary, often dubbed Really Simple Syndication) is a family of web feed formats used to publish frequently updated works—such as blog entries, news headlines, audio, and video—in a standardized format.[2] An RSS document (which is called a "feed", "web feed",[3] or "channel") includes full or summarized text, plus metadata such as publishing dates and authorship.
 

You can find more information about RSS from the following links.

Now let’s start writing code creating a Basic RSS Reader. So first We need two things to create RSS Reader. A RSS Entity class which hold properties for RSS and Another method which populate IEnumerable of particular RSS Class. We are creating this example with ASP.NET So I have create One Model class called RSS Like following.
using System.Collections.Generic;
using System.Linq;
using System.Xml.Linq;
using System.Text.RegularExpressions;

namespace CodeSimplified.Models
{
public class Rss
{
public string Link { get; set; }
public string Title { get; set; }
public string Description { get; set; }
}
}

Now our entity class is ready. Now we need a class and a method which will return IEnumerable of RSS Class. So I have created a Static Class RSS Reader which has “GetRSSFeed” Method which return RSS Feeds like following.

using System.Collections.Generic;
using System.Linq;
using System.Xml.Linq;
using System.Text.RegularExpressions;

namespace CodeSimplified.Models
{
public class RssReader
{
private static string _blogURL = "http://feeds.feedburner.com/blogspot/DotNetJalps";
public static IEnumerable<Rss> GetRssFeed()
{

   XDocument feedXml = XDocument.Load(_blogURL);
   var feeds = from feed in feedXml.Descendants("item")
               select new Rss
               {
                   Title = feed.Element("title").Value,
                   Link = feed.Element("link").Value,
                   Description = Regex.Match(feed.Element("description").Value, @"^.{1,180}\b(?<!\s)").Value

               };

   return feeds;

}
}
}

As you can see in above code. I am loading RSS feed with XDcoument Class with my Blog RSS feed URL and Then I am populating RSS Class Enumerable with the help of the Linq-To-XML. Now We are ready with Our Model classes so Now it’s time to Add ActionResult in Home Controller. So I have added Action Result which return View with RSS IEnumerable like following.

public ActionResult RssReader()
{
    return View(CodeSimplified.Models.RssReader.GetRssFeed());
}

Now everything is ready. So its time to create a view. So I have created strongly typed view for RSS Model class like following.

@model IEnumerable<CodeSimplified.Models.Rss>
@{
ViewBag.Title = "RssReader";
}

<h2>RssReader</h2>
<p>
@Html.ActionLink("Create New", "Create")
</p>
<table>
<tr>
<th>
   Title
</th>
<th>
   Description
</th>
<th>
   Link
</th>
</tr>

@foreach (var item in Model) {
<tr>
<td>
   <a href="@item.Link" target="_blank">@Html.Encode(item.Title)</a>
</td>
<td>
  @System.Web.HttpUtility.HtmlDecode(item.Description)
</td>
<td>
   <a href="@item.Link" target="_blank">More</a>
</td>
</tr>
}
</table>

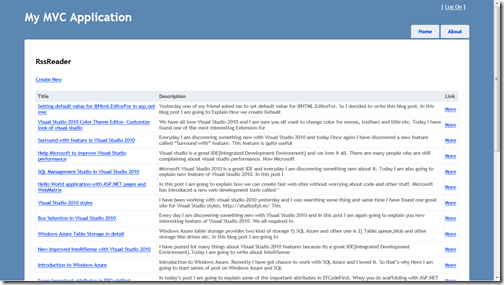
Let's run application via pressing F5 and Following is the output as expected.


RssReader

So that’s it. Isn’t that cool? With the few lines of code we have created a Basic RSS Reader. Hope you like it. Stay tuned for more.. Till then Happy Programming..

Shout itkick it on DotNetKicks.com
Share:
Tuesday, August 16, 2011

Setting default value for @Html.EditorFor in asp.net mvc

Yesterday one of my friend asked me to set default value for @HTML.EditorFor in ASP.NET MVC. So I decided to write this blog post. In this blog post I am going to Explain How we create Default values for model Entities. So Let’s start this via taking a simple example Model class called User. In User Model class I have created two properties UserName and UserJoinedDate. Following is a code for that.
using System;

using System.Collections.Generic;

using System.Linq;

using System.Web;


namespace CodeSimplified.Models

{

public class User

{

    private DateTime _userJoinDate = DateTime.Now;


    public DateTime UserJoinDate

    {

        get

        {

            return _userJoinDate;

        }

        set

        {

            _userJoinDate = value;

        }

    }


    public string UserName

    { get; set; }

}

}
As you can see in above class username is default property while for UserJoinedDate I have used old method of declaring properties. Where I have assigned a private variable with System DateTime.
Now let’s Create a Action Result User in Home Controller like following where I am returning a new User View like following.

using System;

using System.Collections.Generic;

using System.Linq;

using System.Web;

using System.Web.Mvc;


namespace CodeSimplified.Controllers

{

public class HomeController : Controller

{

    public ActionResult Index()

    {

        ViewBag.Message = "Welcome to ASP.NET MVC!";


        return View();

    }


    public ActionResult About()

    {

        return View();

    }


    public ActionResult User()

    { return View(new CodeSimplified.Models.User()); }

}

}

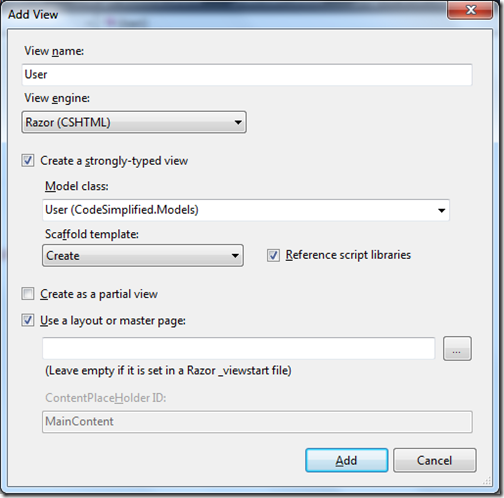
Now Let’s Create User View from the action right click Add view like following. Here I have created Strongly Typed view like following.


User

Once you click Add It will add a new View like following.

@model CodeSimplified.Models.User


@{

ViewBag.Title = "User";

}


<h2>User</h2>


<script src="@Url.Content("~/Scripts/jquery.validate.min.js")" type="text/javascript"></script>

<script src="@Url.Content("~/Scripts/jquery.validate.unobtrusive.min.js")" type="text/javascript"></script>


@using (Html.BeginForm()) {

@Html.ValidationSummary(true)

<fieldset>

    <legend>User</legend>


    <div class="editor-label">

        @Html.LabelFor(model => model.UserJoinDate)

    </div>

    <div class="editor-field">

        @Html.EditorFor(model => model.UserJoinDate)

        @Html.ValidationMessageFor(model => model.UserJoinDate)

    </div>


    <div class="editor-label">

        @Html.LabelFor(model => model.UserName)

    </div>

    <div class="editor-field">

        @Html.te

        @Html.EditorFor(model => model.UserName)

        @Html.ValidationMessageFor(model => model.UserName)

    </div>


    <p>

        <input type="submit" value="Create" />

    </p>

</fieldset>

}


<div>

@Html.ActionLink("Back to List", "Index")

</div>


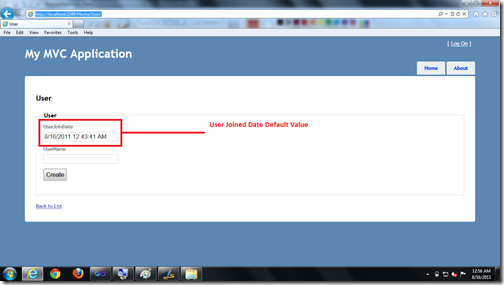
Now everything is ready so Let's run that in browser. Following is the output as expected.

Browser

So that’s it. It’s very easy. Hope you liked it. Stay tuned for more.. Till then happy programming.

Shout itkick it on DotNetKicks.com
Share:
Saturday, August 13, 2011

Visual Studio 2010 Color Theme Editor- Customize look of visual studio

We have all love Visual Studio 2010 and I am sure you all want to change color for menus, toolbars and title etc. Today I have found one of the most interesting Extension for Visual studio 2010 from which you can manage all this things. Don’t believe me I’m sure you won’t believe but this reality and You can change the look of your favorite visual studio look and feel. There is a new extension called “Visual Studio Color Theme Editor” from which you can do all this stuff. Here is the link for that.

http://visualstudiogallery.msdn.microsoft.com/20cd93a2-c435-4d00-a797-499f16402378

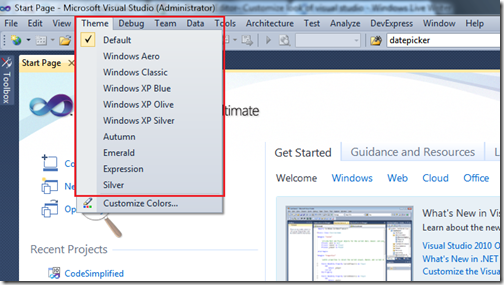
Once you download and install this link a Theme Menu will be added to Visual Studio like following.

ThemeMenu

There are 8 themes provided by the Default. You can choose any one of them. Lets choose Emerald theme for visual studio and It will look like following.

EmerlandThemeForVisualStudio

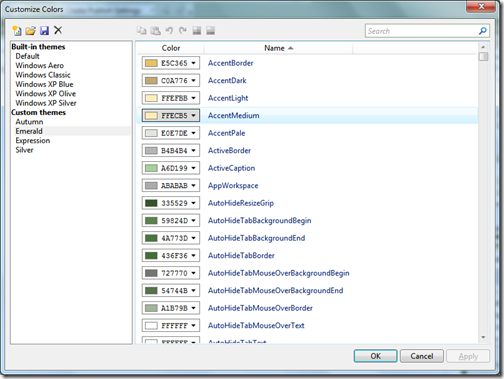
Isn’t that great?. Even you can also design your own theme also. Click on Theme->Customize colors and then It will popup a dialog like following. where you can will get lots of things for which you can customize the color.


CustomisedColorDialogForVisualStudio

Isn’t that Great. Hoped You liked it. Stay tuned for more..Till then happy programming..


Shout itkick it on DotNetKicks.com
Share:
Tuesday, August 2, 2011

Surround with feature in Visual Studio 2010

Everyday I am discovering something new with Visual Studio 2010 and today Once again I have discovered a new feature called “Surround with” feature. This feature is quite useful when you have very big HTML element and You want to surround it some HTML or ASP.NET element i.e. Suppose there is one very big div there and you want to add update panel for Ajax . So let’s take a Simple Example over there. I am having a div which contain very big HTML in it. Like following.

<div>

 Very big HTML here.

</div>

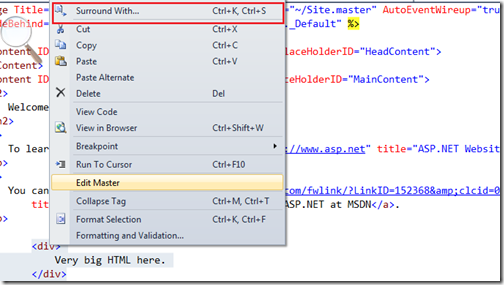
Now let's put that div into update panel with Surround with feature. You can right click and click Surround With or You can directly have shortcut Ctrl+k, Ctrl +S like following.

SurroundMenu

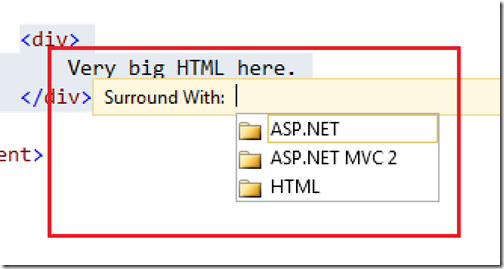
Now once you click it It will popup three things. 1) ASP.NET 2) ASP.NET MVC 2 and 3) HTML. You can select element of any of that like following.

SurroundPopup

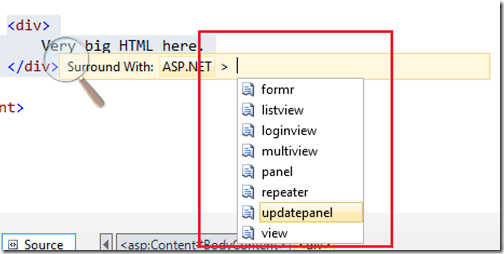
I am going select ASP.NET as we want to put Update panel over there. Once you click ASP.NET It will popup elements of asp.net. Here I have selected update panel as I want to put update panel covering this div like following.

UpdatePanel

Now once you click update panel it will put Update panel and div will be in content template of Update panel. Now our code will like following.

<asp:UpdatePanel runat="server">

 <ContentTemplate>

     <div>

         Very big HTML here.

     </div>

 </ContentTemplate>

</asp:UpdatePanel>

That's it. Isn't that cool?.Isn't visual studio 2010 is a great IDE? Hope you like it. Stay tuned for more.. Till then Happy Programming..

Shout itkick it on DotNetKicks.com
Share:
Monday, July 25, 2011

Hello World application with ASP.NET pages and WebMatrix

In this post I am going to explain how we can create fast web sites without worrying about code and other stuff. Microsoft has introduced a new web development tools called ‘WebMatrix’. It’s a free tool provided by Microsoft to create website fast.

What is WebMatrix?

Web Matrix is a free tool provided by Microsoft for website development. You can develop websites lightening fast with the help of Microsoft Web Matrix. It includes IIS express(express version of IIS) and SQL Server Compact (Compact edition of SQL Server database). It also contains lots of popular web application templates like wordpress ,blogengine etc. You can also create dynamic web pages with WebMatrix. Here is the link from where you can download WebMatrix.

http://go.microsoft.com/fwlink/?LinkID=205867

What is asp.net Pages?


ASP.NET pages are one of easiest way to create websites pages. You can use Razor and all other syntax to create webpages. You can write script tag to write dynamic code and you can also write HTML in same page.

Creating Hello World application with WebMatrix


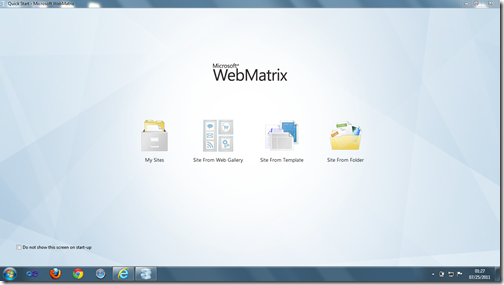
Now let’s create a very basic Hello World application without writing any dynamic code. So let’s first open WebMatrix and it will show start up page like following.


WebMatrix

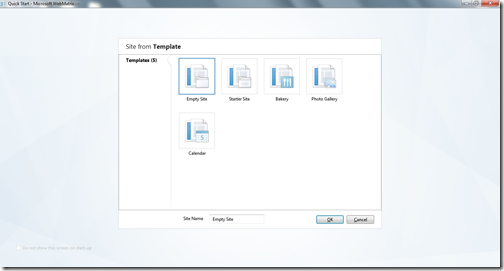
Here you will have four options My Sites, Site from Open Source Gallery, Sites from Template and Site from folder. I want to create a new site so I have clicked on Site from template. Once you click on that you will be presented to Site from template dialog where you have different options like Empty Site,Starter site,Bakery etc. like following.

EmptySite

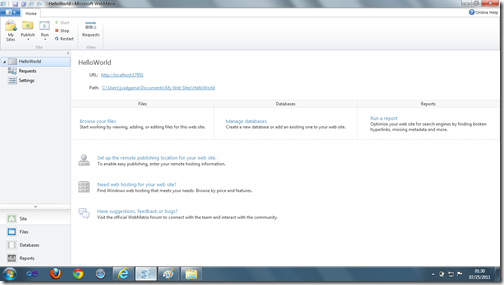
As I want to create a very basic site so I have clicked Empty site.Once you click on empty site your site will be created and you will presented to following screen.

SiteStructure

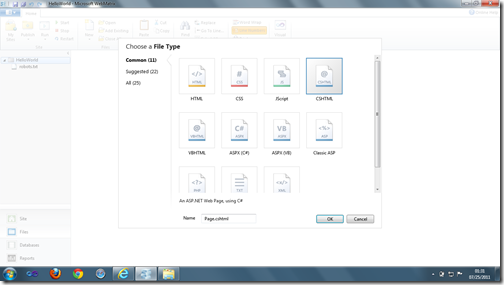
Now its time to create new page for the site. So I have clicked File->New Pages and you will be presented to page dialog like following where different options are available like HTML,CSS,Jscript,CHTML etc.

CSHTML

I have selected CSHTML as I want to have my site dynamic so I have one page called default.cshtml and then I have written Hello world HTML like following.

<!DOCTYPE html>

<html lang="en">

   <head>

       <meta charset="utf-8" />

       <title></title>

   </head>

   <body>

       <h1>Hello World</h1>

   </body>

</html>

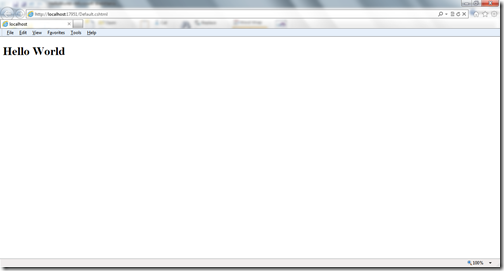
Now let's run site in browser and following is the output.

HelloWorld

That’s it. It’s so easy. In future post I am going to write some dynamic code using Microsoft Web Matrix.Hope you like it..Stay tuned for more.. Till than happy programming..

kick it on DotNetKicks.comShout it
Share:
Wednesday, June 15, 2011

Maintaining Browser History for Ajax events through script manager in asp.net

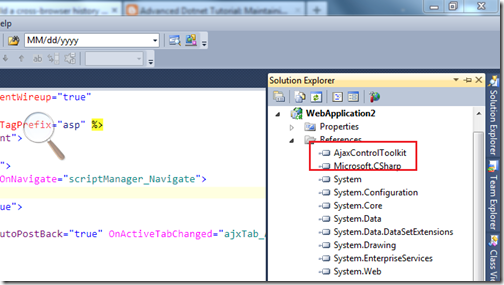
In one of our project we have requirement of maintaining history of Ajax events. After doing some search on the web I have found one interesting capabilities of Script Manager control. I have found that there is one property called “EnableHistory” which will enable history for all the Ajax Event for which you have created the History Point. So Let’s first take a simple example with Ajax Tab and we are maintaining history of tab Navigation. To add the Ajax tab we first need the AjaxToolKit. So I have download the AjaxToolKit and Added Reference to my project like below.

Reference

Once I have done with adding reference I have written some asp.net HTML code to create Three tab and Also added a script manager like following which Enable history =”true” property and Navigate event. Like following.

<%@ Page Title="Home Page" Language="C#" MasterPageFile="~/Site.master" AutoEventWireup="true"
 CodeBehind="Default.aspx.cs" Inherits="WebApplication2._Default" %>
 <%@ Register Assembly="AjaxControlToolkit" Namespace="AjaxControlToolkit" TagPrefix="asp" %>
<asp:Content ID="HeaderContent" runat="server" ContentPlaceHolderID="HeadContent">
</asp:Content>
<asp:Content ID="BodyContent" runat="server" ContentPlaceHolderID="MainContent">
 <asp:ScriptManager id="scriptManager" runat="server" EnableHistory="true" OnNavigate="scriptManager_Navigate">
 </asp:ScriptManager>
 <asp:UpdatePanel ID="updatePanelTab" runat="server" ChildrenAsTriggers="true">
     <ContentTemplate>
         <asp:TabContainer ID="ajxTab" runat="server" ActiveTabIndex="0"  AutoPostBack="true" OnActiveTabChanged="ajxTab_ActiveTabChanged">
 <asp:TabPanel ID="homTab" runat="server" HeaderText="home" >
                     <ContentTemplate>
                         Home
                     </ContentTemplate>
 </asp:TabPanel>
  <asp:TabPanel ID="aboutUsTab" runat="server" HeaderText="About us" >
                     <ContentTemplate>
                         About Us
                     </ContentTemplate>
 </asp:TabPanel>
  <asp:TabPanel ID="contactUsTab" runat="server" HeaderText="Contact us" >
                     <ContentTemplate>
                         Contact us
                     </ContentTemplate>
 </asp:TabPanel>
 </asp:TabContainer>
     </ContentTemplate>
 </asp:UpdatePanel>

</asp:Content>

Here in the above Code I have created Three tabs Home,About us and Contact us and I have putted that in update panel and Also I have enabled “Autopostback” to true so whenever tab will be changed it will post back the page. So now let us do the server side part. Here I have written code in two events. First one is from the script manager navigate event which will fire when we navigate pages thorough browser history and another one is the ActiveTabChanged event which will fire when we change Tab. In Script manager navigate I have written code to select tab based on the state from navigate event. In ActiveTabchanged event I have written code to create navigation history point which will register that in browser history. Following is the code for that.

using System;
using System.Web.UI;

namespace WebApplication2
{
 public partial class _Default : System.Web.UI.Page
 {
     protected void scriptManager_Navigate(object sender, HistoryEventArgs e)
     {
         string state = e.State["historyPoint"];
         ajxTab.ActiveTabIndex = Convert.ToInt32(state);
     }

     protected void ajxTab_ActiveTabChanged(object sender, EventArgs e)
     {
        if(scriptManager.IsInAsyncPostBack && !scriptManager.IsNavigating)
        {
            scriptManager.AddHistoryPoint("historyPoint",ajxTab.ActiveTabIndex.ToString(),ajxTab.ActiveTab.HeaderText);
        }
     }
 }
}
So code is completed now lets run the application and Check it in browser. It will be loaded like below.
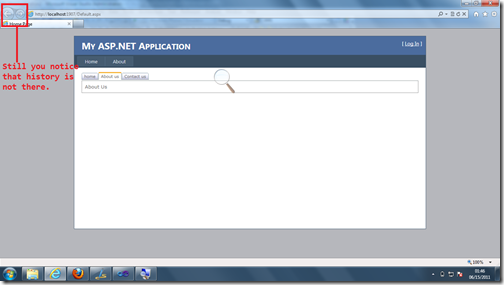
WithoutHistory

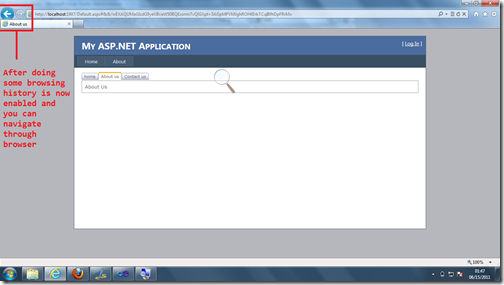
Now once you browse page with some tab you can see history is enabled in browser and you can go back and forward with browser navigations like following.

AfterHistory

So that’s it. Isn’t that cool? Stay tuned for more.. Hope you liked it. Till that Happy programming.

Shout it
kick it on DotNetKicks.com
Share:
Thursday, June 9, 2011

Finding Saturday,Sunday between date range in C#/ASP.NET

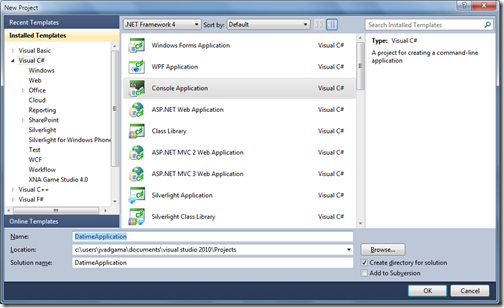
I know this post will sound basic to some of the people. But yesterday one of my reader asked me this question. So I decided to write this blog post . So lets first create a console application which will find the Saturday,Sunday between two dates just like following.

DateTimeConsoleApplication

Once you are ready with Console application. You need to write following code in that to find and print Saturday and Sunday between particular date range.

using System;

namespace DatimeApplication
{
   class Program
   {
       static void Main(string[] args)
       {
             DateTime startDate=new DateTime(2011,3,1);
             DateTime endDate = DateTime.Now;

             TimeSpan diff = endDate - startDate;
             int days = diff.Days;
             for (var i = 0; i <= days; i++)
             {
                 var testDate = startDate.AddDays(i);
                 switch (testDate.DayOfWeek)
                 {
                     case DayOfWeek.Saturday:
                     case DayOfWeek.Sunday:
                         Console.WriteLine(testDate.ToShortDateString());
                         break;
                 }
             }
           Console.ReadLine();
       }
   }
}
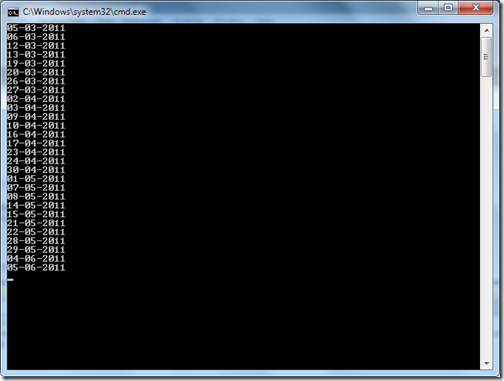
As you can see in above code I am finding Saturday and Sunday between 1st March 2011 and today. So I have taken two variables called startDate and endDate. After that I have got difference between them and then via for loop I am checking that day of week is Saturday or Sunday then I am printing that. Now lets run the application and lets check browser and Here you can see below output as expected.

Output

So as you can see it is very Easy. You can find any weekday that way. Hope you liked it. Stay tuned for more..

Shout it

kick it on DotNetKicks.com
Share:
Thursday, May 19, 2011

Insert with Dapper Micro ORM and ASP.NET MVC 3

As I have already posted about the how to fetch data in my earlier post for Dapper ORM. In this post I am going to explain how we can insert data with the dapper ORM. So let’s extend the earlier post project. As explained in earlier post I have already created a class called CustomerDB this class will contains all the operation with Dapper Micro ORM. So For inserting data let’s first create CREATE method like following in CutomerDB Class like following. In that I have create a simple Insert Query in string and then using connection.execute method to execute method. Following is code for that.
public class CustomerDB
{
  public string Connectionstring = @"Data Source=DotNetJalps\SQLExpress;Initial Catalog=CodeBase;Integrated Security=True";

  public IEnumerable<Customer> GetCustomers()
  {
      using (System.Data.SqlClient.SqlConnection sqlConnection = new System.Data.SqlClient.SqlConnection(Connectionstring))
      {
          sqlConnection.Open();
          var customer = sqlConnection.Query<Customer>("Select * from Customer");
          return customer;

      }
  }

   
  public string  Create(Customer customerEntity)
  {
      try
      {
          using (System.Data.SqlClient.SqlConnection sqlConnection = new System.Data.SqlClient.SqlConnection(Connectionstring))
          {
              sqlConnection.Open();
           
              string sqlQuery = "INSERT INTO [dbo].[Customer]([FirstName],[LastName],[Address],[City]) VALUES (@FirstName,@LastName,@Address,@City)";
              sqlConnection.Execute(sqlQuery,
                                    new
                                        {
                                            customerEntity.FirstName,
                                            customerEntity.LastName,
                                            customerEntity.Address,
                                            customerEntity.City
                                        });

              sqlConnection.Execute(sqlQuery);
              sqlConnection.Close();

          }
          return "Created";
      }
      catch (Exception ex)
      {
          return ex.Message;
      }

  }

}
Now we are ready with Create Method for database now let’s create two ActionResult for the Creating customer like following in Customer Controller like following.
public ActionResult Create()
{
return View();
}

//
// POST: /Customer/Create

[HttpPost]
public ActionResult Create(Customer customer)
{
try
{
    // TODO: Add insert logic here
    var customerEntities = new CustomerDB();
    customerEntities.Create(customer);
    return RedirectToAction("Index");
}
catch
{
    return View();
}
}
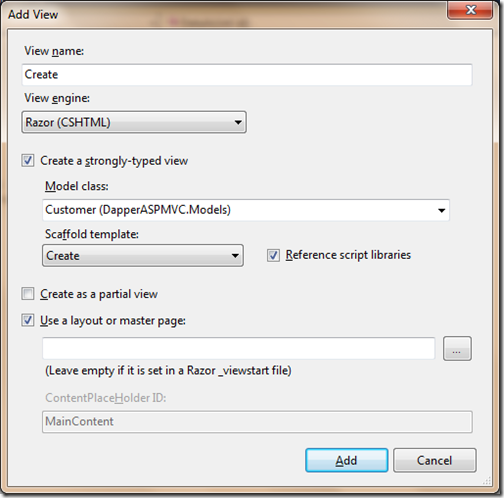
Now we are ready with the both ActionResult. First ActionResult will return simple view of Create which we are going to create now and another ActionResult Create will get customer object from the form submitted and will call our create method of CustomerDB Class. Now it’s time to create a view for adding customer. Right Click return view Statement in Create Action Result and Click Add View and Just Create view like following.

CreateView
That’s it now we are ready. Now let’s test it in browser. Like following.

AddNew
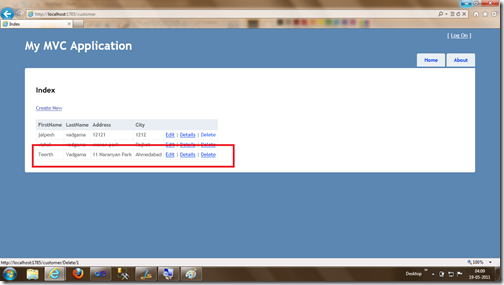
Now let’s click and create and then it will redirect us to customer list page like following. Where you can see the newly added details.

View
So that’s it. Its very easy to Insert data with Dapper Micro ORM. Hope you like it…Stat tuned for more.

Note: For reference of this post you can also see my first post called -Playing with dapper Micro ORM and ASP.NET MVC 3.0.
kick it on DotNetKicks.com
Shout it
Share:
Monday, May 16, 2011

Playing with dapper Micro ORM and ASP.NET MVC 3.0

Some time ago Sam Saffron a lead developer from stackoverflow.com has made dapper micro ORM open source. This micro orm is specially developed for stackovewflow.com for keeping performance in mind. It’s very good single file which contains some cool functions which you can directly use in your browser. So I have decided to have a look into it. You can download dapper code from the following location it’s a single static class file called SQLMapper.

http://code.google.com/p/dapper-dot-net/

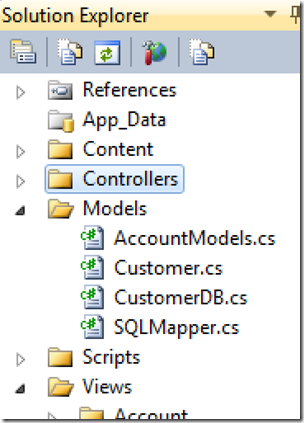
So once you download that file you can use that file into your project. So I have decided to create a sample application with asp.net mvc3. So I have created a simple asp.net mvc 3 project called DapperMVC. Now let’s first add that SQLMapper class file into our project at Model Folder like following.

SQLMapper

Now let’s first create sample table from which we will fetch the data with the help of dapper file. I have created sample customer table with following script.

SET ANSI_NULLS ON
GO

SET QUOTED_IDENTIFIER ON
GO

CREATE TABLE [dbo].[Customer](
 [CustomerId] [int] NOT NULL,
 [FirstName] [nvarchar](50) NULL,
 [LastName] [nvarchar](50) NULL,
 [Address] [nvarchar](256) NULL,
 [City] [nvarchar](50) NULL,
CONSTRAINT [PK_Customer] PRIMARY KEY CLUSTERED
(
 [CustomerId] ASC
)WITH (PAD_INDEX  = OFF, STATISTICS_NORECOMPUTE  = OFF, IGNORE_DUP_KEY = OFF, ALLOW_ROW_LOCKS  = ON, ALLOW_PAGE_LOCKS  = ON) ON [PRIMARY]
) ON [PRIMARY]

GO

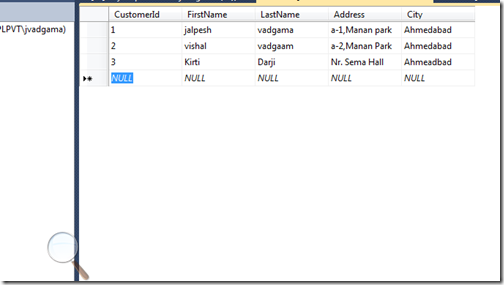
Once I have created table I have populated some test data like following.

TestData

Now we are ready with database table Now its time to add a customer entity class. So I have created sample customer class with properties same as Database columns like following.

public class Customer
{
 public int CustomerId { get; set; }
 public string FirstName { get; set; }
 public string LastName { get; set; }
 public string Address { get; set; }
 public string City { get; set; }
}

Now we are done with the Customer Entity class then I have created a new class called CustomerDB and a created a GetCustomer Method where I have used Query Method of Dapper to select all customers with ‘select * from customer’ simple query. I know it’s not a best practice to write ‘select * from customer’ but this is just for demo purpose so I have written like this. Query method accepts query as parameter and returns IEnumerable<T> where T is any valid class. In our case it will be Customer which we have just created before. Following is the code for CustomerDB Class.

using System.Collections.Generic;

public class CustomerDB
{
 public string Connectionstring=@"Data Source=DotNetJalps\SQLExpress;Initial Catalog=CodeBase;Integrated Security=True";

 public  IEnumerable<Customer> GetCustomers()
 {
     using (System.Data.SqlClient.SqlConnection sqlConnection = new System.Data.SqlClient.SqlConnection(Connectionstring))
     {
         sqlConnection.Open();
         var customer = sqlConnection.Query<Customer>("Select * from Customer");
         return customer;

     }
 }

}

Now we are ready with our model classes now It’s time to Create a Controller so I have created a Customer Controller like following.

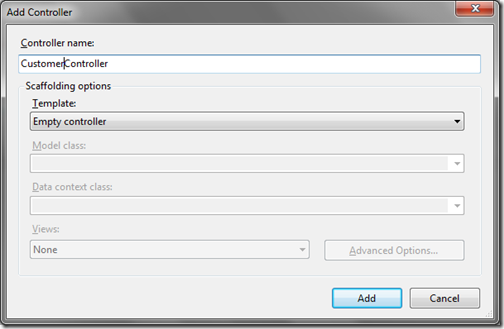
CustomerController

It will create customer controller in controller folder with by default ActionResult Index. I have modified Action Result just like to following to return customerEntities with IndexView.

public class CustomerController : Controller
{
 //
 // GET: /Customer/

 public ActionResult Index()
 {
     var customerEntities = new CustomerDB();
     return View(customerEntities.GetCustomers());

 }

}

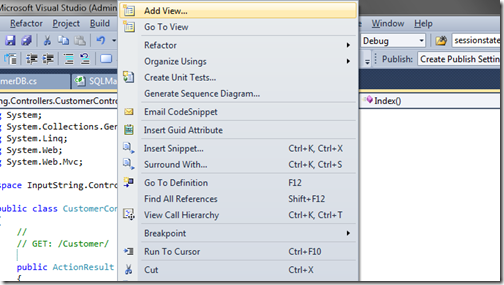
Now we are ready with our Customer Controller and now it’s time to create a view from the customer entities. So I have just right clicked customer entities and Create a View like following.

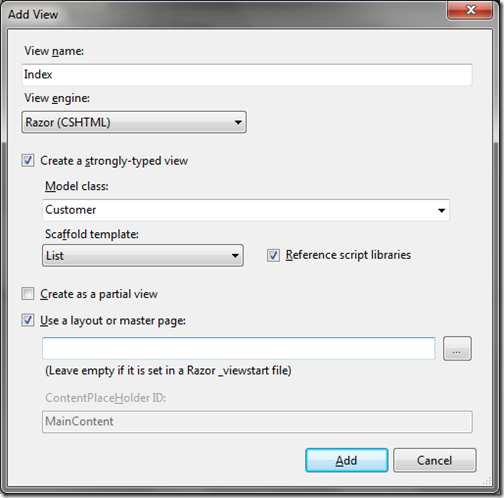
AddingView

It will popup the following dialogbox where I have selected Razor View with Strongly Typed View. Also I have selected Customer Model class customer and selected list template like following.

RazorView

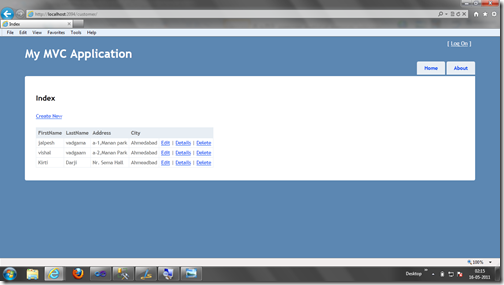
That’s it now we are done with all the coding and It’s now time to run the project and result is as accepted as following.

Browser

That’s it. Isn’t that cool? Hope you liked this. Stay tuned for more.. Happy programming
Shout it

kick it on DotNetKicks.com
Share:

Support this blog-Buy me a coffee

Buy me a coffeeBuy me a coffee
Search This Blog
Subscribe to my blog


My Mvp Profile
Follow us on facebook
Blog Archive
Total Pageviews