Showing posts with label ASP.NET. Show all posts
Friday, May 13, 2011

Nav tag in HTML5

HTML5 is great new version of HTML with great features. I am exploring that in great details for our forthcoming projects. I found a great tag that can be used in all websites for the navigation. <nav> tag defines a area for navigation in whole HTML markup.

The HTML5 specification for nav tag is like following. You can find all the HTML 5 specification here.
The nav element represents a section of a page that links to other pages or to parts within the page: a section with navigation links. Not all groups of links on a page need to be in a nav element only sections that consist of major navigation blocks are appropriate for the nav element. In particular, it is common for footers to have a list of links to various key parts of a site, but the footer element is more appropriate in such cases, and no nav element is necessary for those links.
<nav> tags can be used as navigation area and under it you can put the group of links that will use for navigation of area. For example if you have downloaded the ASP.NET MVC3 tool update with HTML5 then you can see they have defined the navigation area with nav tags like following.

<nav>
   <ul id="menu">
       <li>@Html.ActionLink("Home", "Index", "Home")</li>
       <li>@Html.ActionLink("About", "About", "Home")</li>
   </ul>
</nav>

As you can see in above they putted Home and About link in the navigation. So now its with the nag tag the html mark-up is more readable. Once its loaded in browser it and if you view source it will be populate as groups of link in nav tag like following.


<nav>
               <ul id="menu">
                   <li><a href="/">Home</a></li>
                   <li><a href="/Home/About">About</a></li>
               </ul>
</nav>

So that’s it You can see its very easy to use and now we have very readable and clear markup with HTML5. Stay tuned for more.. Happy Programming.

Shout it

kick it on DotNetKicks.com
Share:

HTML5 Intellisense in Visual Studio 2010/2008

Recently I was playing with HTML5 and I was in need of the HTML5 intellisense in Visual Studio 2010. I found a great extension which will provide me a great intellisense for HTML5. I thought its great to share with you all.  You can download that tool from following link.

http://visualstudiogallery.msdn.microsoft.com/d771cbc8-d60a-40b0-a1d8-f19fc393127d

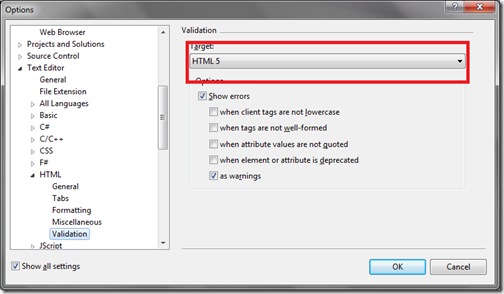
Once you download install it. You need to change your validation to HTML5 in your Visual Studio 2010 configuration. For that you have to go to Tools->Options->Text Editor->HTML->Validation and there you need to select the HTML5 like following.

ToolsForVisualStudio2010

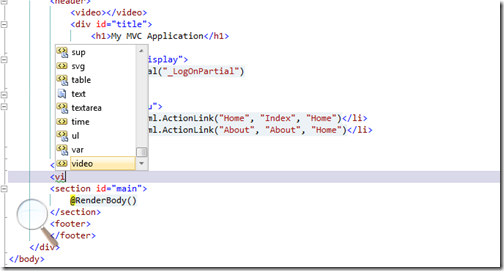
That’s it now your visual studio 2010 or 2008 will have intellisense for HTM5. Just like following.

Intellisense

That’s it. Hope you like it. Stay tuned for more..Happy programming.

Shout it

kick it on DotNetKicks.com
Share:
Monday, April 11, 2011

New search feature Navigate To in Visual Studio 2010

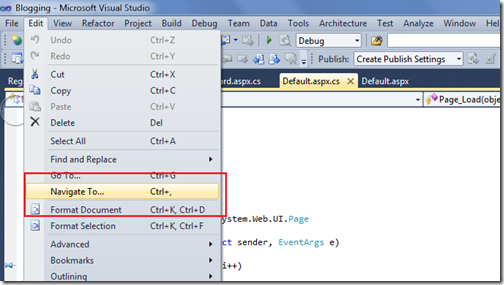
While you are doing code review then it is very necessary to search code and navigate code what you are reviewing and Navigate To feature of Visual Studio 2010 is made for the same. With the help of that feature you can easily navigate through code. You can go to Navigate Window via Edit-> Navigate To or you can directly apply Ctrl + , like following.

NavigateTo

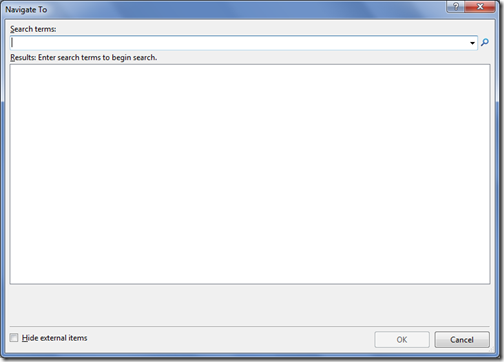
After clicking on Navigate Too a window will open like following.

NavigateToWindow

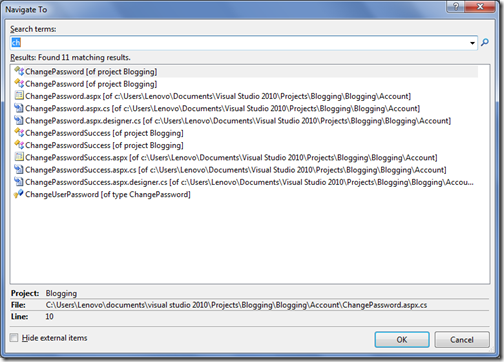
Now you can navigate to any code with this window like following.It’s a incremental search so once you started typing it will automatically filter it self.

NavigateToSearch

So If you know the method name and anything related to project then it very easy to search with this feature. Hope you liked it. Stay tuned for more.. Happy Programming.

Shout it

kick it on DotNetKicks.com
Share:
Sunday, April 10, 2011

Pin features while debugging in Visual Studio 2010.

Visual Studio 2010 is one of most awesome tool to debug Microsoft.NET related code. I have found one more interesting feature with the Visual studio 2010. That is called Pin Data Tip feature. This features can be very useful when you are debugging the code with loops. Normally when you debug with the code if you want to know the value of variable then you have to put your cursor on that variable and tool tip will show the values of that variable. The pin feature will pin that tool tip and you don’t have to put mouse over there. Let’s take a simple example to examine that feature. Below is the code for that. I have created a simple for loop and I am printing variable value with Response.Write on asp.net page. Below is the code for that.

using System;
using System.Collections.Generic;
using System.Linq;
using System.Web;
using System.Web.UI;
using System.Web.UI.WebControls;

namespace Blogging
{
  public partial class _Default : System.Web.UI.Page
  {
      protected void Page_Load(object sender, EventArgs e)
      {
          for (int i = 1; i <= 20; i++)
          {
              Response.Write(i.ToString());
          }
       
      }
  }
}

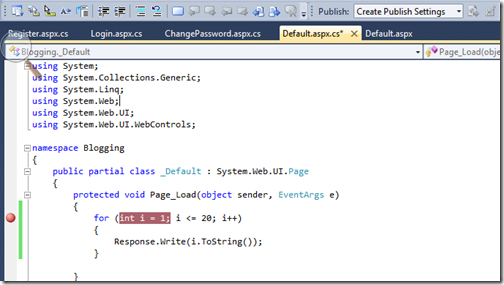
Now let’s put the break point on for loop like following and then start debugging via pressing F5.

BreakPoint

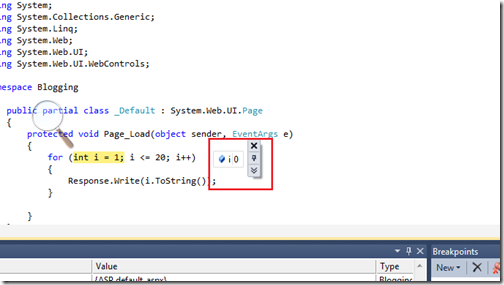
Now I have started debugging and first time code execution came to my break point. Now you can see when I put mouse pointer to that value it will show a variable I value like following.

VaraibleValue

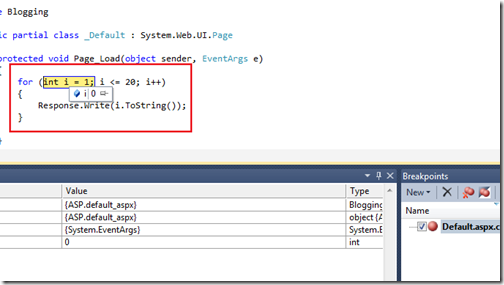
Now as you can see there is one Icon in above code so once you click on that pin Icon that it will pin the DataTip for that variable like following.

Pindatatip

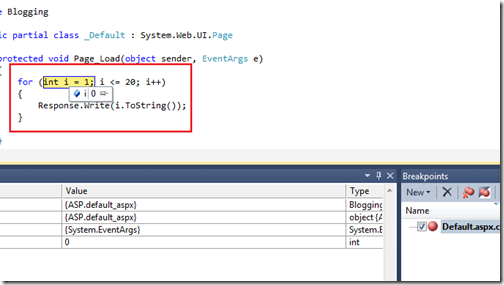
So now whatever you debug in that loop you can see the the value of variable I at any time like following.

VaraibleValue

So that’s it. Now life become easy with this kind of new debugging features of visual studio 2010. Hope you liked it.. Stay tuned for more.. Happy Programming.

Shout it

kick it on DotNetKicks.com
Share:

View Call Hierarchy window in Visual Studio 2010

Visual studio 2010 Ultimate is great IDE(Integrated Development Environment) and I am loving more and more whenever I found some thing new. While doing some Code and Review and other stuff with Visual Studio 2010 I have found one of most interesting feature in Visual Studio 2010 called “Called Hierarchy”.You can navigate your code better with the Call Hierarchy feature in Visual Studio 2010.
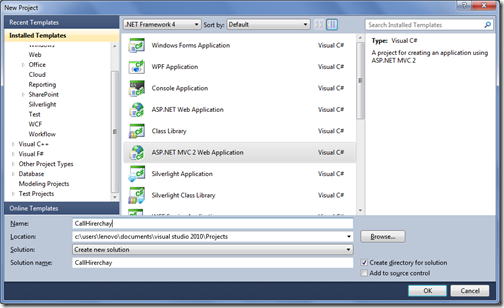
To check out let’s Create a sample asp.net MVC application like following .

CallHirerchay

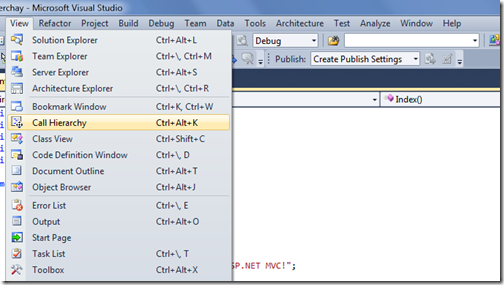
After creating a ASP.NET MVC 2 application it will create a basic simple application and we can run it and We have two views like home and about. We will check few code with Call Hirarchy. We can enable Call hierarchy window with two way one from the View->View Call Hierarchy like following or you can also use the shortcut Ctrl+Alt+K.

CallHirerarchywindow 

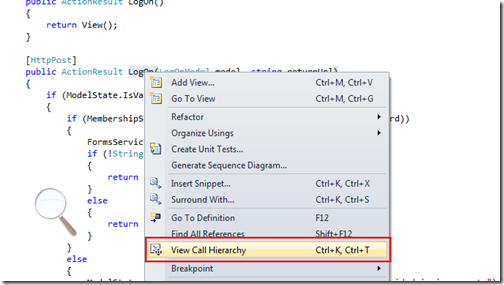
Now lets check the Account Controller-> Logon Action Result with call hierarchy You can also enable call hierarchy with selecting the Logon action and right click –> View Call Hierarchy like following or You can use the Shortcut for that like Ctrl + K,Ctrl + T.

ViewCallHierarchy 

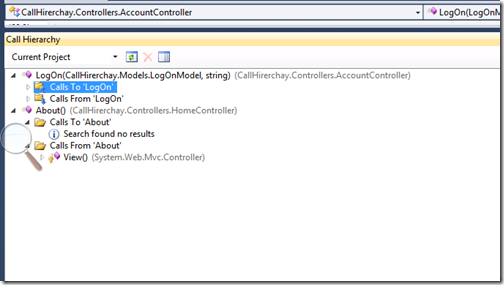
Once you click the call Hierarchy It will open the code that is called logon and also call made from the logon method like below.

CallHierarchayforLogin

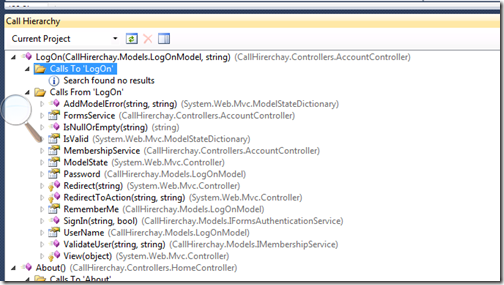
One you expand the both ‘Call To LogOn’ and ‘Calls from LogOn’ you can see all the calls Since there is no call for Logon on asp.net mvc sample application it will say but you can see calls made from it like following.

DetailOfCall

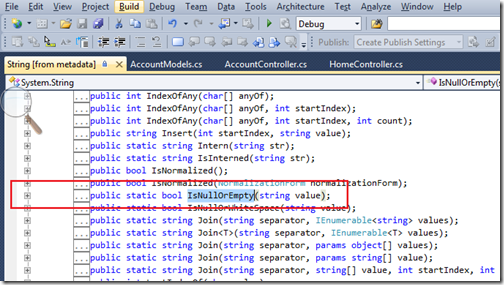
And on double click on any method or property will navigate you that code. Like I have double clicked the IsNullOrEmpty I have navigated to string class with that property.

StringIsnullOrEmpty

That’s it. So you can see its a great way to navigate code for code review and code inspection. Hope you liked it.. Stay tuned for more.. Happy Programming..

Shout it

kick it on DotNetKicks.com
Share:
Saturday, April 9, 2011

Adding labels to breakpoint in visual studio 2010

With visual studio 2010 Microsoft has given a new features called to add/edit label in break point. This features comes very handy when you are having very large code to debug and You are having so many break points to debug. So, You can add the label to various break point and then use this label to understand execution of program. Let’s see how its works with visual studio 2010.

I have written following sample code to understand it better. This is a simple default.aspx page with four method to print a string on web page.

using System;
using System.Collections.Generic;
using System.Linq;
using System.Web;
using System.Web.UI;
using System.Web.UI.WebControls;

namespace Blogging
{
  public partial class _Default : System.Web.UI.Page
  {
      protected void Page_Load(object sender, EventArgs e)
      {
          Method1();
          Method2();
          Method3();
          Method4();
       
      }

      public void Method1()
      {
          Response.Write("Method1");
      }
      public void Method2()
      {
          Response.Write("Method2");
      }
      public void Method3()
      {
          Response.Write("Method4");
      }
      public void Method4()
      {
          Response.Write("Method4");
      }
  }
}

Here you can see there are four methods method 1,2,3 and 4 and each printing respective string with respective methods.

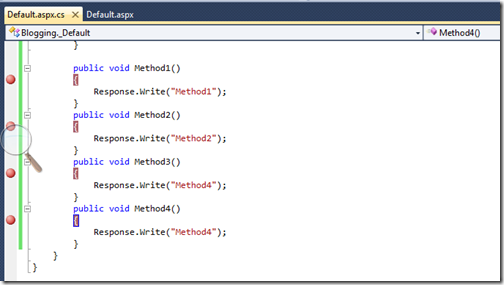
Now Let’s put four break point in visual studio like following.

Four breakpoints with four methods

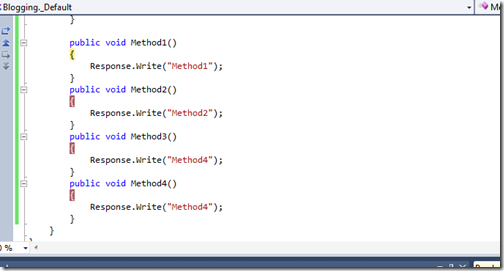
Now let’s debug the web application via pressing F5 and then we will go one by one break point and will add labels. Now I am at first break point.

FirstBreakPoint

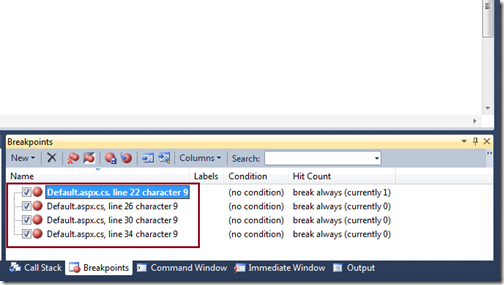
Now when you go to the break point window you can see all the break point over there like following.

BreakPointWindow

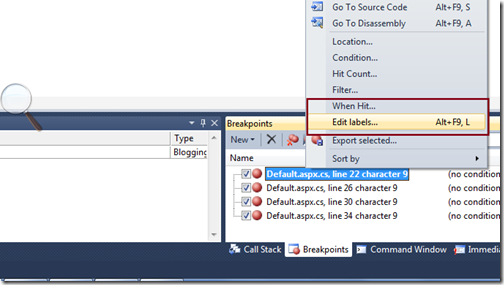
Now let’s Create a new label first for break point via selecting that row and right click edit label like following.

Edit Labels

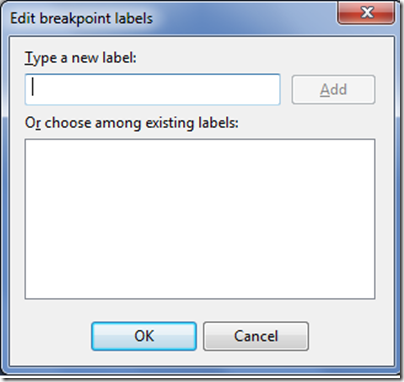
Once you click edit labels a window will appear which will ask for adding a new label for break point like following.

AddLabel

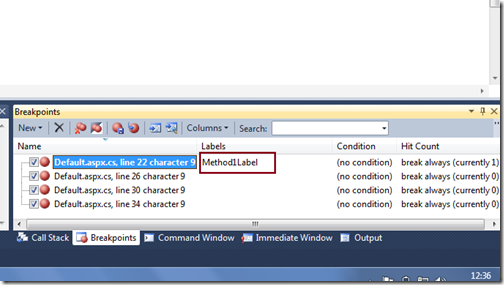
Now I am adding a new label called method1 label in this box.Now you can see the in break point window with a label just like following.

Method1Label

So now you can see the Method 1 Label is there so you need not to check this break point via clicking on that break point. You can remember this break point via clicking on this. That’s it. Hope you like it.. Stay tuned for more.. Happy Programming.

Shout it

kick it on DotNetKicks.com
Share:
Thursday, April 7, 2011

Checking whether page is secure or not in ASP.NET or JavaScript

Recently in one the project we require to check whether page is secure or not as we are going to open a new popup window from that page and that why we need to pass https protocol if we have that page secure. I have search lots of things on internet and I have found following ways of finding whether page is secure or not in ASP.NET or JavaScript.

In ASP.NET There are two way of doing it. Either we can use current request to check whether it is secured or not or we can use server variables to check whether it it secure or not just like following.

HttpContext.Current.Request.IsSecureConnection
Here in above code If this returns true then Page is secured otherwise it is not Or you can use following server variable to check the protocol.
Request.ServerVariables["SERVER_PROTOCOL"];
In JavaScript you can document.location.protocol to check whether page is secure or not. Just like following.
document.location.protocol=='https:'
So you can see its very easy to check whether page is secure or not. Hope you liked it… Stay tuned for more..
Shout it
kick it on DotNetKicks.com
Share:
Tuesday, April 5, 2011

NuGet Version 1.2 released

Someday ago Phil Haack from Microsoft has released the newer version of Nuget. There will be new exe for the newer version of the NuGet. Those who does not know about NuGet please visit my earlier post about NuGet

Followings are some new features of NuGet 1.2.

  1. Framework profile support
  2. Automatically add binary redirects
  3. Specifying Framework Assembly References (GAC)
  4. Nuget.exe is now able to store API key credentials.
  5. Package Explorer
To know about all the features in details please visit following link.

http://nuget.org/announcements/nuget-1.2-released

You can update to this version via following command.

NuGet.exe u


Shout it
kick it on DotNetKicks.com
Share:
Monday, March 28, 2011

My blog post is appearing on Microsoft Official ASP.NET site.

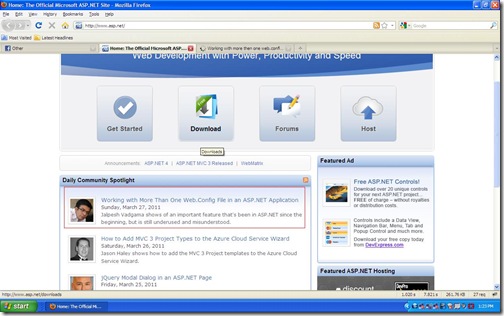
Today I got a surprise from the Microsoft. One of my friend Hajan Informed me that my blog post is appearing on the Microsoft Official asp.net site www.asp.net. This is great surprise and honor for me that my blog post are appearing on Microsoft official site.

MicrosoftASP.NET

I would like to thanks all the peoples who are supporting me and all the people who are their to correct me If I am wrong. Thank you once again!!. I will continue to writing my blogs to serve community and this kind of encouragement give more boost for writing blogs.

Stay tuned for more.. I will keep writing.. Thank you readers..

Technorati Tags: ,
Shout it
Share:
Wednesday, March 23, 2011

Working with more then one web.config files in asp.net application.

Recently one of reader of my blog how we can work with more then one web.config files in asp.net application. So I decided to blog about that. Here is the my reply for that.

You can work with more then one web.config file in asp.net. But you can not put more then one web.config in each folder. Let’s first understand the hierarchy of web.config and other configuration file settings. On the top of the every configuration files you will have machine.config file which will have all system wide configuration settings.You can find this file in your OS drive like C: /windows/Microsoft.NET/vFrameworkNumber/Config folder. Here framework number with what ever framework you are using 1.1/2.0 or 4.0. You can override those settings in web.config file at the your application root folder. Same way you can add more web.config file in subfolder and can override the setting of parent folder web.config file. So we will hierarchy like below.
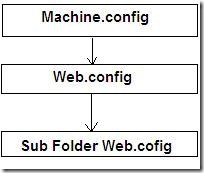
Hirerchay

Now let’s Create Project for it. In that I have create two web.config and 2 pages. First I have putted the web.config in root folder and then I have putted web.config in subfolder. Same way I have created a sub folder and then I have putted the web.config in sub folder. I have also putted one asp.net page in root as well as subfolder to use respective web.config settings. Here are my folder structure like below.
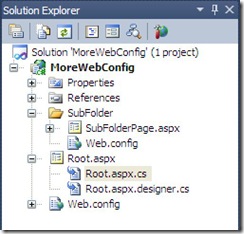
FolderStructure

Below is code for root folder web.config

<?xml version="1.0"?>
<configuration>
<system.web>
<compilation debug="true" targetFramework="4.0" />
</system.web>
<appSettings>
<add key="root" value="This is from root web.config"></add>
<add key="MySetting" value="This my settings is from root web.config"></add>
</appSettings>

</configuration>

and following is code for sub folder web.config.

<?xml version="1.0"?>
<configuration>
<system.web>
</system.web>
<appSettings>
<add key="sub" value="This is from sub web.config settings"></add>
<add key="MySetting" value="This my settings is from sub folder web.config"></add>
</appSettings>
</configuration>


After that I have written a code in root asp.net page to print settings from web.config folder like this following.

using System;
using System.Collections.Generic;
using System.Linq;
using System.Web;
using System.Web.UI;
using System.Web.UI.WebControls;

namespace MoreWebConfig
{
public partial class Root : System.Web.UI.Page
{
protected void Page_Load(object sender, EventArgs e)
{
Response.Write(System.Web.Configuration.WebConfigurationManager.AppSettings.Get("Root"));
Response.Write("<BR>");
Response.Write(System.Web.Configuration.WebConfigurationManager.AppSettings.Get("MySetting"));

}
}
}

Same way I have wrriten code in subfolder like following.

using System;
using System.Collections.Generic;
using System.Linq;
using System.Web;
using System.Web.UI;
using System.Web.UI.WebControls;

namespace MoreWebConfig.SubFolder
{
public partial class SubFolderPage : System.Web.UI.Page
{
protected void Page_Load(object sender, EventArgs e)
{
Response.Write(System.Web.Configuration.WebConfigurationManager.AppSettings.Get("Sub"));
Response.Write("<BR>");
Response.Write(System.Web.Configuration.WebConfigurationManager.AppSettings.Get("MySetting"));

}
}
}

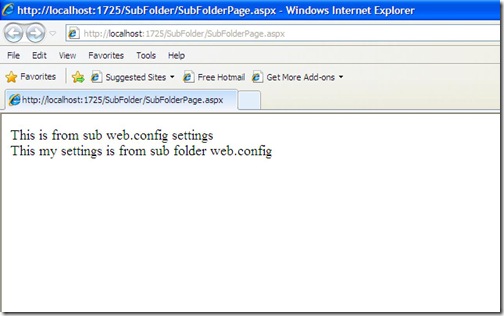
Now let’s run the both pages in browser one by one and you can see root folder application page is fetching settings from root folder web.config while sub folder application page is fetching setting from subfolder web.config even if key ‘mysetting’ is same on both as expected. You can see out put in browser below.

Root.aspx
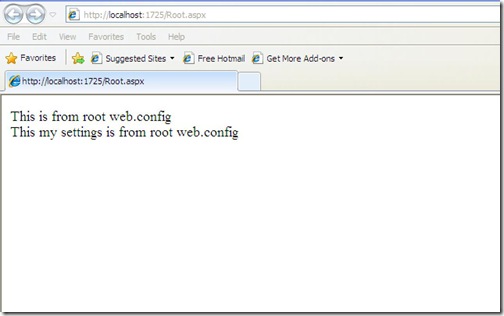
Root

SubFolderPage.aspx

SubFolder

So it’s very easy to work with multiple web.config. The only limitation of this you can not access sub folder web.config settings from root folder page. Except all you can use anything. Hope you liked it. Stay tuned for more..Happy programming..


Technorati Tags: ,
Shout it
kick it on DotNetKicks.com
Share:
Tuesday, January 25, 2011

Installing Nuget package with package manager console step by step overview.

I have already blogged about NuGet in earlier post about how to install NuGet packages to your project with wizard. NuGet Extension also provides an package manager console to add library to your projects. Let’s install a blogml package via package manager console. So if you still not installed NuGet exntension then please read my earlier post here that explains how to install the NuGet Extension.

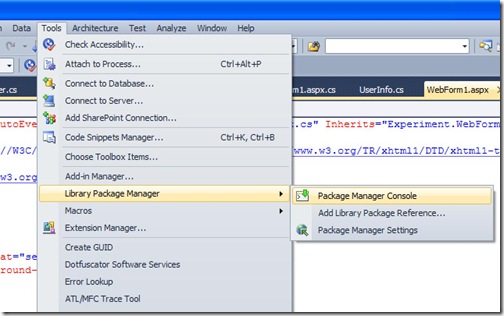
Once you are done with installing NuGet Extension to go to package manager console. You have to click Tools->Library package manager –>Package Manager console like following.

PcakgeManagerConsole

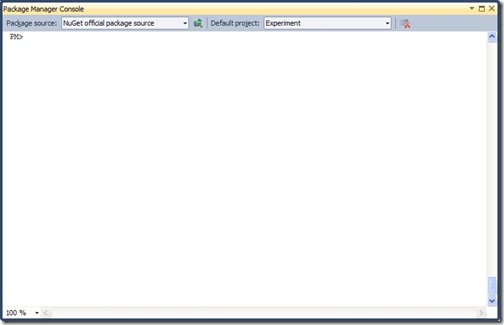
Once you click that menu you will get package manager console like following. PackageManagerConsolewindow

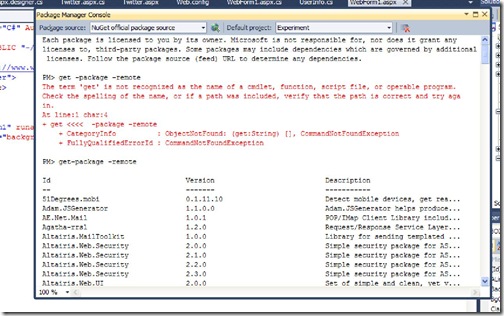
One you load an command line is available to you just need to write command to find packages and then you need to write command to install packages. let’s first see how many packages are available with the NuGet Extension. So first you have to write ‘get-package –remote’ command in command line to see what packages are available as following.

PackageCommand

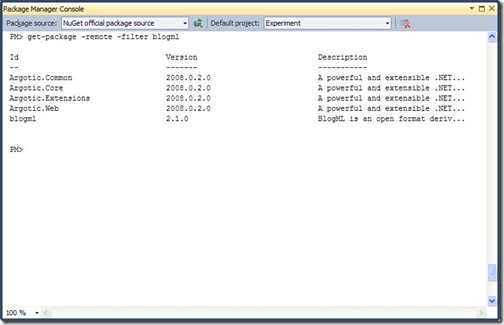
So It will load all the packages available in NuGet Now let’s filter some package via command. Suppose I want to install BlogML library to my project then I have to type ‘get-package –remote filter blogml’ and it will load all the packages that will contain BlogML like following.

FilterBlogML

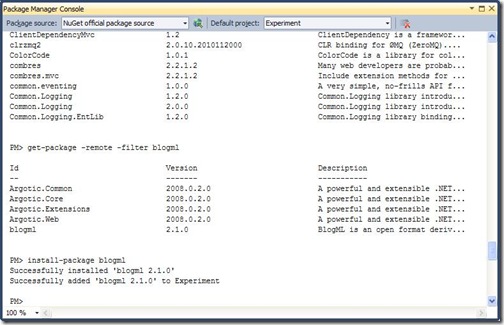
Now let’s install BlogML library to my project for that I have to type ‘install-package blogml’ and it will install the package like following.

InstallingPackage

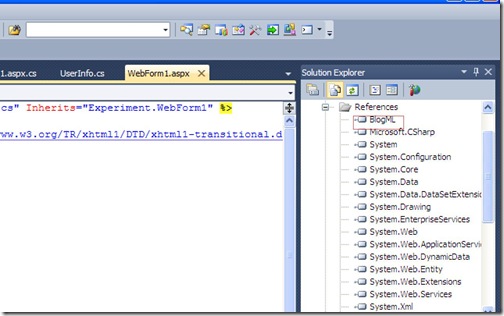
That’s it you can see Now your package is installed on your project and you find it in reference of your project like following.

BlogMLReference

It will also create packages.config and you can see installed packages there like following.

<?xml version="1.0" encoding="utf-8"?>
<packages>
<package id="blogml" version="2.1.0" />
</packages>

So that’s it as you can see its very easy to install NuGet package and its very convenient to install packages with this. Hope this help you. Stay tuned for more… Happy Programming..


Technorati Tags: ,,
Shout it
Share:

Support this blog-Buy me a coffee

Buy me a coffeeBuy me a coffee
Search This Blog
Subscribe to my blog


My Mvp Profile
Follow us on facebook
Blog Archive
Total Pageviews