Thursday, April 10, 2014

Dapper Micro ORM Series

Recently before some time I have created a blog post about list of blog post I have written about Petapoco Micro ORM. So one of the friend suggested I should write same kind of series post about Dapper Micro ORM so that reader of my blog can find the all the posts on same page. So that’s why I writing this blog post.

What is dapper:

Dapper is Micro ORM developed by Sam Saffron few years ago while he was working as lead developer at stack exchange. This ORM was developed specially for Stack Exchange QA sites like stackoverflow.com and superuser.com for the performance improvement. It has got a single file where all the code has been written. You can download dapper Micro ORM from the following location.

http://code.google.com/p/dapper-dot-net/

Dapper Micro ORM related posts on dotnetjalps.com:

Following is a list of post related to dapper Micro ORM that I have written on this blog.

Playing with dapper Micro ORM and ASP.NET MVC 3.0
Insert with Dapper Micro ORM and ASP.NET MVC 3
Edit/Update with dapper ORM and ASP.NET MVC 3
Delete with Dapper ORM and ASP.NET MVC 3

If I write blog post about dapper then I will keep adding into this list. That’s it.

Hope you like it. Stay tuned for more!!
Share:
Saturday, April 5, 2014

Converting a C# Object into JSON string

Some people might think why I am writing so much about basics but the things but in reality  I got lot of questions through email and other communities about very basic things. So I thought instead of replying them into single thread. It is a good idea to write blog post about it and as a result I am writing this blog post.

In this post we are going to learn how we can convert a object into JSON string It is very simple. Let’s first see how we can convert C# Object into JSON string.

Converting a C# object into JSON string:


So to demo this, I have created a employee class like following.

public class Employee
{
    public string FirstName { get; set; }
    public string LastName { get; set; }
}

Now let’s create object of this class and assign some value like following.

Employee employee=new Employee
                    {FirstName = "Jalpesh",
                    LastName = "Vadgama"};

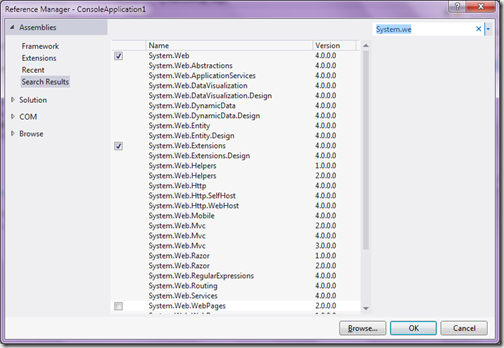
For this demo we are using console application so we have to add System.Web and System.Web.Extensions  reference to access the JavaScript Searilizer class through which we are going to convert this object into JSON string. We are going to add reference like following.

add-reference-serializtion-web-convert-chsarp-object-into-json

Now with JavaScript Searilizer class which belongs to System.Web.Script.Serialization namespace we can easily convert C# object into JSON string. Following is a code for that.

var javaScriptSerializer = new 
    System.Web.Script.Serialization.JavaScriptSerializer();
string jsonString = javaScriptSerializer.Serialize(employee);
Console.WriteLine(jsonString);

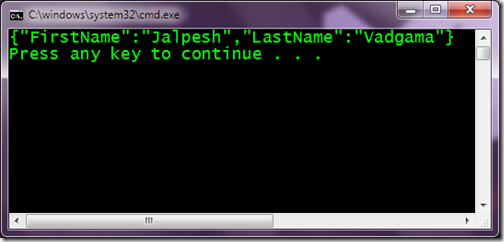
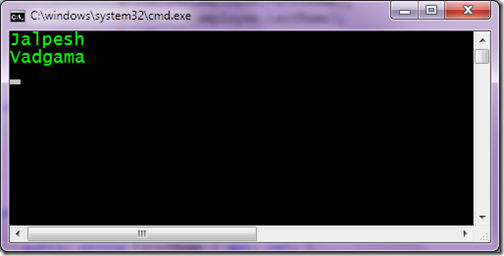
Now when run this console application. Following is a output as expected.

convert-c#-object-to-json-string-javascriptsearializer

Here its serialize object into JSON string. Same you can desterilize the JSON string into C# object with Deserialize function.

That’s it. It’s very easy. Hope you like it. Stay tuned for more..
Share:

ASP.NET Checkbox button Attributes in JavaScript.

This is a follow up post I have just written before some time- Getting tooltip of ASP.NET Radio button in java script. In that post I have explained that to render all properties properly in ASP.NET renders checkbox and radio button surrounded by Span tag. So one of the friend message me on facebook how we can add JavaScript attribute on ASP.NET Controls like checkbox or radio button. So I thought it will be good idea to write a quick blog post about it.

Adding JavaScript attribute to ASP.NET Checkbox and Radio button:


So Let’s see how we can write JavaScript attribute from server side with ASP.NET Checkbox and same will be applied to ASP.NET Radio button also. Following is a HTML code for ASP.NET checkbox.

<asp:CheckBox runat="server" ID="myCheckBox" 
Text="Yes" ToolTip="Yes"/>

Now I want to write a onBlur event for JavaScript so I have written a following function in JavaScript.

function onBlur() {
alert('Onblur Fired');
}

Normally we write JavaScript attribute from server side like below in page load event.

protected void Page_Load(object sender, EventArgs e)
{
myCheckBox.Attributes.Add("onblur", "onBlur();");
}

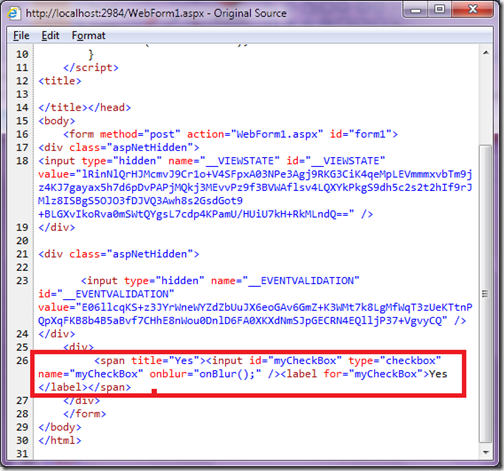
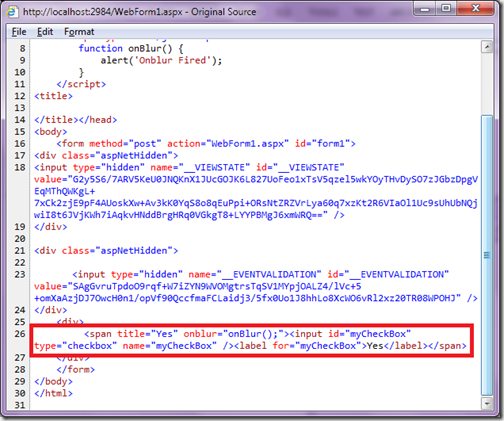
Now when you run this code in browser and see that in browser with View Source it will apply onblur event to span tag.

javascript-css-attribute-of-asp-net-checkbox-control

So it will not fire ‘onblur’ event of checkbox as this event is right now applied to span tag. So what should we do? Here is the fix. ASP.NET Checkbox and Radio Button provides InputAttributes attribute collection. So you can directly assign attributes to checkbox like below.

protected void Page_Load(object sender, EventArgs e)
{
myCheckBox.InputAttributes.Add("onblur", "onBlur();");
}

That's it. If you see in view source now it will assign JavaScript attribute in correct way and now it will fire event also.

javascript-css-attribute-of-asp-net-checkbox-control-correct-way

Note: You can add CSS Attribute in the same way as you do with JavaScript attribute.

Hope you like it. Stay tuned for more..
Share:

Getting tooltip of ASP.NET Radio button in java script.

This post in regards to a question that I have answered on stack overflow. Getting Tool tip of the Radio button in JavaScript. Where user asks why he is not able to get tooltip with document.GetElementById and Client Id of ASP.NET Radio button control like following.

document.getElementById('<%= rbSelectedIds.ClientID %>').title

While answering this question, I have found that there are lots of people not aware about this. So I thought it is a good idea to write a blog post about it.

By default ASP.NET Radio button and check box controls rendered under span when you have attribute like tooltip. Because System.Web.UI.WebControls namespace may render differently in  different browsers and to achieve same functionality in all the browsers they are rendering with span.

There is a complete discussion there one in one of the StackOverFlow.com

Why does ASP.Net RadioButton and CheckBox render inside a Span?

Example : Getting ASP.NET Radio button tooltip in JavaScript:


So let’s take same example as mentioned in that question. Following is my HTML Code. Below is radio button HTML code.
<div>
       <ASP:RadioButton runat="server" ID="myRadioButton" 
            Text="Yes" ToolTip="Yes"/>
</div>

Now when you run this in browser it will render this radio button is render with surrounded by span like follow.

how-to-get-tooptip-of-radio-button-in-java-script

You can see that title attribute is given to span tag instead of radio button. Now let’s create a ASP.NET button to get tooltip of that radio button like below.

<asp:Button runat="server" Text="Get Tooltip" 
        OnClientClick="getToopTip();"/>

So we are done with button now it’s time to write a JavaScript. Following is a code for JavaScript.
function getToolTip() {
    var sParentElement = document.getElementById("<%=myRadioButton.ClientID%>").parentElement;
    var tooltip = sParentElement.title;
    alert(tooltip);
}

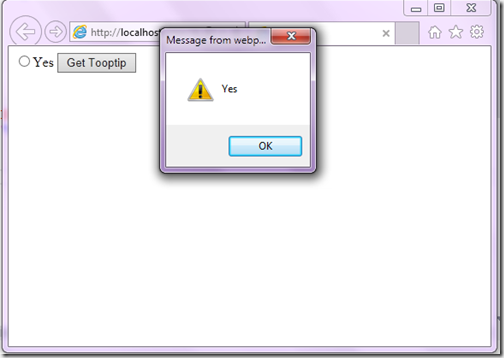
So we are done with code. Now it’s time to run this code in browser. And when you click on button it will show alert with tool tip of radio button.

getting-tooltip-in-javascript-asp-net-radio-button-and-checkbox

That’s it. Hope you like it. Stay tuned for more.
Share:

Overriding/set default button in master page in asp.net

Some time ago I have written a blog post about Default focus and default button in ASP.NET. In that post I have explained how we can set default button for form. Recently I got email related to that post asking that how we can set or override default button on a page with master page. 

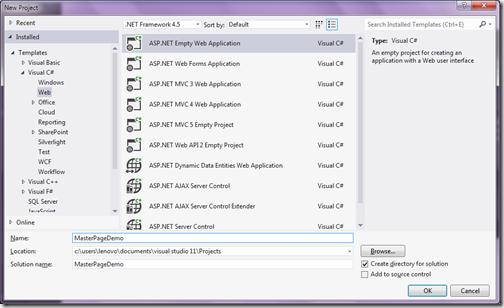
In this page we will learn how we can override default button in master page. So what we are waiting for? Let’s start by creating a an asp.net empty application via File –> New Project –> ASP.NET Empty web application.

overriding-setting-default-button-with-master-page-asp-net

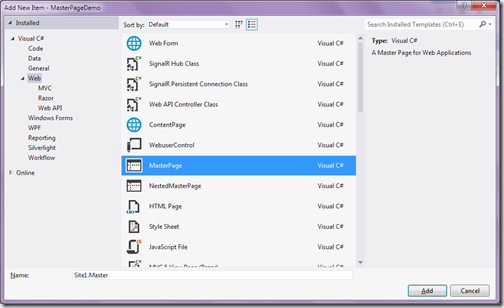
Once You are done with creating project it’s time to add a master page in solution via right click-> Add new Item.

adding-master-page-override-default-button

Following is HTML code ASP.NET master page.

<%@ Master Language="C#" AutoEventWireup="true" CodeBehind="Site1.master.cs"
     Inherits="MasterPageDemo.Site1" %>
<!DOCTYPE html>
<html xmlns="http://www.w3.org/1999/xhtml">
<head runat="server">
    <title></title>
    <asp:ContentPlaceHolder ID="head" runat="server">
    </asp:ContentPlaceHolder>
</head>
<body>
    <form id="form1" runat="server">
    <div>
        <asp:ContentPlaceHolder ID="ContentPlaceHolder1" runat="server">
        
        </asp:ContentPlaceHolder>
    </div>
    </form>
</body>
</html>

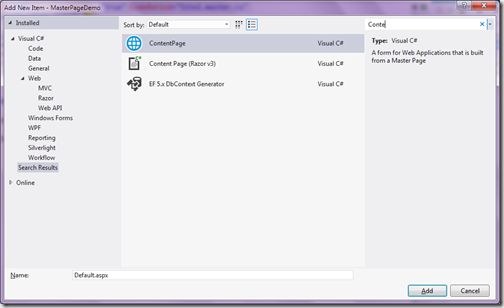
Now it’s time to add new content page with master page and selecting above master page.

adding-content-page-set-default-button-dynamically-master-page

Following is a code for content page.

<%@ Page Title="" Language="C#" MasterPageFile="~/Site1.Master" AutoEventWireup="true"
     CodeBehind="Default.aspx.cs" Inherits="MasterPageDemo.Default" %>
<asp:Content ID="Content1" ContentPlaceHolderID="head" runat="server">
    
</asp:Content>
<asp:Content ID="Content2" ContentPlaceHolderID="ContentPlaceHolder1" runat="server">
    <asp:TextBox runat="server" ID="Message"></asp:TextBox>
    <ASP:Button  runat="server" ID="DefaultButton"
        OnClick="DefaultButton_Click" Text="Default"/>
    <asp:Button runat="server" ID="AnotherButton"
        OnClick="AnotherButton_Click" Text="Another"/>
</asp:Content>
Here I have added two buttons “Default Button” and “Another button” and a textbox. Now I want to make this “Default Button” default dynamically. Below code I have written for both button’s click event. It will only print in textbox which button is clicked.

protected void DefaultButton_Click(object sender, EventArgs e)
{
    Message.Text = "Default Button Clicked";
}

protected void AnotherButton_Click(object sender, EventArgs e)
{
    Message.Text = "Another button clicked";
}

Now I want to make default button as default button of form so whenever I press enter it will fire click event of default button. So to dynamically set / override default button on master page form I have to write following code on content page page_load event.

protected void Page_Load(object sender, EventArgs e)
{
    Form.DefaultButton = DefaultButton.UniqueID;
}

Now when you run and press enter in browser output will be as expected as follows.

default-button-override-asp-net-masterpage-browser

That’s it. Hope you like it. Stay tuned for more..
Share:
Saturday, March 22, 2014

Explicit Keyword in C#

Yesterday, I have written a blog post about Implicit Keyword in C#. In today’s post we are going to learn about Explicit keyword in C#. Like Implicit keyword explicit keyword is also used for typecasting one class into another class. It is also a type conversion operator but rather then directly invoking it will invoke by cast.

As per MSDN, The Explicit keyword declares a user defined type conversation operator that must be invoked with cast.

Usage of explicit operator in C#:

Let’s take a simple example. Following is a code for that.

using System;

namespace ExplicitOperatorDemo
{
    class Program
    {
        static void Main(string[] args)
        {
            User user=new User
            {
                    FirstName = "Jalpesh",
                    LastName = "Vadgama"
            };

            Employee employee = (Employee) user;

            Console.WriteLine(employee.FirstName);
            Console.WriteLine(employee.LastName);
            Console.ReadKey();
        }
    }

    public class Employee
    {
        public string FirstName { get; set; }
        public string LastName { get; set; }
    }

    public class User
    {
        public string FirstName { get; set; }
        public string LastName { get; set; }

        public static explicit operator Employee(User user)
        {
            Employee employee=new Employee
            {
                    FirstName = user.FirstName, 
                    LastName = user.LastName
            };
            return employee;

        }
    }
}

I have written almost same code as we have written for implicit operator. Same two classes “Emplyee” and “User” with first name and last name operator. The only difference is I have written explicit keyword instead of implicit. And same way I have used casting in main function of console application.

In main function I have initialized class “User” with first name and last name and then type cast that in Employee class object.  Following is out put as expected.


That’s it. It is very easy. Hope you like it. Stay tuned for more..
Share:
Friday, March 21, 2014

Launching DotNetJalps Communities

Everyday I got lots of emails asking about technical things and Every time I am trying to give proper answer to them. But due to lack of time it was always not possible to reply all the emails as I have professional commitments also. So that’s why I decided to launch DotNetJalps community where people can ask questions and If I am not there then also another people can answer the question. Another benefit of communities will be the solution given in that particular answer will be visible to all the users of community.
So I have created Google+ community for that. Following is a link for that.

https://plus.google.com/communities/109749681215763540822

I request to ask your questions there instead of sending me emails and I would also encourage you participate in discussion. I am also going to share all my blog post there. You guys can also share your links and discuss various technology related things.

But please make sure there should technology related things only. So please join my community ask question and give answer to people.

Stay tuned for more!!
Share:

Implicit Keyword in C#

In today’s post we are going to learn about implicit operator in C#. Implicit keyword is used for conversation in C#. It is used to declare an implicit user-defined type conversation operator. So with the help of implicit keyword you can convert one class into another class without writing any other syntax.

You can find more information about Implicit from following MSDN link.
http://msdn.microsoft.com/en-us/library/z5z9kes2.aspx

Usage of Implicit Keyword in C#:


Sounds interesting!! Let’s take a example of implicit operator in so that it will be much clear. Following is a code for that.

using System;

namespace ImplicitOpeartorDemo
{
    class Program
    {
        static void Main(string[] args)
        {
            User user=new User
            {
                    FirstName = "Jalpesh",
                    LastName = "Vadgama"
            };

            Employee employee = user;

            Console.WriteLine(employee.FirstName);
            Console.WriteLine(employee.LastName);
            Console.ReadKey();
        }
    }

    public class Employee
    {
        public string FirstName { get; set; }
        public string LastName { get; set; }
    }

    public class User
    {
        public string FirstName { get; set; }
        public string LastName { get; set; }

        public static implicit operator Employee(User user)
        {
            Employee employee=new Employee
            {
                    FirstName = user.FirstName, 
                    LastName = user.LastName
            };
            return employee;

        }
    }
}

In above code I have created two classes “User” and “Employee”. Both contains two properties FirstName and LastName. Also in user class I have defined implicit operator Employee which convert user object into employee object.

In main function I have created object of user with first name as “Jalpesh” and last name as “Vadgama” and then assign it to Employee class. So when you assign object to employee class it will call Employee operator with implicit keyword and convert that user object into employee object.

At the end I have printed first name and last name property of Employee class and following is output as expected.

implicit-operator-c#

That’s it. It’s very easy. Hope you like it. Stay tuned for more.. Happy programming.
Share:
Thursday, March 20, 2014

Enhanced debugging with DebuggerDisplay in C#

We all need to debug our projects and for that we need to some visualization to see values of debug data C# has a attribute called ‘DebuggerDisplay’ which helps developers to visualize data in the way developer wants .

As per MSDN, DebuggerDisplay attributes allows developers of the type, who specifies and best understands the runtime behaviour of that type, to also specify what that type will look like when it is display in debugger.

How to use DebuggerDisplay attribute:


Display attribute constructor has one argument, a string will displayed in the value column for instances of type. This string will contain {} braces and this text between {} will evaluate as expression. So what we are waiting for lets try it in Visual Studio. I have written following code for that.
using System.Diagnostics;

namespace ConsoleApplication1
{
    class Program
    {
        static void Main(string[] args)
        {
            var employee =new Employee();
        }
    }

    public class Employee
    {

        [DebuggerDisplay("Id={EmployeeId}")]
        public int EmployeeId = 1;

        [DebuggerDisplay("Name={Name}")]
        public string Name = "Jalpesh Vadgama";
    }
}

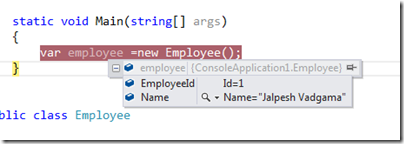
Here you can see I have created a class called “Employee” with two variable with DebuggerDisplay Attribute and from main method I have created a object of employee class. Now let’s create debug the code via pressing F5 and see how its works.

DisplayDeubggerAttribute

As you can see its display data as defined in argument. So now you can format your debugger visualizer screen as per your requirement. That’s it. Hope you like it. Stay tuned for more.
Share:
Wednesday, February 26, 2014

Internet Explorer 11 developer toolbar features

Recently Microsoft has launched new developer tool bar with Internet Explorer 11 with some cool features. In this post we are going to learn about the new features of Internet Explorer Developer toolbar. Microsoft has rewritten whole toolbar and now it loaded with bunch of features.

DOM Explorer:

When you launch Internet Explorer Developer toolbar with F12 by default it will load DOM Explorer and this will have all html and style sheet. You can select any element and modify or change style sheet of live site.

dom-explorer-toolbar-internet-explorer

You modify the existing HTML on left side of pane and you add/modify the style sheet of selected element on the right side of the pane. There is also find functionality given to find any specific element.

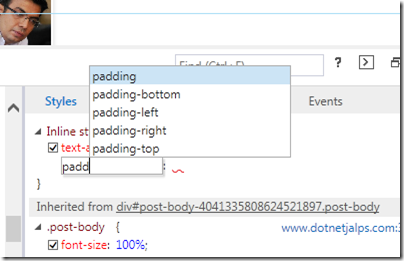
It also provides intellisense for modifying and changing HTML and style sheet.

intellisense-html-css-developer-toolbar


Console tool:

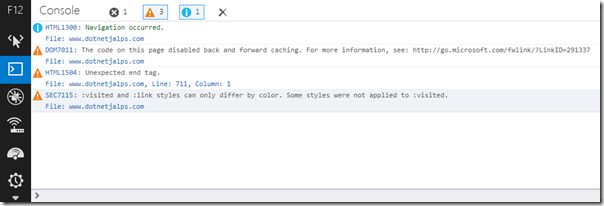
Second one on left side is console tool where you can have whole history running JavaScript with console.log statement

console-log-toolbar-internet-explorer

Here it will show whole errors and exception related to client side code executed for this page.

Debugger tool:

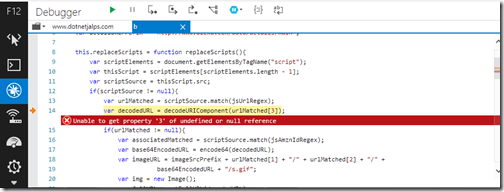
This tool is used for the debugging the your client side code when application running and you can easily debug your code with the help of this tool.

Here you can set your breakpoints just like in your IDE and easily debug loop or any client code.You can also debug the compressed JavaScript here. It’s a great way to debug and find errors.

debugger-tool-internet-explorer-developer-tools

Network tool:

Network tool is used for the performance measurement for a web page. It will give you a details of any request network involved in your web page loading. It will tell request completion time in mili seconds. Here you can also find amount data and bandwidth being transferred when your web page loads.

Network-tool-internet-explorer-developer-toolbar

The UI Responsiveness tool:

Next is UI responsiveness tool where you can find if your web page is running slow then what happened which part is consumed more CPU .It will help you identify different source CPU utilization which causes your web page to load slowly in browser.

ui-responsiveness-tool-internet-explorer
With help of this tool you can optimize your web pages performance via changing part/code which causes more CPU Utilization.

Profiler tool:

Profiler tool is used for measuring JavaScript performance. It will show you number of function called during profiling session. From here you can isolate JavaScript which makes your web page slow.

profiler-tool-internet-explorer-toolbar-developer

Memory tool:

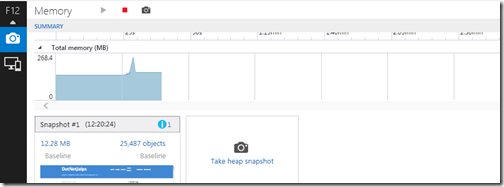
With the help of this Memory tool you can easily find the memory leak issues of your web page. The memory tool track memory usage of web page and help you identify where more memory is consumed and where memory leak is happening.

memory-usage-memory-tool-internet-explorer-developer-toolbar

Here is also allows you to take heap snapshot at regular interval and then can analyse via clicking on it.

memory-usage-memory-tool-internet-explorer-developer-toolbar2

With the help of this you can easily identify memory leaks in your code.

Emulation tool:

The emulation tools help you testing your web page on different screen size and hardware's. You can easily emulate different screen size and emulations.

emulation-tool-internet-explorer-developer-toolbar

That’s it. All this awesome features which is provided by developer tool for internet explorer 11. It will definitely going to make your life very easy. Highly recommend this.

Stay tuned for more.. 

Share:
Saturday, February 22, 2014

CodeMaid extension for visual studio

Till now I'm a resharper fan boy and I still love using it. It is a great productivity tool. But it is not free for commercial use. So lots of my friends tell me that they want something open source or free which provide some kind of productivity over normal visual studio things and recently I came across CodeMaid extension of visual studio. It is a great plugin. It's not replacement of resharper but it will surely increase your productivity and make your code clean.

What is CodeMaid?

CodeMaid is an open source Visual Studio extension to cleanup, dig through and simplify our C#, C++, F#, VB, XAML, XML, ASP, HTML, CSS, LESS, JavaScript and TypeScript coding.

You can download that from following link.

http://visualstudiogallery.msdn.microsoft.com/76293c4d-8c16-4f4a-aee6-21f83a571496.

It also got  a separate site for that from where you can see and learn all the features. Following is a link for that.

http://www.codemaid.net/

 Here you can find latest news, feature list and documentation for code maid.

Installing CodeMaid

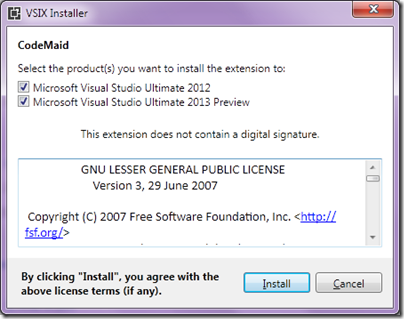
Installing CodeMaid is really easy download .vsix file from the above link and then double click on that. It will automatically start installing it.. It will ask for list of Visual Studio available like following.

CodeMaid

Once you click on install it will install CodeMaid plugin in Visual Studio.

Features of CodeMaid Extension of Visual Studio:

There are lots of features available with CodeMaid Extension of Visual Studio.

Code Cleaning:

This feature will automatically run on save. It will do following things.
  1. Removed unused using statement and sort them
  2. Add unspecified access modifier.
  3. Add Blank line padding.
  4. Remove blank lines adjacent to braces.
  5. Run Visual Studio formatting
  6. Remove Constructive blank lines.
  7. Remove End of Line white spaces.
  8. Update region tags.
You find more about this at -http://www.codemaid.net/documentation/#cleaning

Code Digging:

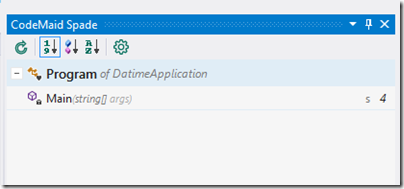
Once you install CodeMaid it will add a CodeMaid spade where you can navigate and digg code. Here you can alphabetically sort everything drag and drop members etc.

CodeMaidSpade

There are tons of features available like Joining, Formatting, Collapsing, Configuring, Switching etc. You can find that for the following feature documentation list.

http://www.codemaid.net/documentation/

I have used it for few days and highly recommend it it saves lot of time. Hope you like it. Stay tuned for more.
Share:
Thursday, February 20, 2014

PetaPoco series–DotNetJalps

Recently one of the friend ask to create list of post that I have written about PetaPoco this post is a complete list of all my PetaPoco related post.

What is PetaPoco?

PetaPoco is a Microsoft ORM developed by Top Ten Software. It was inpired by Massive and Dapper Micro ORM. Following is a link where you can get all information about PetaPoco.

http://www.toptensoftware.com/petapoco/

PetaPoco related blog posts on DotNetJalps:

Following is a complete list of PetaPoco posts that I have written on my blog. I will keep updating this list also for future posts about PetaPoco.

Get started with ASP.NET MVC and PetaPoco
PetaPoco with stored procedures
PetaPoco with parameterised stored procedure and Asp.Net MVC
CRUD operations with PetaPoco and ASP.NET MVC

Hope you like it. Stay tuned for more.
Share:
Sunday, February 9, 2014

Getting things done by Evernote

We all want to get our things done and be more productive. I know that nobody will have 100% satisfaction about being productive.All We want is to achieve our goals and be successful in our life. This post is all about this. How you can do achieve your goals without stress. In this post we are going to learn what is getting things done and how we are going to achieve with Evernote a great note taking software.

What is Getting things done:


Getting things done- is a time management methods where you can dump all your tasks and projects into some inbox physical or software and remove that from out of mind and backing them via actionable items.

This method is written in Book By David Allen’s called Getting things done- The art of stress free productivity. If you still haven’t read this book then you are missing something. I highly recommend this book to read at least once. Because this will change the way you look at your goals and you will be productive.

Getting things done comprises of following things.

Collection:  This phase comprises of collecting all the information around you. This phase is one of the most important part because here you are doing dump all the information that are there in your mind. Here you need to collect every information that are there and either you need to do some action against it or you want to do it in future and you want to use for future reference.

Processing: Once you collect all the information in this phase you are going separate things that you are doing to do like your to-do list, project etc. Other information that are there you can either going to use as reference or you can delete it or defer it.

Organizing: This phase is result of the processing phase you are going to separate things and organize things in system that you trust. Either its your physical inbox or any software that you trust.

Doing: This means tasks or project that you can do right now. You only need to concentrate when you do things.

Reviewing: Examining the results of work. Based on your review you need to change strategy. You need to do that review at least once a week.

Here is the some link for reference.

http://joshkaufman.net/getting-things-done/
http://www.thesecretweapon.org/the-secret-weapon-manifesto/a-better-way
http://www.lifehack.org/articles/productivity/50-tricks-to-get-things-done-faster-better-and-more-easily.html
http://zenhabits.net/the-getting-things-done-gtd-faq/

Why Evernote:


I have choose Evernote due to following reason.
  1. Its almost free. You can do lots of stuff with free account and If you need more items then you can have premium account with very  cheap rate. You don’t need to buy a licence for that.
  2. You can use Evernote on any platform Web, Windows, Mac, tablet mobile devices etc..
  3. Customized tagging. You can create tags in the way you want.
  4. Data collection- creating notes and searching notes is very easy.

Getting things done by Evernote:


So what we are waiting for let’s start. First thing you need to is to create a account for Evernote. For that you need to go www.evernote.com. Enter your email address and create an account.
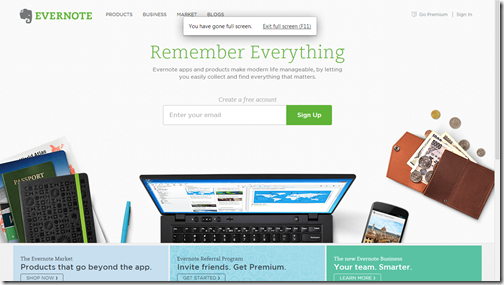
GettingThingsDoneByEvernote

Once you are done with creating account you will be presented a very nice UI itselft on web.
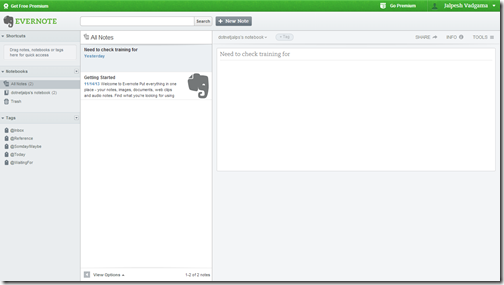
getting-things-done-by-evernote

There are desktop version is also available You can use desktop versions also. I used to work with desktop version on windows. Here is the link for downloading desktop version.

http://evernote.com/download/

Once you download and install it you are are ready to use Evernote.
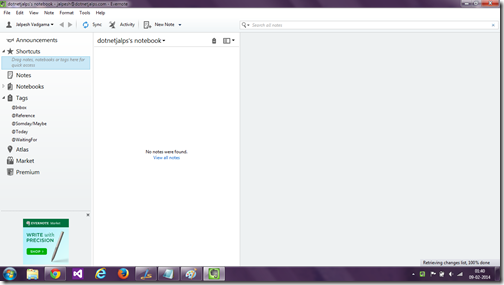
evernote-desktop-version-getting-things-done-by-evernote

Now its time to create tags for getting things done. You can create via right click on tags and create new tags.
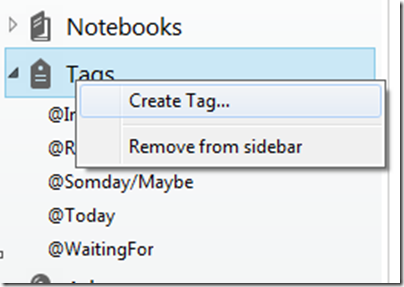
create-tag-evernote-getting-things-done

I have created following tags.

@Inbox, @reference, @Somday/May be, @Today, @waitingfor,@Done
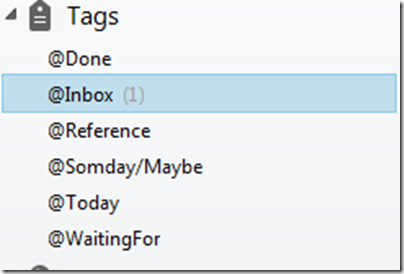
my-tags-created-evernote-getting-things-done

@Inbox- This is the default tag where all my notes go by default. Where I collect the information from my mind. With the Evernote I can collect information via mobile, tablet and desktop any where anything. After collecting all the information in processing phase I am going to separate all things notes into for below tags/categories.

@Reference – This tag is used for notes which is only reference I am never going to do any action on this notes. For example I was reading one blog I found that thing very useful for the project I am working. So I will put the that link of blog as reference.

@Someday/May be- This tag is used for the notes which I might do when I will get spare time or Notes which I need to take action on specific date then I will also sent reminder for that date.

@Today- This tag is for actionable notes that I am going to do today itself. This is most important notes that you need to take action whether answering a email to answering a call or attend a meeting etc.

@Waiting for – This tag is for notes that I need to wait for something for example to Complete a task I need to wait for my network team to build a server. This kind of notes will go under this tags. I will set a reminder also for this notes when I need to ask network team whether its ready or not.

@Done- This tag is for notes which I performed action. I move notes that I completed into done category/tag. So that every week I can review things how things are going where I can improve that.

So, This how I organize my information. Creating notes and tagging notes is very easy. Click on crate a new note and It will present a editor like below.
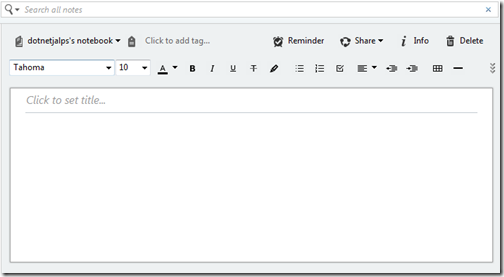
editor-evernote-getting-things-done

 Writing note description
note-evernote-getting-things-done
Tagging notes :
You can easily tag notes like following.
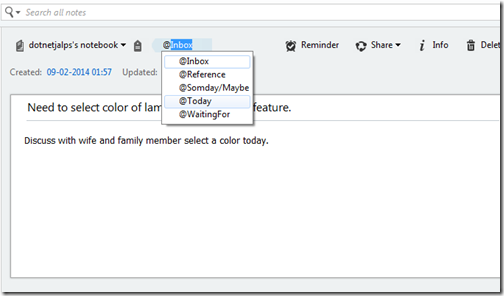
taging-evernote-getting-things-done

You can also set a reminder for that also you can also set reminder email for that also. Once I do organizing information I will definitely know what are things that I need to do today and then I can put my 100% energy on that and complete those things very easily.

Tips for getting things done:

  1. This is not a miracle method you need to try that and then improve your strategy based on that.
  2. You can collect your information any time and put as notes. 
  3. You need to do process things every two or three hours once you are free.
  4. Allow very less interruptions when you working on your actionable items. Interrupt it if its absolutely necessary.
  5. Review everything you do and then make improvement. Also don’t for empty your notes with done things every week.
Try it. Evaluate it. Review it and I am confident you will be more productive then ever. I have tried that for my side activities at home  and I am more productive at home then ever and Now I am going to implement that in my professional work.

I hope you like it. Stay tuned for more.
Share:
Friday, February 7, 2014

Why multitasking does not work any more

Still lots of people thinks that multitasking is good. If you can do multitask then you are more productive.. Every employer loves this.. But wait are you sure you are more productive when you do multitasking nope I don’t think so.. Here are few reasons multitasking does not work any more..

Quality:

Have you ever checked quality of your work when you are doing multiple work. Have you ever carefully read your emails when you talk on phone or do other things while you are writing email. I have tried this many times and I have done many mistakes. When I tried to write emails while I am doing other things most I have made mistake like incorrect spelling,incorrect  grammar,forgot attachment etc. I am sure you all gone through this dilemma. From my experience whenever I have done multitasking I have loose quality of work. In today’s word quality is everything. Let’s take example of doctor they have to deal with patient’s life and disease and if they do not have quality then imagine what will be side effect of that on your body. So quality is everything and if you do two task or project at same time I am 100% sure you can not complete your work with 100% quality.

Focus:

When you do multitasking you are shifting your focus from one task to another task and you can not 100% involve your self with one task because your brain will  think about another task also. And if you loose your focus then it will automatically decrease your productivity.

It’s slowing you down:

Lots of people believe that multitasking is going to save your time but that is not true. Multitasking will slow you down..don’t believe yes it is right. Try a exercise write a business email while talking to your loved one and then measure time taken for writing this email and then think if you are writing email without concentrating on any other thing or phone how much time it will take I am sure you will feel that you can take much smaller amount time then writing email while talking on phone. So it will take longer then you expected because you are switching between phone and emails and your concentration also jumping from one thing to another thing.

Stress:

It will give you lots of stress when you do multiple things at single time because your focus is keep jumping from one thing to another thing and vice-versa. Your mind constantly remind you that you also need to concentrate on another thing also and you can not do efficient work on a single thing.

Memory:

Take an exercise.. Talk on a phone while watching TV.. then once you conclude try to remember thing that you watched on TV. I’m sure you are going to miss lots of important details. Because you are interrupting one task to suddenly focus on another task and ultimately you are going to loose important details and your memory will be poor.

There many more reasons why multitasking does not work but this are top five reason why multitasking is not going to work for human beings. Hope you like it. Stay tuned for more..
Share:
Friday, January 24, 2014

How to deal with over smart people

Today, I am going write some thing not technical, As I feel I am doing that for quite a time I should write about it. In today’s competitive world people wants to show their skills to companies and how important they are but some people are becoming over smart people. They always eager to show their smartness and make themselves highlighted. They take credits for task they have not done etc. I personally don’t like this kind of people but sometimes we have to bare with this kind people. So in this blog post, I am going tell different way of dealing with over smart people.
  1. First and foremost thing you can do is you can Ignore them. You don’t need to give attention what they are saying as you know they are acting over smart.
  2. This kind of people believes that they are smartest person on the earth. Don’t argue with that feeling otherwise you will not able to deal with this kind of people. Just ignore it and let it be. Complete your work with them and let them do what they want to do.
  3. Try working with them instead of against openly with them. If you against them,They will never understand your point because they think they are smarter then you.
  4. Maintain a polite and civil manner with them whatever they say. Keep your self calm and compose. Soon they started notices you that you are not in competitions with them they are motivated to treat you nicer then earlier.
  5. Don’t take their over smartness personally.
  6. Always keep backup plan if you involve this kind of person or give them some responsibilities. So in worst condition you will have plan B if Plan A is not successfully implemented by this kind of people and this will likely to happen.
  7. Keep boss aware what you are doing instead of be in competition of with kind of person. It will impact more then anything.
  8. If you think this people are hard to bare minimize the contact with them.
  9. Demonstrate your view that you view everyone as equal not as a superior or inferior.
I hope this will help you dealing with over smart people. Remember following quote always.

“If you think that you're so smart and holy, that means you haven't yet realized that a part of what we experience today...is a result of our stupidity and wickedness in the past.”
― Toba Beta, Master of Stupidity

Hope you like it. Stay tuned for more..
Share:
Thursday, January 23, 2014

Why continuous integration is your friend?

In this post we are going learn benefits of Continuous Integration in Software Developments. Let’s understand what is continuous integration first and then we will discuss about benefits we are having.

What is Continuous Integration in software development?


As per wikipedia “Continuous integration (CI) is the practice, in software engineering, of merging all developer working copies with a shared mainline several times a day. It was first named and proposed as part of extreme programming (XP). Its main aim is to prevent integration problems, referred to as "integration hell" in early descriptions of XP”.

In simple words, Continuous Integration means whenever any developer from the project team commit/checkin code at that time build will be created with the help of build servers and it will be automatically deployed to a specific location with the help of build server.

There are lots of open source and paid options are available for Continuous Integration like Team Foundation Server, Jenkins, TeamCity etc.

You can found a complete comparision of this tools from the following link.
http://en.wikipedia.org/wiki/Comparison_of_Continuous_Integration_Software

Benefits of Continuous Integration:


Followings are benefits of Continuous Integration and Followings are reason why continuous integration is your friend.

1) Automate everything If you don’t have CI then one of the developers needs to get latest/update code in his/her computer then create a build that will waste lot of time on the developer and ultimately we are going to loose developers productive time for this instead of writing code.

2) It will improve quality of code, Whenever any developers commits the code it will create a build and if build is not successful then it will inform all the users/developers of the using that project/build. So now developers will check quality of code regular because otherwise it will create bad impression of this developer on other stack holders of project.

3) Deployment will very easy. Earlier every time we have to deploy to a particular location manually but here stack holders of project don’t need to worry about the deploying things as it will deploy all the things properly.

4) Your code repository will be up to date every time and you don’t have to worry about it.

5) Save lots of times of developers and increase developers productivity. Take an example suppose there are five developers are working on a software project. One of the developer has committed code and another developer has taken latest version from source control at that he/she is facing problem while compile/building project he will notify the developer who has broke the things. So that developer will check and found that he forgot to commit one of the file. So again he will commit things and notify again to all. This will ultimately a productivity lose.

6) QA/Testing team does not have to wait for deployment. So if developer is committed code it will automatically create build and deploy it on specific location there will not be any dependency of development team to test new features.

That’s it. Looking at above reason I must say Continuous Integration is your best friend and ultimately a productivity booster. Stay tuned for more..
Share:
Saturday, January 18, 2014

Various way of finding duplicate rows in SQL Server

Recently One of the friend ask how we can find duplicate rows in SQL server so I said there are various way of finding duplicates and then I show him few ways of findings duplicate based on criteria. I thought it is a very basic question and still lots of people does not know how to find duplicate rows in SQL Server. So it is good idea to write blog post about it. In this blog post I’m going to explain the same various way of finding duplicates.

First all, We need a table to find duplicate rows. So following is a table for that.I have created Employee table with four fields.

CREATE TABLE [dbo].[Employee](
    [Id] [int] NOT NULL,
    [FirstName] [nvarchar](50) NULL,
    [LastName] [nvarchar](50) NULL,
    [Designation] [nvarchar](50) NULL
) ON [PRIMARY]

Now once you create this “Employee” table now it’s time to write insert data. I have inserted following data.

Find-Duplicate-Row-SQL-Server

Finding duplicate rows in SQL Server:

Now let’s first write query to find duplicate rows in “Employee” table. Following is a query for that.

SELECT
     Id,
     FirstName,
     LastName,
     Designation,
     Count(*) as 'Number of Rows'
FROM Employee 
GROUP BY Id,FirstName,LastName,Designation HAVING COUNT(*) > 1

Once you run this query following result will be there.

Find-exact-duplicate-row-sql-server

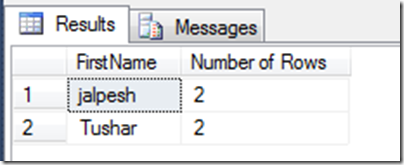
If you can see the data of “Employee” table clearly then you will see that there are two people with first name“Tushar” and “Jalpesh”. Let’s find that via following queries.

SELECT
     FirstName,
     Count(*) as 'Number of Rows'
FROM Employee 
GROUP BY FirstName HAVING COUNT(FirstName) > 1

Now when you run this query it will load following result.

Find-Duplicate-Row-SQL-Server-based-on-Column


That’s it. You can see its very easy to find duplicate rows in SQL Server. Hope you like it. Stay tuned for more.
Share:
Sunday, January 5, 2014

Node.js tools for visual studio

In this post we are going to look how we can use node.js application in visual studio with node.js tools for visual studio.

What is Node.js?


As per wikipedia Node.js is a software plateform that is used to built scalable network(specially server side application). Node.js utilizes JavaScript as its scripting language and achieved high throughput via non blocking I/0 and single-threaded event loop.Node.js was created by Ryan Dhal in starting 2009.Its development and maintenance is sponsored by Joyent.

Why we should care about Node.js:


  1. It uses JavaScript most popular language of the web.
  2. Fast. Powered by incredible V8 virtual machine. It makes JavaScript execution really fast.
  3. A Great feet for real-time web application.
  4. It’s scales very easily.

Node.js tools for visual studio:


You can download the Node.Js tools from the following link.

https://nodejstools.codeplex.com/

Here are some quick features of Node.Js tools.
  1. NTVS support editing, intellisense, profiling, NPM, debugging locally and remotely(Windows, MAC, Linux) as well as Azure web sites and Cloud services.
  2. Designed, Developed and Supported by Microsoft Community.
It is available for both Visual Studio 2012 and Visual Studio 2013 both.

Installation of Node.js tools for visual Studio:


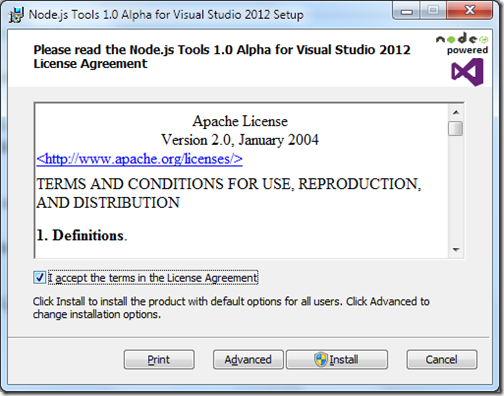
It’s very easy to install download the setup and double click setup.exe it will load following screen.

Node-js-visual-studio-tools-installation1

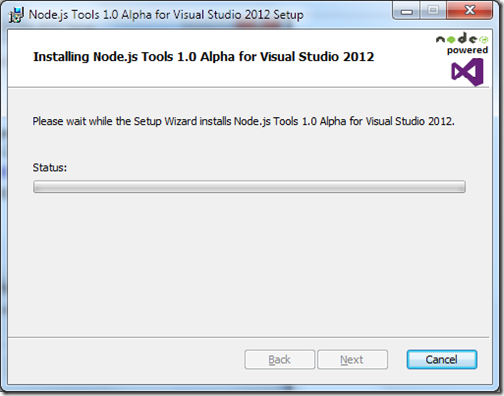
Once you click on install it will load start installing.

Node-js-visual-studio-tools-installation2

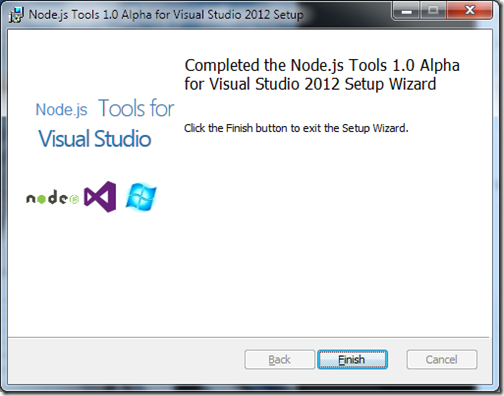
After completing installation it will look like following.

Node-js-visual-studio-tools-installation3

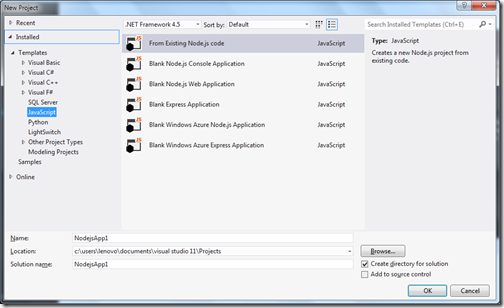
Once you are done with installation open visual studio and go to File-> New Project-> JavaScript and you will see node.js template available.

Blank-Node-Js-Application

That’s it. Hope you like it. In next post We are going to create first node.js application with Visual Studio. Stay tuned for more..
Share:
Saturday, January 4, 2014

Year 2014 resolutions

First of all, Happy new year to all of you!!.  May your all your wishes come true this year.This time I am making resolutions public so I am accountable to my readers. Here are resolutions for year 2014.
  1. Should be more active in communities. Since last 3 months I was busy with professional commitments and lot of things happening with life. Now all things are going to be settle down in January month of this year so now I will be more active on communities.
  2. Loose weight. I have already started loosing weight via controlling my diet and this year I am planning to loose at least 15 kgs.
  3. Write three blog post at least a week.
  4. Learn my self new technologies like Node.js and Python.
This four resolution I want to try to achieve lets see how it goes. I will update how I am doing with my resolution each quarter.

Once again happy new year 2014 to all of you!!. Stay tuned for more..
Share:

Support this blog-Buy me a coffee

Buy me a coffeeBuy me a coffee
Search This Blog
Subscribe to my blog


My Mvp Profile
Follow us on facebook
Blog Archive
Total Pageviews