Showing posts with label C#-4.0. Show all posts
Sunday, January 27, 2013

Tip-Convert array to Comma delimited string

I was needed to convert an string array into the comma delimited string and the old way to do that is too with for loop. But I was sure that there should be some ready made function that will do this very easily.

After doing some research I have found string.Join. With the help of this we can easily an array into the comma delimited string.

String.join have two arguments one is separator and other one is either array or enumerable.

Following is a code for that.
namespace ConsoleApplication3
{
    class Program
    {
        static void Main() {
            string[] name = {"Jalpesh", "Vishal", "Tushar", "Gaurang"};
            string commnaDelmietedName = string.Join(",", name);
            System.Console.WriteLine(commnaDelmietedName);
        }
    }
}


Share:
Friday, January 18, 2013

How to get N row from datatable in C#

Problem:


Recently one of my friend was needed only first three rows of data table and so he asked me and I have multiple solutions for that. So thought it would be great idea to share with you guys.

Possible Solutions to problem:


There are two ways to solve this problem.
  1. With normal for loop
  2. With lamda expression and linq

1. With normal for loop:

Following is code from where we can get 3 rows of data table.
Share:
Friday, January 4, 2013

Lazy<T> in C# 4.0

Before C# 4.0 there was no on demand initialization by default. So at the time of declaration we need to create a value or object will be null or we have to create on demand initialization via coding.. But with C# 4.0 we now have lazy class. As per MSDN it support lazy initialization so it means if we use lazy class then it will initialize the object at the time of demand.

It is very useful for UI responsiveness and other scenario's.  Lazy initialization delays certain initialization and  it’s improve the start-up time of a application. In the earlier framework if we need this kind of functionality we have to do it manually via coding but from C# 4.0 onwards it have Lazy<T> class. With the Help of this we can improve the responsiveness of C# application. Following is a simple example.
Share:
Sunday, December 30, 2012

Lock keyword in C#

As we have written earlier we have now multi-core CPU for our computers and laptops and to utilize that we need to use threading in code. Now if we create thread and access same resource at same time then it will create a problem at that time locking become quite essential in any programming language.

Let’s consider a scenario. We are having a small firm of computers and each computer is shared by two employees and they need to use computer for putting their sales data in excel sheet. So they can not work together at same time and one has to work and other has to wait till first one complete the work. Same situation can be occurred in programming in where we are using same resource for multiple thread.

C# provides locking mechanism via lock keyword. It restricts code from being executed by more then one thread at a time. That is the most reliable way of doing multi threading programming.
Share:
Friday, June 22, 2012

Why C# does not support multiple inheritance?

Yesterday, One of my friends, Dharmendra ask me why C# does not support multiple inheritance. This is the question most of the people ask every time. So I thought it will be good to write a blog post about it. So why it does not support multiple inheritance?

I tried to dig into the problem and I have found the some of good links from C# team from Microsoft for why it’s not supported in it. Following is a link for it.

http://blogs.msdn.com/b/csharpfaq/archive/2004/03/07/85562.aspx


Also, I was giving some of the example to my friend Dharmendra where multiple inheritance can be a problem.The problem is called the diamond problem. Let me explain a bit. If you have class that is inherited from the more then one classes and If two classes have same signature function then for child class object, It is impossible to call specific parent class method.
Share:
Wednesday, September 14, 2011

BigInteger in C# 4.0

In C# 4.0 Microsoft has added so many features and I love all most all the features. In today’s post we are going to discuss BigInteger Class. During programming some complex systems often we need a very big numbers. For example if we use some of asymmetrical cryptographic feature which require to use large numbers or we can give simple example of factorial where we sometime reached to limit of data type provided by C# compiler. At that time this BigInteger data type can be very handy. You can store 232 to 264 number in this data type. So its very big and you can copy very very big number in that data type.

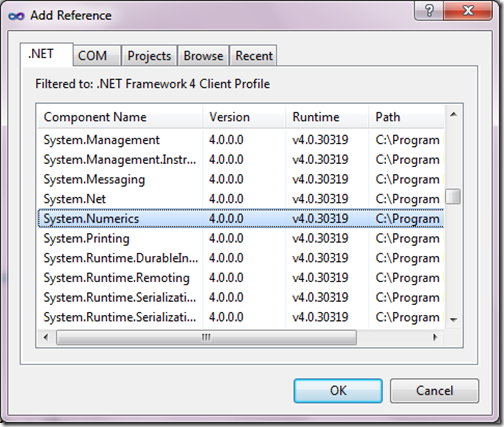
So let’s take a simple example to write a factorial program. BigInteger data type comes under System.Numerics namespace. So first we have to add reference to our program to System.Numerics assembly like following.

Big Integer In C# 4.0 - Add Reference to System. Numeric

Now we have added the reference to System.Numeric so we are ready for code. Here in code I have just taken a very large number in big integer which is out of range of integer to test out. So I have assigned ‘39242937852522522’ to big integer object and printed that. Following is a code for that.

using System;
using System.Numerics;

namespace ExperimentConsole
{
    class Program
    {
        static void Main(string[] args)
        {
            BigInteger n = 39242937852522522;
            Console.WriteLine(n);
        }
    }
}
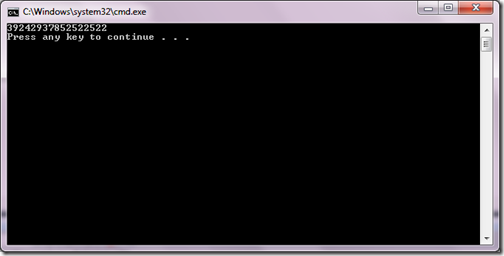
Let’s run code and see output like following as expected its printing value.

Output

If you are run same program with integer it will not compile. It will give ‘Can not covert type long to integer error’. That’s it. Hope you liked it. Stay tuned for more.. Till then happy programming. Namaste!!

Shout it
Share:
Sunday, August 28, 2011

Visual Studio 2010 Features post list on my blog

Share:
Wednesday, August 17, 2011

Creating Basic RSS Reader in ASP.NET MVC 3

In this post I am going to explain you how we can create a basic RSS Reader with the help of Linq-To-Xml and ASP.NET MVC3 Razor. Those who are writing or reading Blogs already knows what is RSS Reader. But those who does not know What is RSS. Below is the definition for RSS as per Wikipedia.


RSS (originally RDF Site Summary, often dubbed Really Simple Syndication) is a family of web feed formats used to publish frequently updated works—such as blog entries, news headlines, audio, and video—in a standardized format.[2] An RSS document (which is called a "feed", "web feed",[3] or "channel") includes full or summarized text, plus metadata such as publishing dates and authorship.
 

You can find more information about RSS from the following links.

Now let’s start writing code creating a Basic RSS Reader. So first We need two things to create RSS Reader. A RSS Entity class which hold properties for RSS and Another method which populate IEnumerable of particular RSS Class. We are creating this example with ASP.NET So I have create One Model class called RSS Like following.
using System.Collections.Generic;
using System.Linq;
using System.Xml.Linq;
using System.Text.RegularExpressions;

namespace CodeSimplified.Models
{
public class Rss
{
public string Link { get; set; }
public string Title { get; set; }
public string Description { get; set; }
}
}

Now our entity class is ready. Now we need a class and a method which will return IEnumerable of RSS Class. So I have created a Static Class RSS Reader which has “GetRSSFeed” Method which return RSS Feeds like following.

using System.Collections.Generic;
using System.Linq;
using System.Xml.Linq;
using System.Text.RegularExpressions;

namespace CodeSimplified.Models
{
public class RssReader
{
private static string _blogURL = "http://feeds.feedburner.com/blogspot/DotNetJalps";
public static IEnumerable<Rss> GetRssFeed()
{

   XDocument feedXml = XDocument.Load(_blogURL);
   var feeds = from feed in feedXml.Descendants("item")
               select new Rss
               {
                   Title = feed.Element("title").Value,
                   Link = feed.Element("link").Value,
                   Description = Regex.Match(feed.Element("description").Value, @"^.{1,180}\b(?<!\s)").Value

               };

   return feeds;

}
}
}

As you can see in above code. I am loading RSS feed with XDcoument Class with my Blog RSS feed URL and Then I am populating RSS Class Enumerable with the help of the Linq-To-XML. Now We are ready with Our Model classes so Now it’s time to Add ActionResult in Home Controller. So I have added Action Result which return View with RSS IEnumerable like following.

public ActionResult RssReader()
{
    return View(CodeSimplified.Models.RssReader.GetRssFeed());
}

Now everything is ready. So its time to create a view. So I have created strongly typed view for RSS Model class like following.

@model IEnumerable<CodeSimplified.Models.Rss>
@{
ViewBag.Title = "RssReader";
}

<h2>RssReader</h2>
<p>
@Html.ActionLink("Create New", "Create")
</p>
<table>
<tr>
<th>
   Title
</th>
<th>
   Description
</th>
<th>
   Link
</th>
</tr>

@foreach (var item in Model) {
<tr>
<td>
   <a href="@item.Link" target="_blank">@Html.Encode(item.Title)</a>
</td>
<td>
  @System.Web.HttpUtility.HtmlDecode(item.Description)
</td>
<td>
   <a href="@item.Link" target="_blank">More</a>
</td>
</tr>
}
</table>

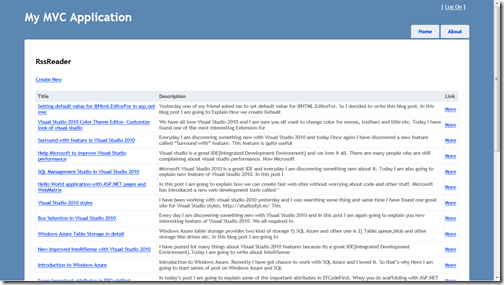
Let's run application via pressing F5 and Following is the output as expected.


RssReader

So that’s it. Isn’t that cool? With the few lines of code we have created a Basic RSS Reader. Hope you like it. Stay tuned for more.. Till then Happy Programming..

Shout itkick it on DotNetKicks.com
Share:
Tuesday, August 16, 2011

Setting default value for @Html.EditorFor in asp.net mvc

Yesterday one of my friend asked me to set default value for @HTML.EditorFor in ASP.NET MVC. So I decided to write this blog post. In this blog post I am going to Explain How we create Default values for model Entities. So Let’s start this via taking a simple example Model class called User. In User Model class I have created two properties UserName and UserJoinedDate. Following is a code for that.
using System;

using System.Collections.Generic;

using System.Linq;

using System.Web;


namespace CodeSimplified.Models

{

public class User

{

    private DateTime _userJoinDate = DateTime.Now;


    public DateTime UserJoinDate

    {

        get

        {

            return _userJoinDate;

        }

        set

        {

            _userJoinDate = value;

        }

    }


    public string UserName

    { get; set; }

}

}
As you can see in above class username is default property while for UserJoinedDate I have used old method of declaring properties. Where I have assigned a private variable with System DateTime.
Now let’s Create a Action Result User in Home Controller like following where I am returning a new User View like following.

using System;

using System.Collections.Generic;

using System.Linq;

using System.Web;

using System.Web.Mvc;


namespace CodeSimplified.Controllers

{

public class HomeController : Controller

{

    public ActionResult Index()

    {

        ViewBag.Message = "Welcome to ASP.NET MVC!";


        return View();

    }


    public ActionResult About()

    {

        return View();

    }


    public ActionResult User()

    { return View(new CodeSimplified.Models.User()); }

}

}

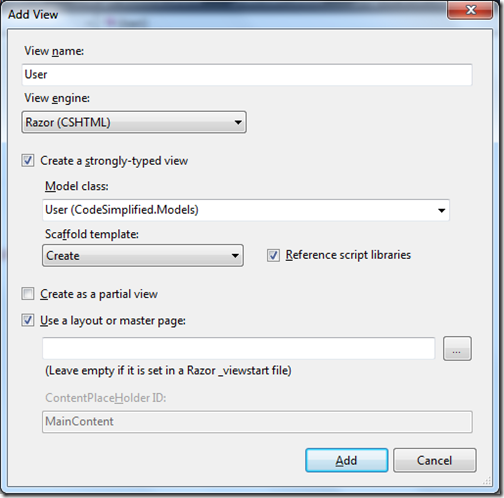
Now Let’s Create User View from the action right click Add view like following. Here I have created Strongly Typed view like following.


User

Once you click Add It will add a new View like following.

@model CodeSimplified.Models.User


@{

ViewBag.Title = "User";

}


<h2>User</h2>


<script src="@Url.Content("~/Scripts/jquery.validate.min.js")" type="text/javascript"></script>

<script src="@Url.Content("~/Scripts/jquery.validate.unobtrusive.min.js")" type="text/javascript"></script>


@using (Html.BeginForm()) {

@Html.ValidationSummary(true)

<fieldset>

    <legend>User</legend>


    <div class="editor-label">

        @Html.LabelFor(model => model.UserJoinDate)

    </div>

    <div class="editor-field">

        @Html.EditorFor(model => model.UserJoinDate)

        @Html.ValidationMessageFor(model => model.UserJoinDate)

    </div>


    <div class="editor-label">

        @Html.LabelFor(model => model.UserName)

    </div>

    <div class="editor-field">

        @Html.te

        @Html.EditorFor(model => model.UserName)

        @Html.ValidationMessageFor(model => model.UserName)

    </div>


    <p>

        <input type="submit" value="Create" />

    </p>

</fieldset>

}


<div>

@Html.ActionLink("Back to List", "Index")

</div>


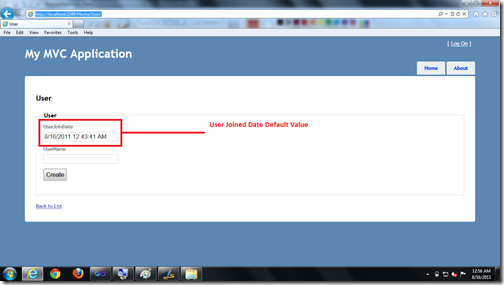
Now everything is ready so Let's run that in browser. Following is the output as expected.

Browser

So that’s it. It’s very easy. Hope you liked it. Stay tuned for more.. Till then happy programming.

Shout itkick it on DotNetKicks.com
Share:
Friday, July 22, 2011

Box Selection in Visual Studio 2010

Every day I am discovering something new with Visual Studio 2010 and In this post I am again going to explain you new interesting feature of Visual Studio 2010. We all required to modify the code in bulk some time and there is a new features for Visual Studio 2010 which enables to made changes in multiple line at same time. Let’s take a simple example like following.


using System;

namespace Parallel
{
  class Program
  {
         private int a=10;
         private int b=10;
         private int c=10;

         static void Main(string[] args)
         {

         }  
  }
}

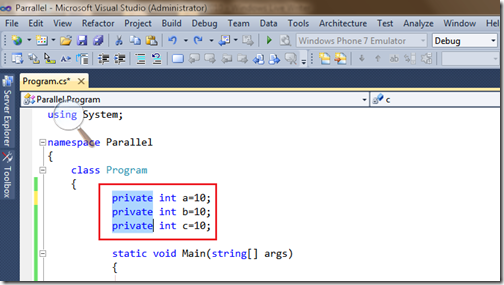
In above code I have three private variable a,b and c and now I want to make them protected. There is two way either I do manually one by one or I can do it with box selection and modify them together. It very easy to use this feature Press ALT+ SHIFT and draw box with help of mouse on the code which you need to modify like following.


SelectedBox

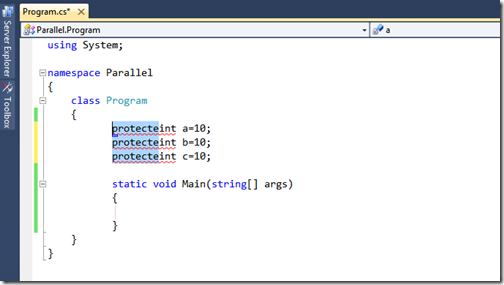
Now I want to make it protected so I started writing protected and it will modify all the line at same time like following.

ChangedCode

And now my code is like following.

using System;

namespace Parallel
{
  class Program
  {
         protected int a=10;
         protected int b=10;
         protected int c=10;

         static void Main(string[] args)
         {

         }  
  }
}

That's it. Hope you like it… Stay tuned for more…Till then Happy programming.


Shout itkick it on DotNetKicks.com
Share:
Sunday, July 17, 2011

New Improved IntelliSense with Visual Studio 2010

I have posted lot many things about Visual Studio 2010 features because its a great IDE(Integrated Development Environment).Today I am going to write about IntelliSense improvement in Visual Studio 2010. Today when I was working with Visual Studio 2008 for a old project(Nowadays I am working with Visual Studio 2010), I have found new improve IntelliSense feature in Visual Studio 2010.


Filtering:


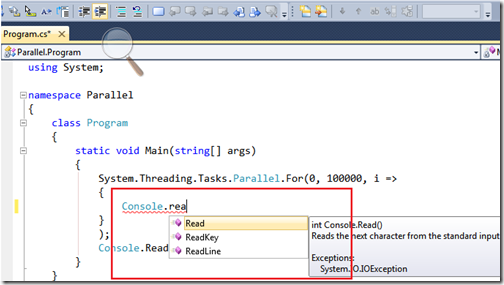
Visual Studio 2010 IntelliSense is filtered better than Visual Studio 2008. I have created a sample application and I am writing Console.ReadLine that you can see in following image its filtering with read only.

Intellisense

In earlier version it was not possible.Hope you like it. Stay tuned for more.. Happy Programming..

Shout it

kick it on DotNetKicks.com
Share:
Thursday, June 9, 2011

Finding Saturday,Sunday between date range in C#/ASP.NET

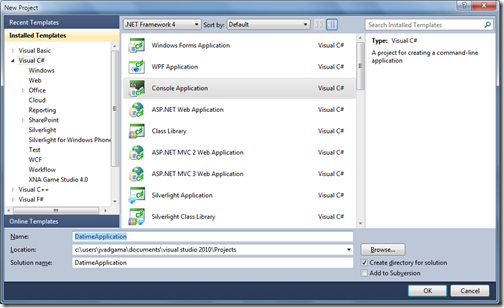
I know this post will sound basic to some of the people. But yesterday one of my reader asked me this question. So I decided to write this blog post . So lets first create a console application which will find the Saturday,Sunday between two dates just like following.

DateTimeConsoleApplication

Once you are ready with Console application. You need to write following code in that to find and print Saturday and Sunday between particular date range.

using System;

namespace DatimeApplication
{
   class Program
   {
       static void Main(string[] args)
       {
             DateTime startDate=new DateTime(2011,3,1);
             DateTime endDate = DateTime.Now;

             TimeSpan diff = endDate - startDate;
             int days = diff.Days;
             for (var i = 0; i <= days; i++)
             {
                 var testDate = startDate.AddDays(i);
                 switch (testDate.DayOfWeek)
                 {
                     case DayOfWeek.Saturday:
                     case DayOfWeek.Sunday:
                         Console.WriteLine(testDate.ToShortDateString());
                         break;
                 }
             }
           Console.ReadLine();
       }
   }
}
As you can see in above code I am finding Saturday and Sunday between 1st March 2011 and today. So I have taken two variables called startDate and endDate. After that I have got difference between them and then via for loop I am checking that day of week is Saturday or Sunday then I am printing that. Now lets run the application and lets check browser and Here you can see below output as expected.

Output

So as you can see it is very Easy. You can find any weekday that way. Hope you liked it. Stay tuned for more..

Shout it

kick it on DotNetKicks.com
Share:
Monday, May 16, 2011

Playing with dapper Micro ORM and ASP.NET MVC 3.0

Some time ago Sam Saffron a lead developer from stackoverflow.com has made dapper micro ORM open source. This micro orm is specially developed for stackovewflow.com for keeping performance in mind. It’s very good single file which contains some cool functions which you can directly use in your browser. So I have decided to have a look into it. You can download dapper code from the following location it’s a single static class file called SQLMapper.

http://code.google.com/p/dapper-dot-net/

So once you download that file you can use that file into your project. So I have decided to create a sample application with asp.net mvc3. So I have created a simple asp.net mvc 3 project called DapperMVC. Now let’s first add that SQLMapper class file into our project at Model Folder like following.
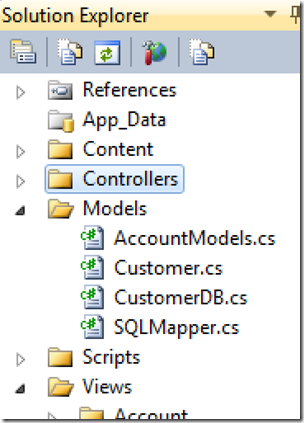
SQLMapper

Now let’s first create sample table from which we will fetch the data with the help of dapper file. I have created sample customer table with following script.

SET ANSI_NULLS ON
GO

SET QUOTED_IDENTIFIER ON
GO

CREATE TABLE [dbo].[Customer](
 [CustomerId] [int] NOT NULL,
 [FirstName] [nvarchar](50) NULL,
 [LastName] [nvarchar](50) NULL,
 [Address] [nvarchar](256) NULL,
 [City] [nvarchar](50) NULL,
CONSTRAINT [PK_Customer] PRIMARY KEY CLUSTERED
(
 [CustomerId] ASC
)WITH (PAD_INDEX  = OFF, STATISTICS_NORECOMPUTE  = OFF, IGNORE_DUP_KEY = OFF, ALLOW_ROW_LOCKS  = ON, ALLOW_PAGE_LOCKS  = ON) ON [PRIMARY]
) ON [PRIMARY]

GO

Once I have created table I have populated some test data like following.
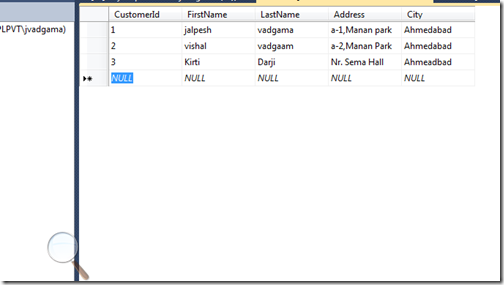
TestData

Now we are ready with database table Now its time to add a customer entity class. So I have created sample customer class with properties same as Database columns like following.

public class Customer
{
 public int CustomerId { get; set; }
 public string FirstName { get; set; }
 public string LastName { get; set; }
 public string Address { get; set; }
 public string City { get; set; }
}

Now we are done with the Customer Entity class then I have created a new class called CustomerDB and a created a GetCustomer Method where I have used Query Method of Dapper to select all customers with ‘select * from customer’ simple query. I know it’s not a best practice to write ‘select * from customer’ but this is just for demo purpose so I have written like this. Query method accepts query as parameter and returns IEnumerable<T> where T is any valid class. In our case it will be Customer which we have just created before. Following is the code for CustomerDB Class.

using System.Collections.Generic;

public class CustomerDB
{
 public string Connectionstring=@"Data Source=DotNetJalps\SQLExpress;Initial Catalog=CodeBase;Integrated Security=True";

 public  IEnumerable<Customer> GetCustomers()
 {
     using (System.Data.SqlClient.SqlConnection sqlConnection = new System.Data.SqlClient.SqlConnection(Connectionstring))
     {
         sqlConnection.Open();
         var customer = sqlConnection.Query<Customer>("Select * from Customer");
         return customer;

     }
 }

}

Now we are ready with our model classes now It’s time to Create a Controller so I have created a Customer Controller like following.
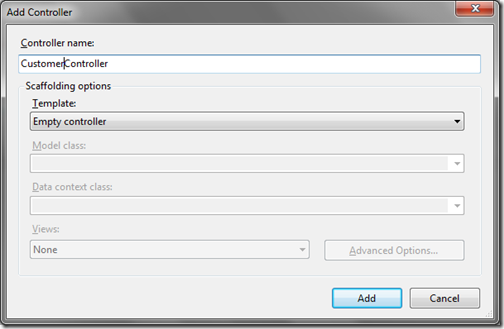
CustomerController

It will create customer controller in controller folder with by default ActionResult Index. I have modified Action Result just like to following to return customerEntities with IndexView.

public class CustomerController : Controller
{
 //
 // GET: /Customer/

 public ActionResult Index()
 {
     var customerEntities = new CustomerDB();
     return View(customerEntities.GetCustomers());

 }

}

Now we are ready with our Customer Controller and now it’s time to create a view from the customer entities. So I have just right clicked customer entities and Create a View like following.
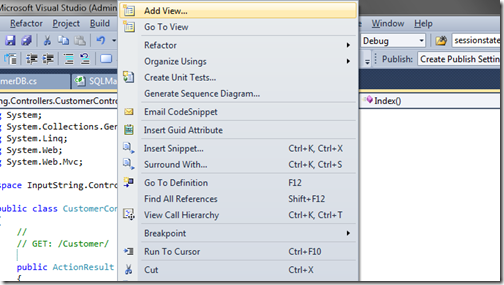
AddingView

It will popup the following dialogbox where I have selected Razor View with Strongly Typed View. Also I have selected Customer Model class customer and selected list template like following.
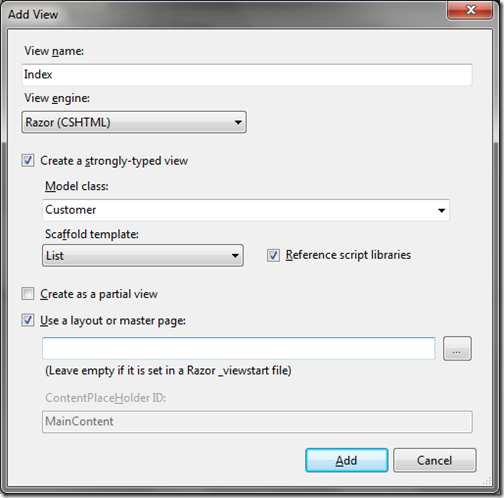
RazorView

That’s it now we are done with all the coding and It’s now time to run the project and result is as accepted as following.
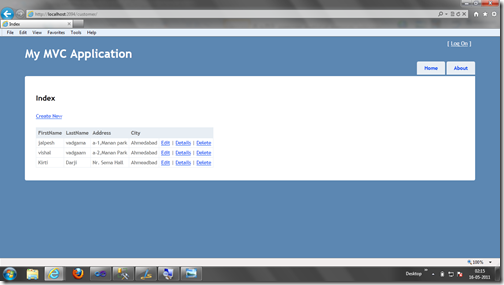
Browser

That’s it. Isn’t that cool? Hope you liked this. Stay tuned for more.. Happy programming

Shout it

kick it on DotNetKicks.com
Share:
Monday, April 18, 2011

Visual Studio 2010 and UML(Unified Modeling Language) Part-I

Microsoft Visual Studio 2010 comes with great UML Features I will explain them in details in future post. But In this post I am going to explain the UML concepts because its necessary to understand UML concepts before moving to Visual Studio 2010 part. I know this post may sound very basic to some of people but its necessary to understand visual studio 2010 UML Features. So let’s start first basic question.

What is UML?

UML means Unified Modeling Language its a standard language for specifying, visualizing, and documenting the artifacts of software systems as well as for business modelling . UML provide a set of engineering practice that has proven successful modeling of large complex and complex systems. In UML mostly graphical notations are used for expressing design concepts of software. Using UML software development team communicate,explore and architectural design of large scale projects.

Goals and Advantages of UML

  1. Provide user a visually appealing modelling language
  2. Its provides extensibility and specialization mechanism to extend the software.
  3. Its independent of any programming language
  4. Its works better with Object Oriented Design concepts
  5. It integrates best practices

Why we need to use UML?

As you know software is now key part of any company production life cycle. Companies want to enhance their production life cycle with the help of software. So software industries are looking towards to automate the best practices,frameworks and patterns. UML language is defined to use this kind of things.

Different Type of UML Diagrams

1) Class Diagram

This diagram displays contains classes,packages and structures. It displays the relationship between them and Inheritance also.

2) Sequence Diagram

This diagram displays sequences of object and classes participating in the particular operation.

3) Use Case Diagram

This diagram displays the relationship between the actors and user cases.

4) Activity Diagram

This diagram displays the flow of the iteration. Here it describes the actions that are taken on particular objects

5) Component Diagram

This diagram displays the code component of system. It displays high level structure of code itself. It also shows dependencies among the components.

6) Layer Diagram

This diagram visualizes the logical architecture of the system.
We will explore this each Diagram in great details in forthcoming posts.
Visual Studio 2010 and UML

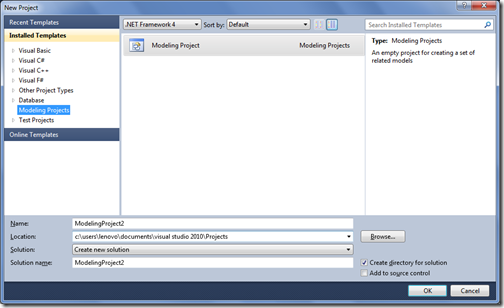
Microsoft Visual Studio 2010 supports the Modelling Projects from where you can create different diagrams. Like following.

ProjectDialog

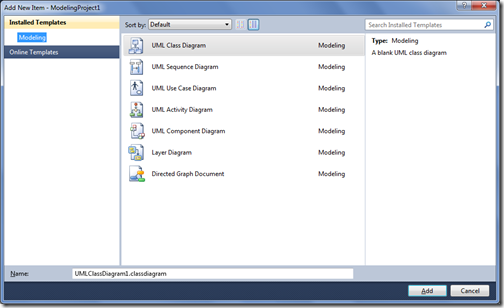
After that You can add any diagrams and other components of the UML via right click project->add new item.

UMLDiagram

That’s it. We will explore all the features in great details in forthcoming posts. Stay tuned for more.. Hope this will help you..
Shout it
kick it on DotNetKicks.com
Share:
Thursday, April 14, 2011

ExpandoObject class in C# 4.0

As you know till now in c# everything was static and known at design time. But with the C# 4.0 language Microsoft have enabled new dynamic data type which is belongs to Dynamic Language Runtime on top of CLR(Common language Runtime). As you know that dynamic object will know their behaviour at run time. Here Microsoft has given one new class called ExpandoObject class. ExpandoObject class is a member of System.Dynamic namespace and is defined in the System.Core assembly. This class object members can be dynamically added and removed at runtime. This is class is a sealed class and implements number of interfaces like below.
public sealed class ExpandoObject :
IDynamicMetaObjectProvider,
IDictionary<string, object>,
ICollection<KeyValuePair<string, object>>,
IEnumerable<KeyValuePair<string, object>>,
IEnumerable,
INotifyPropertyChanged;

Now let’s take a simple example of console application. Where we will create a object of expandoobject class and manipulate that class at run time. Let’s create a simple code like below.

using System;
using System.Collections.Generic;
using System.Linq;
using System.Text;

namespace ExpandoObject
{
class Program
{
    static void Main(string[] args)
    {
        dynamic users = new System.Dynamic.ExpandoObject();
        users.UserName = "Jalpesh";
        users.Password = "Password";

        Console.WriteLine(string.Format("{0}:{1}","UserName:",users.UserName));
        Console.WriteLine(string.Format("{0}:{1}","Password:",users.Password));

        Console.ReadKey();
    }
}
}

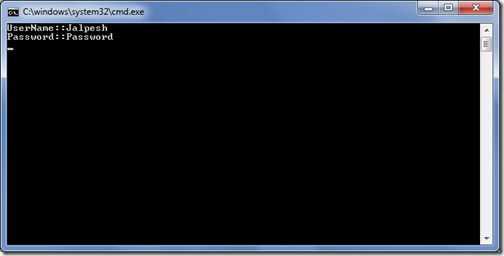
Here in the above code I have added a new memeber called UserName and Password for the new dynamic user type and then print their value. Now let’s run the application and see its output as below

ExpandoObject

That’s it. You can add valid type of member to ExpandoOjbect class. Isn’t interesting.. Hope you liked it.. Stay tuned for more..

Shout it

kick it on DotNetKicks.com
Share:
Wednesday, April 13, 2011

Variable Reference Code Highlighting and Hide selection features of Visual Studio 2010.

Microsoft Visual studio 2010 is a Great IDE(Integrated Development Environment) and I am exploring everyday something new in this blog post , I am also going to explore something new with Visual Studio 2010. There are two more new features that can make developers life easier. Let’s explore that in detail.

Variable Reference Code Highlighting

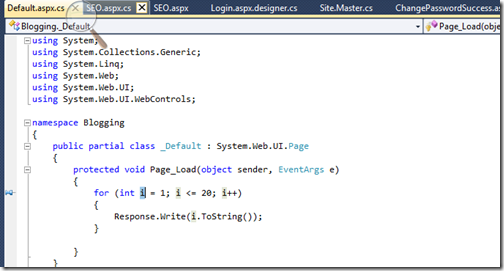
It’s a new feature there in Visual studio 2010. Whenever you put the cursor on the variable it will highlight all the code where that variable used. This is a very nice features as within one shot we can see what is done with that variable in code just like following.

VariableRefeferene

Hiding selected code in Visual Studio 2010

In earlier version of Microsoft Visual Studio We can collapse the method and region. But you can not collapse the particular code block but with Visual Studio 2010 code you can hide the particular selected code via right click outlining –>Hide Selection and you can highlight code lets see first following code.
using System;
using System.Collections.Generic;
using System.Linq;
using System.Web;
using System.Web.UI;
using System.Web.UI.WebControls;

namespace Blogging
{
 public partial class _Default : System.Web.UI.Page
 {
     protected void Page_Load(object sender, EventArgs e)
     {
         if (Page.IsPostBack)
         {
             Response.Write("Page is not postback");
         }

         for (int i = 1; i <= 20; i++)
         {
             Response.Write(i.ToString());
         }
     }
 }
}

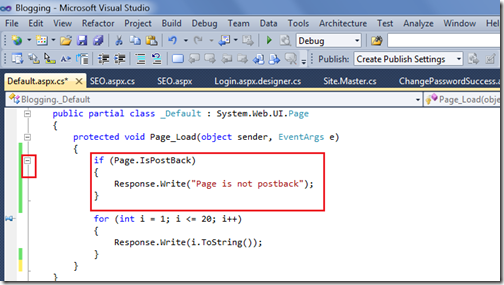
Now I want to hide the following Page.IsPostBack part via right click Outlining –> Hide Selection

CodeHiding

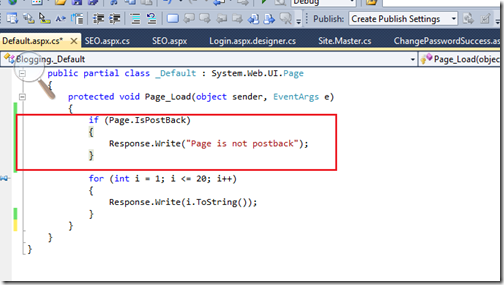
As you can see in above image there is –(Minus) Icon so you can collapse that code Just like region. Now you want to undo the collapsing then once again you need to select the code in editor and then right click and then select Outlining->Stop Hiding Current and then it will be treated as normal code with out collapsible block Like below.

UndoSelection

That’s it hope you liked it.. Stay tuned for more.. Happy programming..

Shout it

kick it on DotNetKicks.com
Share:
Monday, April 11, 2011

New search feature Navigate To in Visual Studio 2010

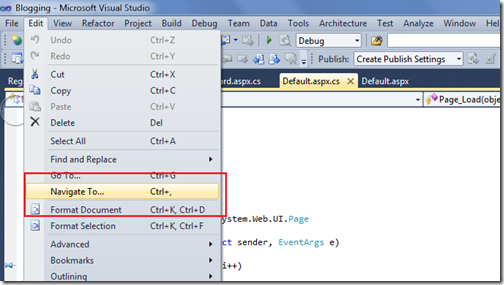
While you are doing code review then it is very necessary to search code and navigate code what you are reviewing and Navigate To feature of Visual Studio 2010 is made for the same. With the help of that feature you can easily navigate through code. You can go to Navigate Window via Edit-> Navigate To or you can directly apply Ctrl + , like following.

NavigateTo

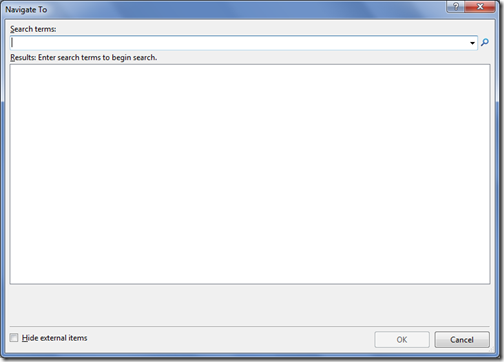
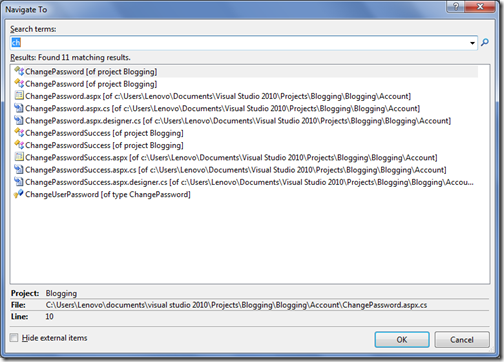
After clicking on Navigate Too a window will open like following.

NavigateToWindow

Now you can navigate to any code with this window like following.It’s a incremental search so once you started typing it will automatically filter it self.

NavigateToSearch

So If you know the method name and anything related to project then it very easy to search with this feature. Hope you liked it. Stay tuned for more.. Happy Programming.

Shout it

kick it on DotNetKicks.com
Share:
Sunday, April 10, 2011

Pin features while debugging in Visual Studio 2010.

Visual Studio 2010 is one of most awesome tool to debug Microsoft.NET related code. I have found one more interesting feature with the Visual studio 2010. That is called Pin Data Tip feature. This features can be very useful when you are debugging the code with loops. Normally when you debug with the code if you want to know the value of variable then you have to put your cursor on that variable and tool tip will show the values of that variable. The pin feature will pin that tool tip and you don’t have to put mouse over there. Let’s take a simple example to examine that feature. Below is the code for that. I have created a simple for loop and I am printing variable value with Response.Write on asp.net page. Below is the code for that.

using System;
using System.Collections.Generic;
using System.Linq;
using System.Web;
using System.Web.UI;
using System.Web.UI.WebControls;

namespace Blogging
{
  public partial class _Default : System.Web.UI.Page
  {
      protected void Page_Load(object sender, EventArgs e)
      {
          for (int i = 1; i <= 20; i++)
          {
              Response.Write(i.ToString());
          }
       
      }
  }
}

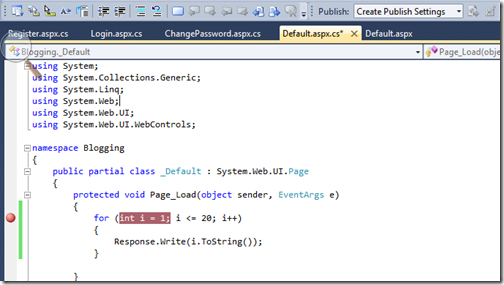
Now let’s put the break point on for loop like following and then start debugging via pressing F5.

BreakPoint

Now I have started debugging and first time code execution came to my break point. Now you can see when I put mouse pointer to that value it will show a variable I value like following.

VaraibleValue

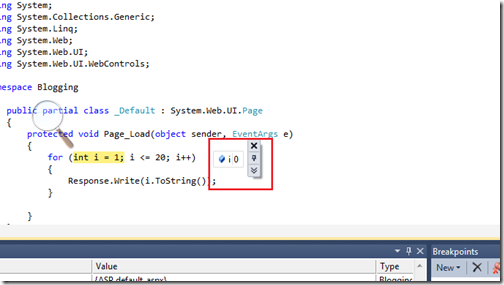
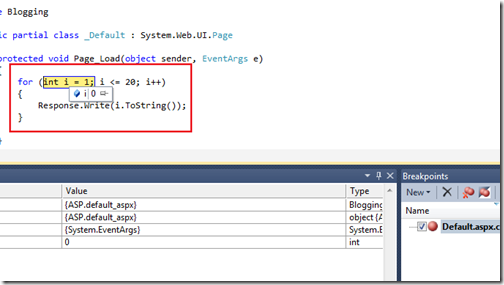
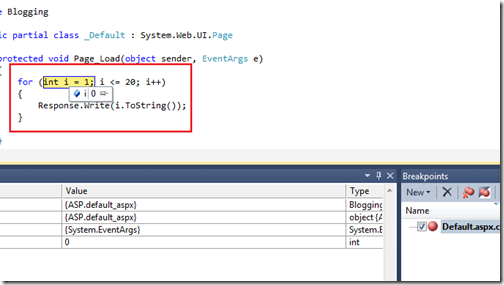
Now as you can see there is one Icon in above code so once you click on that pin Icon that it will pin the DataTip for that variable like following.

Pindatatip

So now whatever you debug in that loop you can see the the value of variable I at any time like following.

VaraibleValue

So that’s it. Now life become easy with this kind of new debugging features of visual studio 2010. Hope you liked it.. Stay tuned for more.. Happy Programming.

Shout it

kick it on DotNetKicks.com
Share:

Support this blog-Buy me a coffee

Buy me a coffeeBuy me a coffee
Search This Blog
Subscribe to my blog


My Mvp Profile
Follow us on facebook
Blog Archive
Total Pageviews