Showing posts with label C#-4.0. Show all posts
Sunday, April 10, 2011

View Call Hierarchy window in Visual Studio 2010

Visual studio 2010 Ultimate is great IDE(Integrated Development Environment) and I am loving more and more whenever I found some thing new. While doing some Code and Review and other stuff with Visual Studio 2010 I have found one of most interesting feature in Visual Studio 2010 called “Called Hierarchy”.You can navigate your code better with the Call Hierarchy feature in Visual Studio 2010.
To check out let’s Create a sample asp.net MVC application like following .
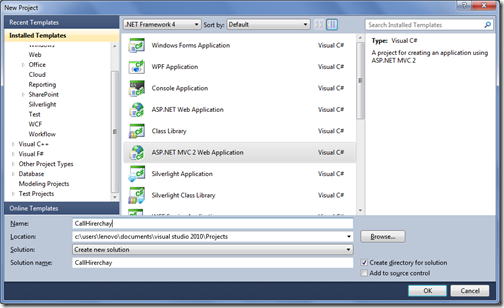
CallHirerchay

After creating a ASP.NET MVC 2 application it will create a basic simple application and we can run it and We have two views like home and about. We will check few code with Call Hirarchy. We can enable Call hierarchy window with two way one from the View->View Call Hierarchy like following or you can also use the shortcut Ctrl+Alt+K.
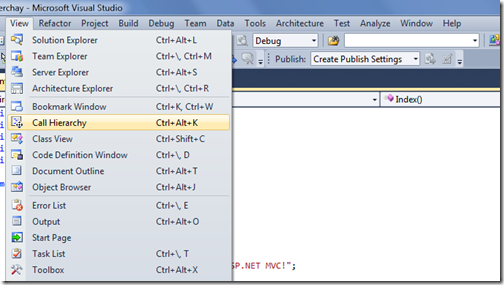
CallHirerarchywindow 

Now lets check the Account Controller-> Logon Action Result with call hierarchy You can also enable call hierarchy with selecting the Logon action and right click –> View Call Hierarchy like following or You can use the Shortcut for that like Ctrl + K,Ctrl + T.
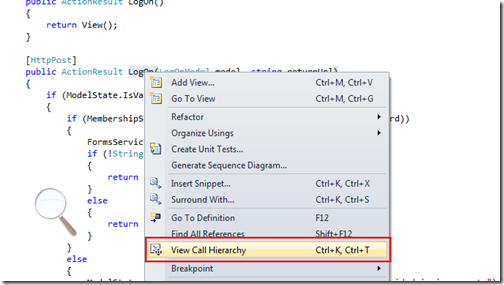
ViewCallHierarchy 

Once you click the call Hierarchy It will open the code that is called logon and also call made from the logon method like below.
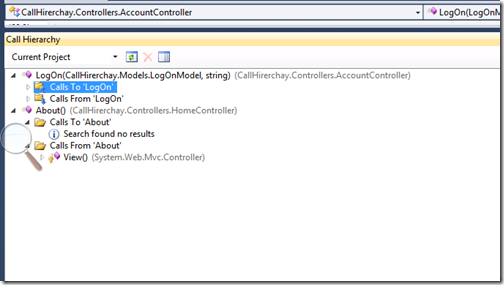
CallHierarchayforLogin

One you expand the both ‘Call To LogOn’ and ‘Calls from LogOn’ you can see all the calls Since there is no call for Logon on asp.net mvc sample application it will say but you can see calls made from it like following.
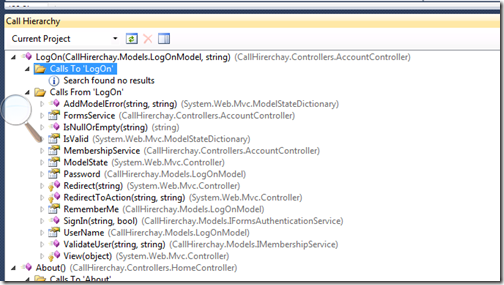
DetailOfCall

And on double click on any method or property will navigate you that code. Like I have double clicked the IsNullOrEmpty I have navigated to string class with that property.
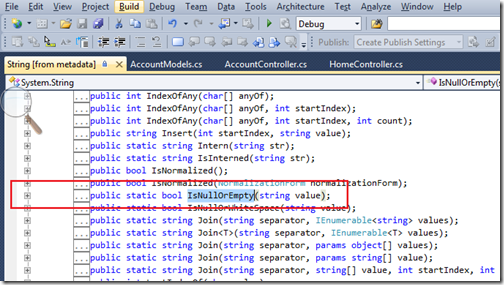
StringIsnullOrEmpty

That’s it. So you can see its a great way to navigate code for code review and code inspection. Hope you liked it.. Stay tuned for more.. Happy Programming..

Shout it

kick it on DotNetKicks.com
Share:
Friday, April 8, 2011

Historical Debugging (Intellitrace) on Visual Studio 2010 Ultimate Part-2

In the first post I have explained how historical debugging will going to work and how we can enable the historical debugging. In this blog post I am going to take one real time scenario and then we will see the How historical debugging will work. Here I have selected the second option for Intellitrace - Track event and call Information. I am going to check historical debugging with my asp.net application so following is a simple code for that.

using System;
using System.Collections.Generic;
using System.Linq;
using System.Web;
using System.Web.UI;
using System.Web.UI.WebControls;

namespace Blogging
{
 public partial class _Default : System.Web.UI.Page
 {
     protected void Page_Load(object sender, EventArgs e)
     {
         Response.Write("This is a page load event");
         ThrowHistoricalException();
     
     }
     public void ThrowHistoricalException()
     {
         throw new Exception("Historical Deubgging");
     }

 }
}

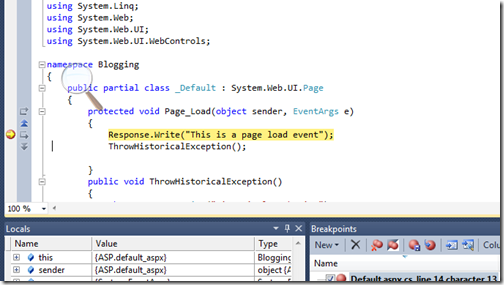
In above code you can see its very simple We are printing one statement on in page load event with Response.Write and then it will call a new method called ThrowHistoricalDebugging. Where it will throw a new exception. Now all ready to check let press F5 to debug this thing. I have putted the break point over Response.Write statement so We can trace everything.  so now debugging starts at my break point Just like below

HistoricalDebuggingBreakPoint

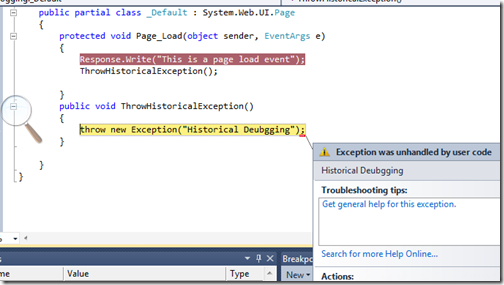
Now let’ proceed the things further now lets step in with the pressing F10 It will call ThrowHistoricalException and Here you can see the exception like following.

HistoricalDebuggingException

As You can see now the Exception thrown. Now lets move to IntelliTrace window what’s are information there.

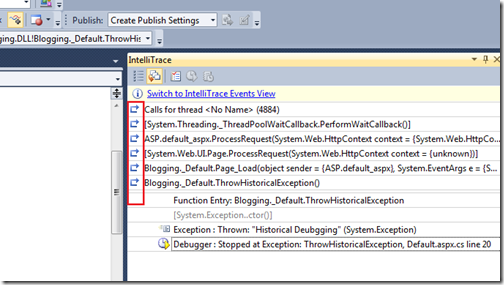
IntelliTraceWindow

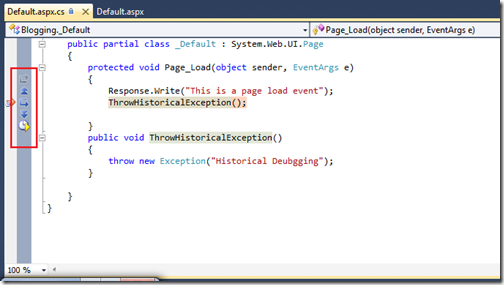
As you can see whole event and method trace information here in Intellitrace windows. Also you can see the A reviwnd Icon there so on clicking on that you can got the specific events and restart debugging. Now I have clicked on Page_load event and Now its going to the page_load event statement where the exception is thrown. Just like below.

IntellitraceRewind

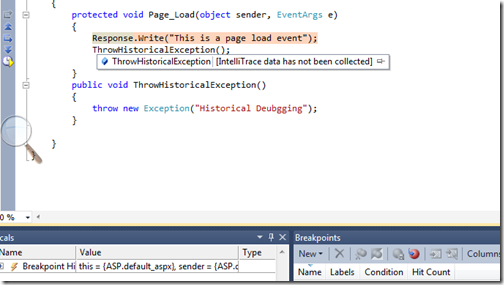
Also you can see there button given to move updown and other stuff to move your current point up and down. I have click move up and You can see in below image its moving up.

IntelliTraceUp

That’s it. As you can see its very easy to move up down and go back to location of code wherever you want with historical debugging. So now you can easily see what happens when your tester is reproducing the bugs. Hope you like it. Stay tuned for more.. Happy Programming.

Shout it

kick it on DotNetKicks.com
Share:

Historical Debugging (Intellitrace) on Visual Studio 2010 Ultimate Part-1

Visual studio 2010 Ultimate comes with one of most interesting function Historical Debugging which will change the way you debug. Let’s see what is Historical Debugging and How its works.

How historical Debugging works?

As as developer you have already faced some situations like Your tester reports a bug and you are not able to reproduce that bug in your local environment or you have very long steps to reproduce it and sometimes it reproduces under special condition and some times it does not. At that time this historical features comes into existence. With Visual Studio 2010 Ultimate Microsoft has introduced a new debugging tool intellitrace. It keeps a trace of important points of your program and its allow you to go back at that time to see what happened at that time. Isn’t that cool? that is just like rewinding your recording to edit your video.

How we can enable Intellitrace on Visual Studio 2010 ?

To enable it you need to go to the Tool->Options->Intellitrace->General just like following.

IntelliTracedialog in Visual Studio Dialog

There is a check box called ‘Enable Intellitrace’. You need to check that checkbox to enable IntelliTrace (Historical Debugging). There are two radio buttons

1) IntelliTrace Event Only- This option will enable historical debugging for the events only. So it will only keep track of events only. Not all the parts of code.

2) Intellitrace events and Call Information: This option will enable historical debugging for events and inner called like method and other stuff. It records method level call but due to that your application performance can be effected. You will not get high performance from your application.

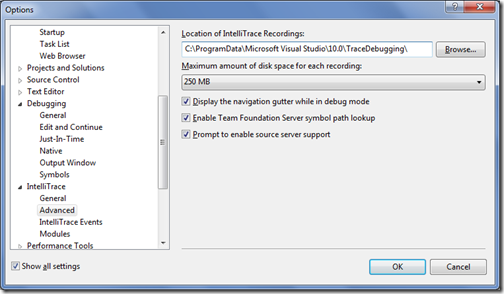
There are some advance options are also given in the options dialog box like following when you click advance in above dialog.

Advance of historical debugging in advnace.

Here you can specify the location of the IntelliTrace Recording and Maximum size of disk space for each recording.

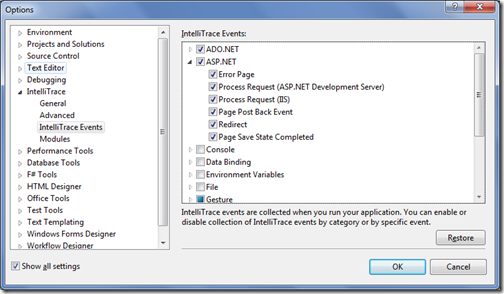
In Intellitrace Events options you can specify which kind of events you want to trace. I have enabled it on ASP.NET Project so I have options for ASP.NET and ADO.NET Enabled by default like following. But You can select events like file,Environment events and lots of options are available so you can specify that as per your requirement like following.

IntelliTraceEventsTypes

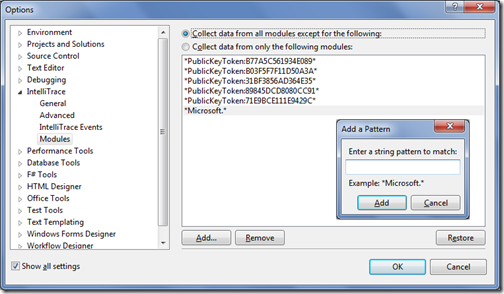
In Modules options you can select for which system modules you want to enable intellitrace if You can also add your own modules here with string pattern like following.

IntelliTraceModule

So,Now we all set for the Historical debugging(IntelliTrace) in Next Post I will demonstrate how historical debugging will work. Hope you liked it.. Stay tuned for more..

Shout it
kick it on DotNetKicks.com
Share:
Tuesday, January 25, 2011

Installing Nuget package with package manager console step by step overview.

I have already blogged about NuGet in earlier post about how to install NuGet packages to your project with wizard. NuGet Extension also provides an package manager console to add library to your projects. Let’s install a blogml package via package manager console. So if you still not installed NuGet exntension then please read my earlier post here that explains how to install the NuGet Extension.

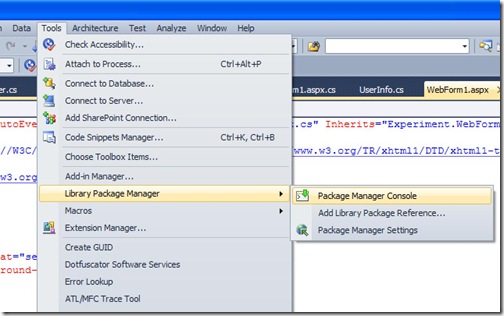
Once you are done with installing NuGet Extension to go to package manager console. You have to click Tools->Library package manager –>Package Manager console like following.

PcakgeManagerConsole

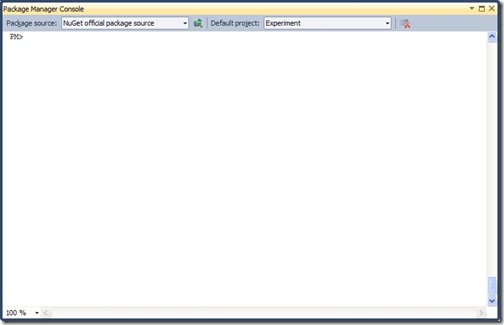
Once you click that menu you will get package manager console like following. PackageManagerConsolewindow

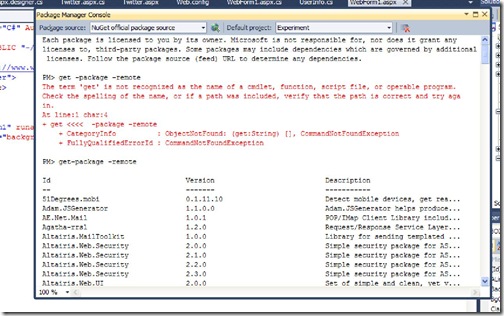
One you load an command line is available to you just need to write command to find packages and then you need to write command to install packages. let’s first see how many packages are available with the NuGet Extension. So first you have to write ‘get-package –remote’ command in command line to see what packages are available as following.

PackageCommand

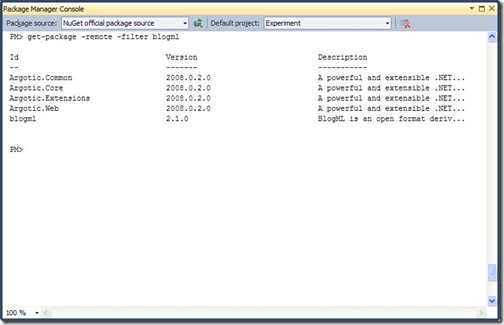
So It will load all the packages available in NuGet Now let’s filter some package via command. Suppose I want to install BlogML library to my project then I have to type ‘get-package –remote filter blogml’ and it will load all the packages that will contain BlogML like following.

FilterBlogML

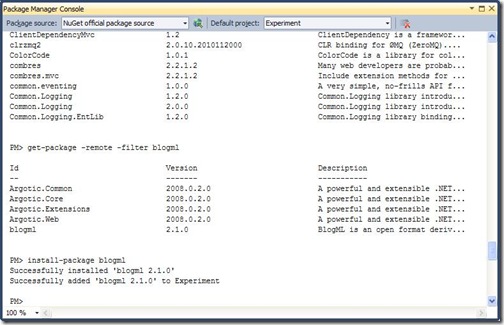
Now let’s install BlogML library to my project for that I have to type ‘install-package blogml’ and it will install the package like following.

InstallingPackage

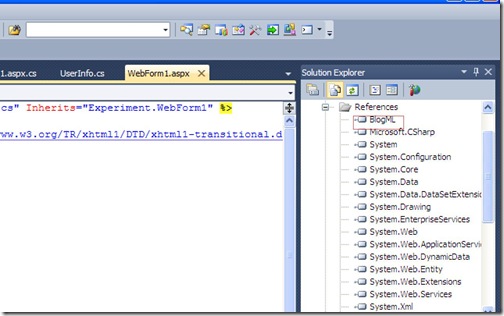
That’s it you can see Now your package is installed on your project and you find it in reference of your project like following.

BlogMLReference

It will also create packages.config and you can see installed packages there like following.

<?xml version="1.0" encoding="utf-8"?>
<packages>
<package id="blogml" version="2.1.0" />
</packages>

So that’s it as you can see its very easy to install NuGet package and its very convenient to install packages with this. Hope this help you. Stay tuned for more… Happy Programming..


Technorati Tags: ,,
Shout it
Share:
Friday, January 21, 2011

HTML and Java Script code snippets in Visual Studio 2010

We all love Visual Studio as great IDE and Microsoft is providing more and more features for that IDE. Let’s investigate one of great features that Microsoft has given with Visual Studio 2010.

What is code snippets?

Code snippets is a one of the cool feature that given in Visual Studio IDE. If you know the chunks of the code that you need to type over and over again throughout the code then this code snippets feature will help you on this. For example your exception handling code. Your redirection code everything you need more can be putted in the code snippets.

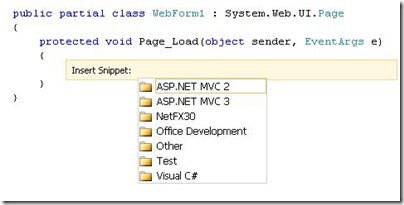
You can insert code snippets via right click –> Insert code snippets and there is also a short code is also available to bring up directly code snippets via pressing ctrl-K+ ctrl-X. Following is look of basic code snippets window.

CodeSnippets with visual studio 2010

You can put your code snippets. Below is link for creating code snippets in Visual Studio 2010.

http://msdn.microsoft.com/en-us/library/ms165394.aspx

HTML and Java Script Code snippets in Visual Studio 2010

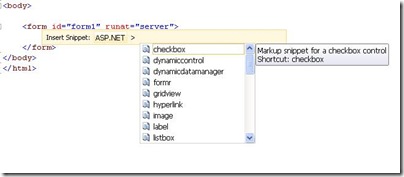
Till visual studio 2008 the code snippets are provide only on the code behind file. But with Visual Studio 2010 now you can have that in HTML and as well Java Script code snippets also and even If you have asp.net MVC installed with Visual Studio 2010. You can have code snippets for that also.

Here you can see HTML code snippets in asp.net web form file below.

HTMLCodeSnippet in visual Studio 2010

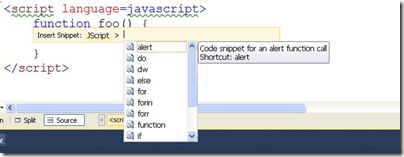
Same way you can have it Javascript code snippets also like following.

JavascriptSnippets

Isn’t that cool? Stay tuned for more!! Happy programming.

Shout it
Share:
Thursday, January 13, 2011

HTTP Module in details

I know this post may sound like very beginner level. But I have already posted two topics regarding HTTP Handler and HTTP module and this will explain how http module works in the system. I have already posted What is the difference between HttpModule and HTTPHandler here. Same way I have posted about an HTTP Handler example here as people are still confused with it. In this post I am going to explain about HTTP Module in detail.

What is HTTP Module?

As we all know that when ASP.NET Runtimes receives any request it will execute a series of HTTP Pipeline extensible objects. HTTP Module and HTTP handler play important role in extending this HTTP Pipelines. HTTP Module are classes that will pre and post process request as they pass into HTTP Pipelines. So It’s one kind of filter we can say which will do some procession on begin request and end request.

If we have to create HTTP Module we have to implement System.Web.IHttpModule interface in our custom class. An IHTTP Module contains two method dispose where you can write your clean up code and another is Init where your can write your custom code to handle request. Here you can your event handler that will execute at the time of begin request and end request.

Let’s create an HTTP Module which will just print text in browser with every request. Here is the code for that.

using System;
using System.Collections.Generic;
using System.Linq;
using System.Web;

namespace Experiment
{
public class MyHttpModule:IHttpModule
{
public void Dispose()
{
//add clean up code here if required
}

public void Init(HttpApplication context)
{
context.BeginRequest+=new EventHandler(context_BeginRequest);
context.EndRequest+=new EventHandler(context_EndRequest);

}
public void context_BeginRequest(object o, EventArgs args)
{
HttpApplication app = (HttpApplication)o;
if (app != null)
{
app.Response.Write("<h1>Begin Request Executed</h1>");
}
}
public void context_EndRequest(object o, EventArgs args)
{
HttpApplication app = (HttpApplication)o;
if (app != null)
{
app.Response.Write("<h1>End Request Executed</h1>");
}
}
}
}
Here in above code you can see that I have created two event handler context_Beginrequest and context_EndRequest which will execute at begin request and end request when request are processed. In this event handler I have just written a code to print text on browser.

Now In order enable this HTTP Module in HTTP pipeline we have to put a settings in web.config HTTPModules section to tell which HTTPModule is enabled. Below is code for HTTPModule.

<configuration>
<system.web>
<compilation debug="true" targetFramework="4.0" />
<httpModules>
<add name="MyHttpModule" type="Experiment.MyHttpModule,Experiment"/>
</httpModules>
</system.web>

</configuration>

Now I just have created a sample webform with following code in HTML like following.
<form id="form1" runat="server">
<B>test of HTTP Module</B>
</form>
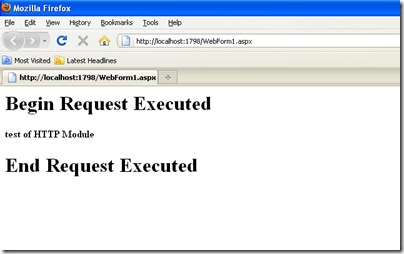
Now let’s run this web form in browser and you can see here it the output as expected.

HTTPModule

Technorati Tags: ,,
Shout it
Share:
Saturday, January 8, 2011

ASP.NET 4.0- Html Encoded Expressions

We all know <%=expression%> features in asp.net. We can print any string on page from there. Mostly we are using them in asp.net mvc. Now we have one new features with asp.net 4.0 that we have HTML Encoded Expressions and this prevent Cross scripting attack as we are html encoding them.

ASP.NET 4.0 introduces a new expression syntax <%: expression %> which automatically convert string into html encoded. Let’s take an example for that.

I have just created an hello word protected method which will return a simple string which contains characters that needed to be HTML Encoded. Below is code for that.

protected static string HelloWorld()
{
return "Hello World!!! returns from function()!!!>>>>>>>>>>>>>>>>>";
}
Now let’s use the that hello world in our page html like below. I am going to use both expression to give you exact difference.
<form id="form1" runat="server">
<div>
<strong><%: HelloWorld()%></strong>
</div>
<div>
<strong><%= HelloWorld()%></strong>
</div>
</form>

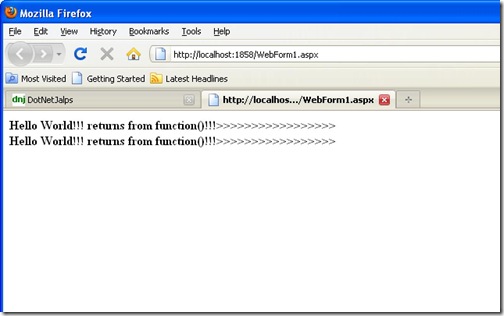
Now let’s run the application and you can see in browser both look similar.

HtmlEncodedExpression

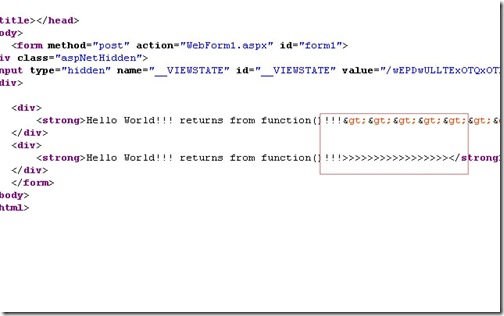
But when look into page source html in browser like below you can clearly see one is HTML Encoded and another one is not.

HtmlEncodeView with html encoding

That’s it.. It’s cool.. Stay tuned for more.. Happy Programming
Technorati Tags: ,,
Shout it
Share:
Sunday, January 2, 2011

.NET Framework 4.0-Guid.Parse Method

In earlier version of .NET framework we don’t have Guid.Parse method Now we have an Guid.Parse method in .NET Framework and it’s work like any parse method. Let’s see it by an example. Let’s create console application for that.

class Program
{
static void Main(string[] args)
{
string newID = "f718943d-757d-4975-947b-3dbff1205be6";
Guid myGuId = Guid.Parse(newID);
Console.WriteLine(myGuId.ToString());
Console.ReadLine();


}
}
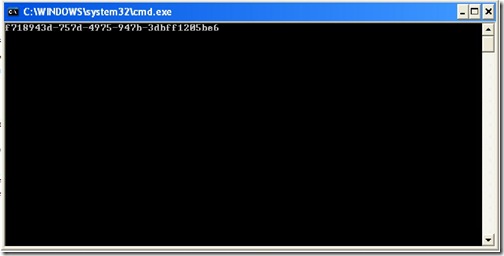
and as expected here is the out put for that.

Guid

That’s is it’s cool. Stay tuned for more..Happy programming..
Technorati Tags: ,
Shout it
Share:
Friday, December 31, 2010

Enum.HasFlag method in C# 4.0

Enums in dot net programming is a great facility and we all used it to increase code readability. In earlier version of .NET framework we don’t have any method anything that will check whether a value is assigned to it or not. In C# 4.0 we have new static method called HasFlag which will check that particular value is assigned or not. Let’s take an example for that. First I have created a enum called PaymentType which could have two values Credit Card or Debit Card. Just like following.

public enum PaymentType
{
DebitCard=1,
CreditCard=2
}
Now We are going to assigned one of the value to this enum instance and then with the help of HasFlag method we are going to check whether particular value is assigned to enum or not like following.
protected void Page_Load(object sender, EventArgs e)
{
PaymentType paymentType = PaymentType.CreditCard;

if (paymentType.HasFlag(PaymentType.DebitCard))
{
Response.Write("Process Debit Card");
}
if (paymentType.HasFlag(PaymentType.CreditCard))
{
Response.Write("Process Credit Card");
}

}
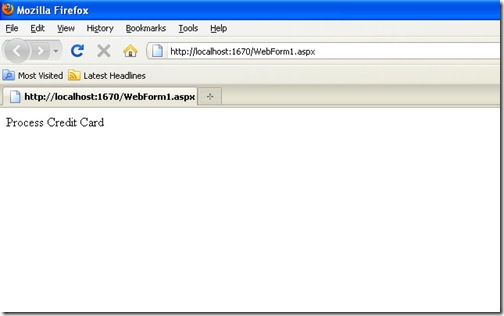
Now Let’s check out in browser as following.

Enum.Has Flag in C# 4.0

As expected it will print process Credit Card as we have assigned that value to enum. That’s it It’s so simple and cool. Stay tuned for more.. Happy Programming..
Technorati Tags: ,,
Shout it
Share:
Tuesday, June 22, 2010

Persisting row selection in data bound control like GridView,ListView

Some times we need show large amount of data like hundred of rows but its very difficult to show that in a single web page so we are using the paging mechanism of inbuilt data bound control of .NET Framework like GridView and ListView. But in paging of data bound control its very hard to remember the row selection like suppose you have selected a row in page 1 and then you goto the page2 and return back to page1 the selected row will not be there. So to do that thing you have right custom coding for that. In Microsoft .NET Framework 4.0 there is one property called EnablePersistedSelection which will automatically do that task. It will first introduced on dynamic data support in .NET Framework 3.5 sp1 but its bye default supported by default in .NET Framework 4.0 it self. In earlier version of .net framework the selection was based on row index now its will be based data key for data bound controls. Here is the code for that.

<asp:GridView id="PersitantGridView" runat="server" EnablePersistedSelection="true">
</asp:GridView>
Its based on datakey so now you go to page1 and selected third row and then go to the page 2 and selected second row and now you again go to first page and you will have third row selected. That’s it.. Hope this will help you..

Technorati Tags: ,,
Shout it
kick it on DotNetKicks.com
Share:
Saturday, June 19, 2010

Zip operator in Linq with .NET 4.0

Microsoft .NET framework 4.0 is having many features that make developers life very easy. Its also provides some enhancement to Linq also. I just found a great operator called Zip which merge the sequence of two entities.

Here is the explanation of Zip Operator from MSDN.

“The method merges each element of the first sequence with an element that has the same index in the second sequence. If the sequences do not have the same number of elements, the method merges sequences until it reaches the end of one of them”.

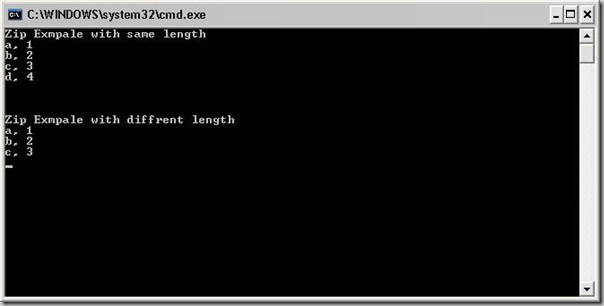
Here is the simple console application for the zip. I have taken three arrays for that one is string array, second one is integer array which is having same length as string array and third one is also integer array but having different length then string array. Here is the sample code for that.

using System;
using System.Collections.Generic;
using System.Linq;
using System.Text;


namespace ConsoleApplication1
{
class Program
{
static void Main(string[] args)
{
string[] a = { "a", "b", "c", "d" };
int[] num = { 1, 2, 3, 4 };
int[] numdiff = { 1, 2, 3, };


Console.WriteLine("Zip Exmpale with same length");
var ZipResult = a.Zip(num,(ae, ne)=>ae + ", " + ne.ToString());
foreach (string s in ZipResult)
{
Console.WriteLine(s);
}

Console.WriteLine(@"\n\n\nZip Exmpale with diffrent length");
ZipResult = a.Zip(numdiff,(ae, ne)=>ae + ", " + ne.ToString());
foreach (string s in ZipResult)
{
Console.WriteLine(s);
}

Console.ReadKey();
}

}
}
Here is the output of following code as expected.Linq Zip Operator in .NET 4.0

Hope this will help you.

Technorati Tags: ,,
Shout it
kick it on DotNetKicks.com
Share:
Saturday, June 12, 2010

ASP.NET4.0-Compatibility Settings for rendering controls

With asp.net 4.0 Microsoft has taken a great step for rendering controls. Now it will have more cleaner html there are lots of enhancement for rendering html controls in asp.net 4.0 now all controls like Menu, List View and other controls renders more cleaner html. But recently i have faced strange problem in rendering controls I have my site in asp.net 3.5 and i want to convert it in asp.net 4.0. I have applied my style as per 3.5 rendering and some of items are obsolete in asp.net 4.0. Modifying style sheet was a tedious job here asp.net 4.0 compatibility setting comes into help.

Asp.net 4.0 compatibility settings provides full backward compatibility in terms of the rendering controls. You can assign this in your web.config section like following.

<system.web>
<pages controlRenderingCompatibilityVersion="3.5|4.0"/>
</system.web>
Here the values of controlRenderingCompatibility is a string which will indicate on which way control should render in browser if you provide 4.0 then it will controls with more cleaner html and while if you want to go with old legacy rendering like 3.5 then you can put 3.5 and it will render same way as you are doing in asp.net 3.5.

Hope this help you!!!

Technorati Tags: ,
Shout it
kick it on DotNetKicks.com
Share:
Friday, May 21, 2010

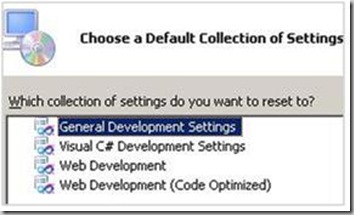
Two new profile in new visual studio 2010.

Visual studio 2010 is a great tool and i have become fan of visual studio 2010. I have found two new code profile in visual studio 2010.

  1. Web Development Profile
  2. Web Development Code Optimized Profile.

Profile

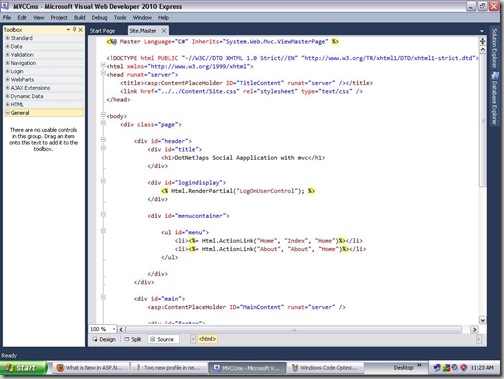
Web Development profile will hide the top bar which contains the client object and and event dropdowns. So it will have more spaces.

WebDevelopment

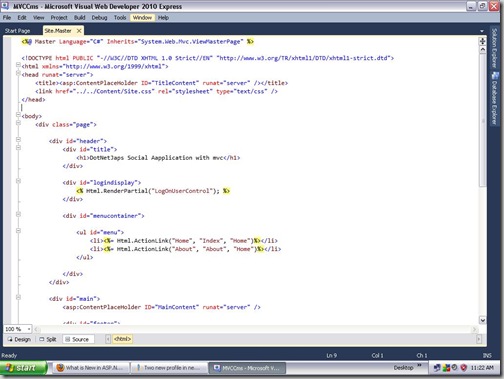
Another one web development code optimized which will hide all the things except main windows. It will hide Toolbox,CSS properties and all other things so you will have more spaces to play with your html.

Windows Code Optimized

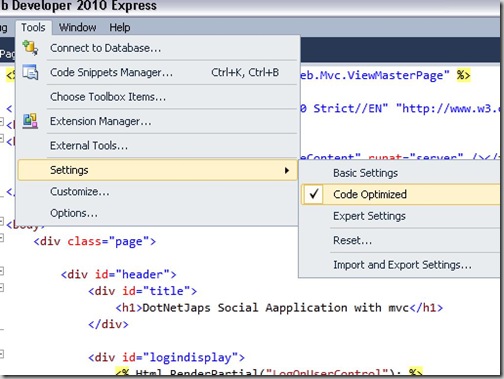
So as a web developer you can use this two great new profile as per your convenience when you only want to play with your html then use webdevelopement code optimized profile and another interesting thing is that you don’t have to reset your settings you can also just do with Tools->Settings menu like below. This will swap different profile like below.

Settigns

Hope this will help you..

Shout it
kick it on DotNetKicks.com
Share:

Support this blog-Buy me a coffee

Buy me a coffeeBuy me a coffee
Search This Blog
Subscribe to my blog


My Mvp Profile
Follow us on facebook
Blog Archive
Total Pageviews