Showing posts with label ASP.NET. Show all posts
Saturday, April 7, 2018

Video Recording : Webinar on ASP.NET Core on Linux

I have done a Webinar for DotNetTricks.com about ASP.NET Core on Linux. There were lots of curiosity about it and lots of people asked for the recording of Webinar so here we go Following is a link of recording of Webinar for ASP.NET Core on Linux. You can watch the full webinar on youtube at following.

https://www.youtube.com/watch?v=Hf0F7nZCTXM&t=706s


I would also like to Thanks Shailendra and Whole DotNetTricks team for the having me on this webinar.

Thank you. Stay tuned there were lots of stuff coming from ASP.NET core and Node.js.
Share:
Saturday, March 10, 2018

Solution: (Error)Unable to Correct problems, You have held broken packages–Install .NET Core on Ubuntu

Recently, I have been using Linux(Ubuntu) machine on my virtual box quite a bit and as  Microsoft.NET Developer I want to install .NET Core on Ubuntu. So I tried following the instruction from below link to install .NET core on Ubuntu 16.04.

https://docs.microsoft.com/en-us/dotnet/core/linux-prerequisites?tabs=netcore2x

But I was not unable to install .NET Core and I was getting following errors.

The following packages have unmet dependencies:
  dotnet-sdk-2.1.4 : Depends: dotnet-runtime-2.0.5 but it is not going to be installed
E: Unable to correct problems, you have held broken packages.
You can see the same error in the following screenshot.

error-ubuntu-net-core-214

I was a little bit curious about that and then I have read carefully the documentation mentioned on the above link and I have found that .NET Core require following require following Ubuntu distributions as Prerequisites.

  • libunwind8
  • liblttng-ust0
  • libcurl3
  • libssl1.0.0
  • libuuid1
  • libkrb5-3
  • zlib1g
  • libicu52 (for 14.X)
  • libicu55 (for 16.X)
  • libicu57 (for 17.X)

Most of the time it should be installed by default with sudo apt-get update and sudo apt-get upgrade command but sometimes it does not. So what I did install all these distributions one by one via sudo apt-get install command and in my case, I was not having liblttng-ust0 distribution on my machine. So I have installed it via the following command.

sudo apt-get install liblttng-ust0
You can also see below screenshot for the same.

install-ubuntu-distribution-for-netcore

Then I was able to install .NET Core on my machine via following above link on documentation.

install-netcore-ubuntu

And now it’s running .NET Core v 2.1.4 on my Ubuntu VirtualBox as you can see it in below dotnet version command.

net-core-version-command

I was able to solve my problem this and so I thought it will be a good idea to share it on my blog so it will help people who are having the same problem.

Stay tuned for more there is a lot more coming for asp.net core and node.js on Linux on future blog posts.
Share:
Sunday, April 2, 2017

How to integrate HangFire with ASP.NET Core 1.1

Hangfire is one of the easiest ways to perform background processing in.NET and.NET Core Applications. In this application we are going to learn how we are can integrate Hangfire with ASP.NET Core application.

About Hangfire:

Hangfire allows you to create background task in.NET applications. It’s extremely easy to integrate. It allows you to kick off method calls outside of the request processing pipeline in very easy but reliable way. You can store those jobs in on premise SQL Server, SQL Azure, Redis, MSMQ or Redis.

You can find more information Hangfire on the following link.
http://hangfire.io/

Hangfire also contains one of very maintained documentation at the following link.
http://docs.hangfire.io/en/latest/

Integrating HangFire with ASP.NET Core 1.1:

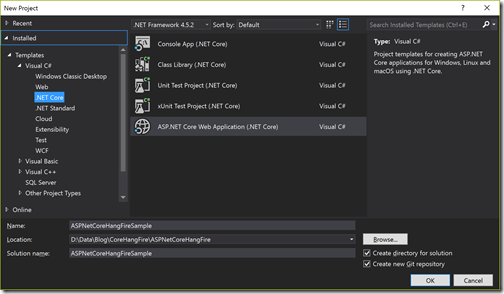
To demonstrate how we can integrate with ASP.NET core, I’m going to create a new ASP.NET Core application in Visual Studio 2017 like below.

new-aspnet-core-application-hangfire

Once click on it will ask for the selection of Application task we are going to select Web Application like below.

aspnet-core-hang-fire-web-application

As our application is not ready, We are going to install Hangfire nuget package in the application.

install-hangfire-nuget-package

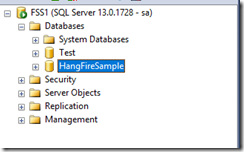
Now we are done with adding Hangfire to our asp.net core application. We need to create a SQL Server database for Hangfire application. Here I’m going to use SQL Server for Job storage but there are various Job Storage options available as mentioned above.

hangfire-sample-database

Now we need to have ConnectionString for the database. Let’s put it on appsetting.json like below.
{
  "ConnectionStrings": {
    "HangFireConnectionString": "Data Source=SQLServer;Initial Catalog=HangFireSample;User ID=YourUserName;Password=YourPassword;MultipleActiveResultSets=true"
  },
  "Logging": {
    "IncludeScopes": false,
    "LogLevel": {
      "Default": "Warning"
    }
  }
}

Now in Startup.cs file configure services method we need to integrate hangfire like below. Here I’ve added hangfire to our application and also indicated that we are going to use SQL Server for Job storage and provided connection string for the same.
public void ConfigureServices(IServiceCollection services)
{
    // Add framework services.
    services.AddMvc();
    services.AddHangfire(config=>config.UseSqlServerStorage(Configuration.GetConnectionString("HangFireConnectionString")));
}
Now Hangfire integration is easy to use. When you run it will automatically create tables related to Hangfire configuration and storage as below.


hangfire-tables-sql-server

Now you can easily add background task like below at any place.
  BackgroundJob.Enqueue(() => Console.WriteLine("BackGroundJob"));
Even you can add recurring job which will run at a specific time like below.
 RecurringJob.AddOrUpdate(() => Console.WriteLine("RecurringJob"), Cron.Daily);
That’s it. You can see it’s very easy to use and You can integrate Hangfire very easily. Hope you like it. Stay tuned for more!.
You can find complete source code of this application at following on github.com : https://github.com/dotnetjalps/ASPNetCoreHangFire
Share:
Saturday, January 28, 2017

How to upgrade your ASP.NET Core application from 1.0 to 1.1

TL;DR;

In this blog, We are going to learn how we can upgrade your ASP.NET Core application from 1.0 to 1.1.  Now Microsoft has release 1.1 before few months, So in this blog, we will see how you can upgrade your ASP.NET 1.0 application to ASP.NET 1.1 core application.

Where to download 1.1 SDK and Tooling for Visual Studio 2015:

You can download 1.1 SDK and Tools from the following link.

https://www.microsoft.com/net/download/core?tduid=(42c8fb30096a508e70a0e7f0d6bdaf55)(256380)(2459594)(TnL5HPStwNw-1.6L2HANlqPr5.uZiHJ1MQ)()#/current

where-to-download-tooling-and-sdk-for-core1.1

Here different tooling is also available for the Visual Studio 2015 and Visual Studio 2017. For this blog post, We are going to use Visual Studio 2015.

How to upgrade to ASP.NET core 1.0 to ASP.NET core 1.1:

So let’s get started. I’m going to create a new ASP.NET Core 1.1 application and then we will move it to ASP.NET 1.1. So let’s create an ASP.NET core 1.0 application and then let’s upgrade it to 1.1. I have created a new application like following.

creating-new-aspnet-core-app-to-upgrade-to-11

Once you click ok it will have a dialog selecting application type and I’m going to select web application.

web-application-aspnet-core-11

Once you click Ok, It will create an application like below and you can see that it’s an ASP.NET Core 1.0 application.

aspnet-core-1.0-app-in-solution-explorer

And here’s how it’s project.json looks like.
{
  "dependencies": {
    "Microsoft.NETCore.App": {
      "version": "1.0.1",
      "type": "platform"
    },
    "Microsoft.AspNetCore.Diagnostics": "1.0.0",
    "Microsoft.AspNetCore.Mvc": "1.0.1",
    "Microsoft.AspNetCore.Razor.Tools": {
      "version": "1.0.0-preview2-final",
      "type": "build"
    },
    "Microsoft.AspNetCore.Routing": "1.0.1",
    "Microsoft.AspNetCore.Server.IISIntegration": "1.0.0",
    "Microsoft.AspNetCore.Server.Kestrel": "1.0.1",
    "Microsoft.AspNetCore.StaticFiles": "1.0.0",
    "Microsoft.Extensions.Configuration.EnvironmentVariables": "1.0.0",
    "Microsoft.Extensions.Configuration.Json": "1.0.0",
    "Microsoft.Extensions.Logging": "1.0.0",
    "Microsoft.Extensions.Logging.Console": "1.0.0",
    "Microsoft.Extensions.Logging.Debug": "1.0.0",
    "Microsoft.Extensions.Options.ConfigurationExtensions": "1.0.0",
    "Microsoft.VisualStudio.Web.BrowserLink.Loader": "14.0.0"
  },

  "tools": {
    "BundlerMinifier.Core": "2.0.238",
    "Microsoft.AspNetCore.Razor.Tools": "1.0.0-preview2-final",
    "Microsoft.AspNetCore.Server.IISIntegration.Tools": "1.0.0-preview2-final"
  },

  "frameworks": {
    "netcoreapp1.0": {
      "imports": [
        "dotnet5.6",
        "portable-net45+win8"
      ]
    }
  },

  "buildOptions": {
    "emitEntryPoint": true,
    "preserveCompilationContext": true
  },

  "runtimeOptions": {
    "configProperties": {
      "System.GC.Server": true
    }
  },

  "publishOptions": {
    "include": [
      "wwwroot",
      "**/*.cshtml",
      "appsettings.json",
      "web.config"
    ]
  },

  "scripts": {
    "prepublish": [ "bower install", "dotnet bundle" ],
    "postpublish": [ "dotnet publish-iis --publish-folder %publish:OutputPath% --framework %publish:FullTargetFramework%" ]
  }
}

And here’s how the global.JSON looks like.
{
  "projects": [ "src", "test" ],
  "sdk": {
    "version": "1.0.0-preview2-003131"
  }
}
So the first thing we need to is to upgrade the global.json to latest version like below.
{
  "projects": [ "src", "test" ],
  "sdk": {
    "version": "1.0.0-preview2-1-003177"
  }
}


So here in project.json, you can see that all packages belong to 1.0. Now there is multiple ways we can do upgrade either we can manually upgrade all packages via manually upgrading it or we can do it with Visual Studio tooling. I’m going to use Visual Studio tooling as that is the easiest way to do it. You can do this via Right Click your application and Select “Manage Nuget Packages for this solution”. It will load the following dialog. You need to goto Update tab of that dialog.

upgrade-nuget-package-to-1.1

You need to select upgrade all packages and update your application. Once you did with that there is once place where you need to manually upgrade it in project.json. GoTo following part of project.json.
"frameworks": {
  "netcoreapp1.0": {
    "imports": [
      "dotnet5.6",
      "portable-net45+win8"
    ]
  }
},
Now upgrade netcoreapp1.0 to 1.1 like below.
"frameworks": {
  "netcoreapp1.1": {
    "imports": [
      "dotnet5.6",
      "portable-net45+win8"
    ]
  }
},
Now once you do that and build your application. You might get the error like following.

error-for-runtime-application-net-core

That is because of windows runtime is not there for 1.1. So you need to add following in project.json.
"runtimes": {
  "win10-x64": {}
},
Now once you add that in project.json. It will restore the runtime for your operating system and it will start building your application.
And here’s how my project.json looks like after upgrading all stuff.
{
  "dependencies": {
    "Microsoft.AspNetCore.Razor.Tools": {
      "version": "1.0.0-preview2-final",
      "type": "build"
    },
    "BundlerMinifier.Core": "2.2.306",
    "Microsoft.Extensions.Logging": "1.1.0",
    "Microsoft.Extensions.Logging.Console": "1.1.0",
    "Microsoft.Extensions.Logging.Debug": "1.1.0",
    "Microsoft.Extensions.Options.ConfigurationExtensions": "1.1.0",
    "Microsoft.NETCore.App": "1.1.0",
    "Microsoft.VisualStudio.Web.BrowserLink.Loader": "14.1.0",
    "Microsoft.AspNetCore.Diagnostics": "1.1.0",
    "Microsoft.AspNetCore.Mvc": "1.1.1",
    "Microsoft.AspNetCore.Routing": "1.1.0",
    "Microsoft.AspNetCore.Server.IISIntegration": "1.1.0",
    "Microsoft.AspNetCore.Server.Kestrel": "1.1.0",
    "Microsoft.AspNetCore.StaticFiles": "1.1.0",
    "Microsoft.Extensions.Configuration.EnvironmentVariables": "1.1.0",
    "Microsoft.Extensions.Configuration.Json": "1.1.0"
  },

  "tools": {
    "Microsoft.AspNetCore.Razor.Tools": "1.0.0-preview2-final",
    "Microsoft.AspNetCore.Server.IISIntegration.Tools": "1.0.0-preview2-final"
  },

  "frameworks": {
    "netcoreapp1.1": {
      "imports": [
        "dotnet5.6",
        "portable-net45+win8"
      ]
    }
  },

  "buildOptions": {
    "emitEntryPoint": true,
    "preserveCompilationContext": true
  },

  "runtimeOptions": {
    "configProperties": {
      "System.GC.Server": true
    }
  },


  "publishOptions": {
    "include": [
      "wwwroot",
      "**/*.cshtml",
      "appsettings.json",
      "web.config"
    ]
  },

  "runtimes": {
    "win10-x64": {}
  },

  "scripts": {
    "prepublish": [ "bower install", "dotnet bundle" ],
    "postpublish": [ "dotnet publish-iis --publish-folder %publish:OutputPath% --framework %publish:FullTargetFramework%" ]
  }
}

And in solution explorer, you can see that now it’s targeting to 1.1.
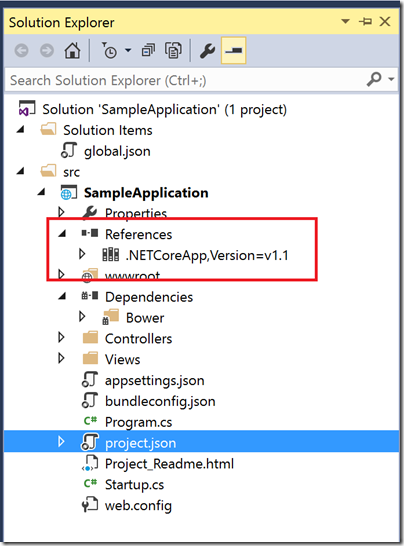
targeting-11-upgrade-to-11-solutionexplorer

That’s it. It’s pretty easy to upgrade your application to latest build. Hope you like it. Stay tuned for more!!
Share:
Saturday, October 22, 2016

Opening ASP.NET Core Visual studio solution in Visual Studio code

In this blog post, We are going to see how we can open an ASP.NET Core solution in visual studio code.  So what we are waiting for. First, we are going to create an ASP.NET Core web application like below.

ASPNETCoreApplication

Then select web application like below.

ASPNETCoreWebApplication

Now once you created Ok it will create an ASP.NET Core Web Application like below.

SolutionExplorer

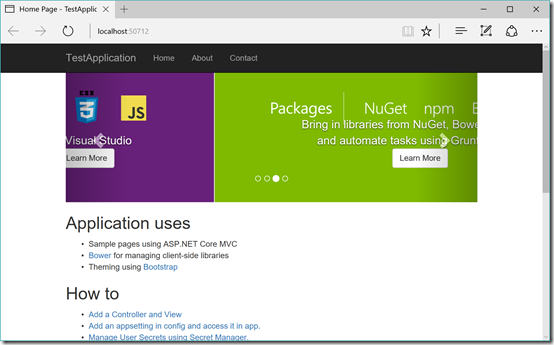
Now let’s run that application to make sure that its work fine.

edgeASPNETCoreApplication

Open ASP.NET Core Solution in Visual Studio Code:

For those who don’t know What is Visual Studio code is here is the definition from the Wikipedia.

Visual Studio Code is a source code editor developed by Microsoft for Windows, Linux and macOS. It includes support for debugging, embedded Git control, syntax highlighting, intelligent code completion, snippets, and code refactoring
It is a cross-platform open source editor for writing code from Microsoft. You can find more information about that from the following links.

https://en.wikipedia.org/wiki/Visual_Studio_Code
https://code.visualstudio.com/

Now we are going to see how we can open the same application with Visual Studio code. But before doing that we need to make sure that the computer have .NET Core installed on your machine and Also make sure that Visual Studio Code C# support is there in Visual Studio code. You can find more about that from the following link.

https://code.visualstudio.com/Docs/languages/csharp
https://code.visualstudio.com/docs/runtimes/dotnet

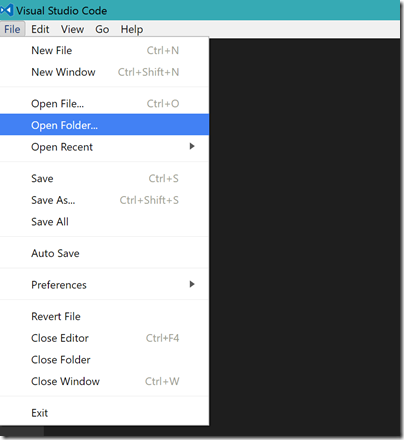
Since Visual Studio Code is not a full fledge IDE(Integrated Development Environment) like Visual Studio. We need to open the folder which contains the solution and source code. You can do that from Visual Studio Code.

OpenFolderInVisualStudioCode

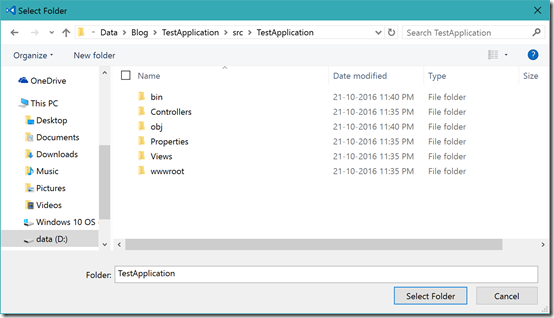
Then select the src folder of your application like below.

SRCFolderApplicationinVisualStudioCode

Once you click on “Select Folder” it will open source code like below.

SourceCodeInVisualStudioCode


Now when you open any CSharp file on the right bottom you will see a text like installing OmniSharp.  OmniSharp is a set of tooling and editor integrations and Libraries that together creates great IntelliSense and  other tooling support for popular editors like Code, Sublime Text, Brackets, Atom,Emacs and Vim etc. You can find more information about that on the following link.

http://www.omnisharp.net/

Once you click on that text you can also see the progress of installation of Omnisharp libraries in output windows like below.

OmniSharpOutputWindowVisualStudioCode

Once it installed it will automatically select the project which you have in solution. If you have multiple projects then you can click on that and it will ask you to select the project for which you need all IntelliSense .

SelectApplicationInVisualStudioCode

That’s it. Now you have most of the experience that you got in Full Visual Studio and full fledge IntelliSense to all the .NET Features.

VisualStudioCodeExperience

Disclaimer: I have tested it on the windows machine and its works perfectly fine. For macOS and Linux I would expect the same. For further information, you can follow a GitHub Issue which is already created by the community. You can find that GitHub issue at the following link.

https://github.com/OmniSharp/omnisharp-vscode/issues/283

That’s it. It’s very easy to use light weight Visual Studio Code for same development experience like Full Fledge Visual Studio.
Share:
Tuesday, June 14, 2016

How to create Rest API(Web API) with ASP.NET Core 1.0

Recently Microsoft has released ASP.NET Core 1.0 RC2, I am getting lots of request from readers that about creating Web API. So I thought it will be a good idea to write a blog post about how to create Rest API(Web API) with ASP.NET Core 1.0.

So let’s get started via creating an ASP.NET Core 1.0 Web Application like following.

creating-aspnet-core-project

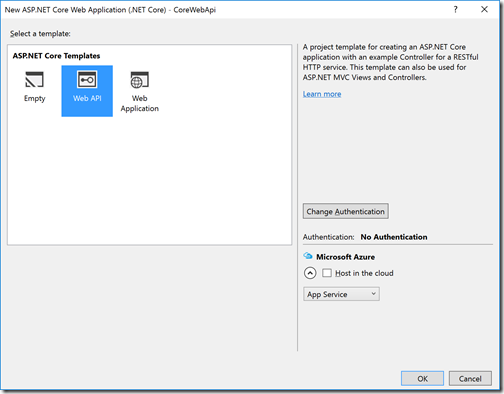
Once you click on ASP.NET Web Application, It will ask whether you need to create Web Application or Web API application. We are going to Web API so I am going to select Web API Application like following. Please note that in ASP.NET Core 1.0 there is no separate libraries or DLLs required for creating web APIs. This is just a project template.

creating-aspnet-core-api-project

Now once you click on OK It will create a Web API application with default values controller and program.cs.  As you know Program.cs is now starting point for the ASP.NET Core 1.0 application so It contains all the required configuration and startup items. Following is a code for that.
using System.IO;
using Microsoft.AspNetCore.Hosting;

namespace CoreWebApi
{
    public class Program
    {
        public static void Main(string[] args)
        {
            var host = new WebHostBuilder()
                .UseKestrel()
                .UseContentRoot(Directory.GetCurrentDirectory())
                .UseIISIntegration()
                .UseStartup<Startup>()
                .Build();

            host.Run();
        }
    }
}

Here you can see that there is a WebHostBuilder class which hosts the application and there is some configuration for using this application on IIS and Kestrel which is  a cross-platform server from Microsoft.

Now let’s create our model class first. I have created an Employee model class like following.
namespace CoreWebApi.Model
{
    public class Employee
    {
        public int EmployeeId { get; set; }
        public string FirstName { get; set; }
        public string LastName { get; set; }
        public string Designation { get; set; }
    }
}
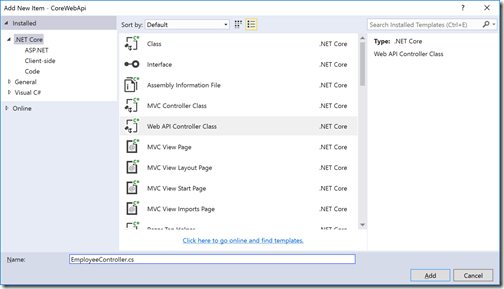
Since now our model is ready, It’s time to create the controller. You can create web API controller via add new item like following.

creating-aspnet-core-api-controller-class

And here the code for our get Method.
using System.Collections.Generic;
using CoreWebApi.Model;
using Microsoft.AspNetCore.Mvc;

namespace CoreWebApi.Controllers
{
    [Route("api/[controller]")]
    public class EmployeeController : Controller
    {
        // GET: api/values
        [HttpGet]
        public IEnumerable<Employee> Get()
        {
           var employees = new List<Employee>
           {
               new Employee {EmployeeId = 1,FirstName = "Jalpesh",LastName = "Vadgama",Designation = "Technical Architect"},
               new Employee {EmployeeId = 2,FirstName = "Vishal",LastName = "Vadgama",Designation = "Technical Lead"}
           };
            return employees;
        }
    }
}

Here you can see that I have created a get method that returns a List of Employee. Now Let’s run this in our browser and it will work like following.

aspnet-core-api-browser-sample
You can find complete source code of this blog post at following location on Github-https://github.com/dotnetjalps/ASPNetCoreWebAPI
That’s it. Hope you like it. Stay tuned for more!
Share:
Sunday, April 24, 2016

Cascading dropdown with ASP.NET Web Forms and Entity framework

This post may be pretty basic for many people. But I have been getting this request over and over so I thought it will be a good idea to write a blog post about it.

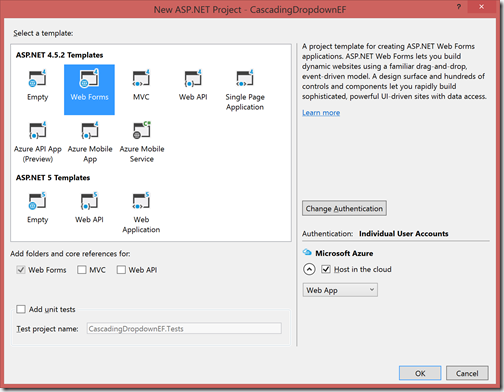
In this blog post, We are going to learn how we can create the cascading dropdown with ASP.NET Web forms and Entity framework. To create an application first we need to create web application like following.

new-project-visual-studio

After creating a web application like following. It’s time to create model classes for our application. Here to illustrate the example, We are going to use Standard and Student models. Multiple students can be there in a standard. So we are going to have two dropdowns Standard and Student. Once you change select standard based on that student dropdown will be filled.

Here is code for Standard Student Model class:
using System.Collections.Generic;

namespace CascadingDropdownEF.Models
{
    public class Standard
    {
        public int StandardId { get; set; }
        public string Name { get; set; }

        public virtual  ICollection<Student> Students { get; set; }
    }
}
And following is the code for the Student model.
using System.ComponentModel.DataAnnotations.Schema;

namespace CascadingDropdownEF.Models
{
    public class Student
    {
        public int StudentId { get; set; }
        public string FirstName { get; set; }
        public string LastName { get; set; }
        public int StandardId { get; set; }
        [ForeignKey("StandardId")]
        public Standard Standard { get; set; }
    }
}
Now once we have our model ready it’s time to create our Entity framework context class. We are going to use Entity code first model here . So here is the code for the Entity framework context.
using System.Data.Entity;
using System.Data.Entity.ModelConfiguration.Conventions;

namespace CascadingDropdownEF.Models
{
    public class StudentContext : DbContext
    {
        public StudentContext() : base("name=StudentConnectionString")
        {
            
        }
        public DbSet<Standard> Standards { get; set; }
        public DbSet<Student> Students { get; set; }

        protected override void OnModelCreating(DbModelBuilder modelBuilder)
        {
            modelBuilder.Conventions.Remove<PluralizingTableNameConvention>();
        }
    }
}
Here I have created two DbSet for students and standards. Also in model creating event I have removed plural names so when entity framework create tables when we run this application it will remove plural names from the table.

Creating Web Forms and using Entity framework for cascading dropdowns:


Now we have our database layer or operation ready. it’s time to create a new Web Form which will have Standard and Student drop-down.

adding-cascading-dropdown-page

After creating Web Form I have written following HTML code in aspx file.
<%@ Page Language="C#" AutoEventWireup="true" CodeBehind="CascadingDrodownDemo.aspx.cs" Inherits="CascadingDropdownEF.CascadingDrodownDemo" %>

<!DOCTYPE html>

<html xmlns="http://www.w3.org/1999/xhtml">
<head runat="server">
    <title>Cascading dropwon demo</title>
</head>
<body>
    <form id="form1" runat="server">
        <div>
            <asp:DropDownList runat="server" ID="ddlStandard" CssClass="dropdown" AutoPostBack="true" OnSelectedIndexChanged="ddlStandard_OnSelectedIndexChanged"/>
        </div>
        <br/>
        <div>
            <asp:DropDownList runat="server" ID="ddlStudent" CssClass="dropdown"/>
        </div>
    </form>
</body>
</html>

You can see that I have created two ASP.NET dropdowns Standard and Student and Also for Standard dropdown I have autopostback=”true” and selected index change event.
On the aspx.cs file i have written the following code.
using System;
using System.Linq;
using CascadingDropdownEF.Models;

namespace CascadingDropdownEF
{
    public partial class CascadingDrodownDemo : System.Web.UI.Page
    {
        private readonly StudentContext _studentContext;

        public CascadingDrodownDemo()
        {
            _studentContext = new StudentContext();
        }

        protected void Page_Load(object sender, EventArgs e)
        {
            if (!Page.IsPostBack)
            {
                BindStandards();
                BindStudents();
            }
           
        }

        private void BindStudents(int? standardId=null)
        {
            ddlStudent.Items.Clear();
            if (standardId != null)
            {
                var students = from student in _studentContext.Students
                    where student.StandardId == standardId.Value
                    select new
                    {
                        StudentId = student.StudentId,
                        Name = student.FirstName + " " + student.LastName
                    };

                ddlStudent.DataSource = students.ToList();
                ddlStudent.DataTextField = "Name";
                ddlStudent.DataValueField = "StudentId";
                ddlStudent.DataBind();
            }

            ddlStudent.Items.Insert(0,"--Select Student--");
        }

        private void BindStandards()
        {
            ddlStudent.Items.Clear();
            var standards = _studentContext.Standards.ToList();
            ddlStandard.DataSource = standards;
            ddlStandard.DataTextField = "Name";
            ddlStandard.DataValueField = "StandardId";
            ddlStandard.DataBind();

            ddlStandard.Items.Insert(0,"--Select Standard--");
        }

        protected void ddlStandard_OnSelectedIndexChanged(object sender, EventArgs e)
        {
            BindStudents(Convert.ToInt32(ddlStandard.SelectedValue));
        }
    }
}
Here You can see that I have created two method BindStudent and BindStarnds. In Bindstandards it fetches all the standards and bind it to Standard dropdown . In BindStudents method, I have used a nullable parameter standardId which will be null by default. So If standard id is not provided as you can see it will only insert default item.  Now in page load method, I have called this two methods. Also, you can see that I have written Standard event dropdown selected index change event which will pass standard value.

Now everything is ready. I have inserted following data in Standard and Student table.

Standard-Cascading-dropdown-data-entity-framework

And student table like following.

student-cascading-dropdown-entity-framework

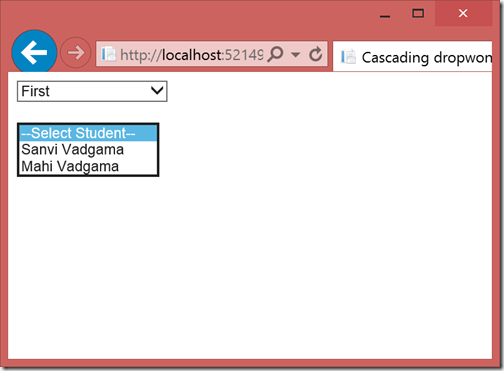
Now when you run the application. It will look like following.

sample-application

That’s it. Hope you like it. Stay tuned for more.
You can find complete source code of this application at following location on github- https://github.com/dotnetjalps/CascadingDropdownEF
Share:
Sunday, February 1, 2015

Grid view row span in ASP.NET

I know for some one it will sound like a very basic code for the row span of grid view but still there are lots of people that does not about that. So I thought it will be a good idea to write a blog post about it. So in this blog post we are going to learn How we can use row span in ASP.NET Grid Views.

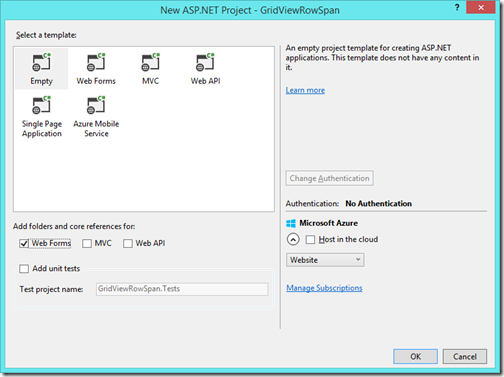
So what we are waiting for Let’s take a small example of sample ASP.NET Web forms application. So Let’s start by creating an empty ASP.NET Webforms application like below.

GridViewColSpan

After that I have added a page web page like below.

Share:

Project.json file in ASP.NET 5(vNext)

Recently Microsoft has released the preview version of ASP.NET 5(vNext) as a Part of Visual Studio 2015 CTP. As this whole .NET framework is rewritten from the scratch so there are lots of change there. One of most exciting changes in ASP.NET 5(vNext) is moving all changes in Project.json file instead of solution. This Project.json file will have lots information related to dependencies, configuration and lots of other stuff.

Project.json file in ASP.NET 5(vNext)

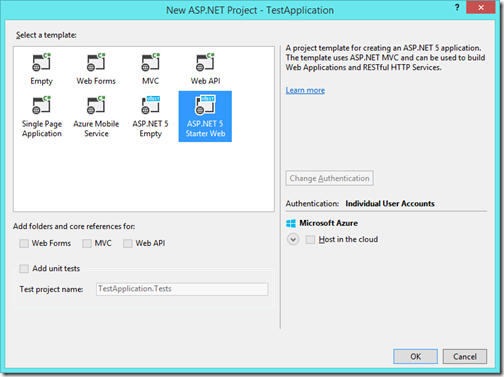
Let’s create a ASP.NET 5(vNext) application from File –> New  Project

aspnet-5-starter-app

Once you create ASP.NET 5 application, It will create a sample project with Project.json like this.

Share:
Monday, January 26, 2015

Setting up development environment for ASP.NET 5(vNext) on Ubuntu

I am really enjoying working on Ubuntu. In previous post, We have learn how to install Sublime Text and in this blog post we are going to learn how we can setup development environment for ASP.NET 5(vNext). So what we are waiting for let’s go.

Note: First thing you need to make sure that Python 3.0 or higher version is installed. I have installed latest version of Ubuntu which already has Python preinstalled.

Setting up package manager control:

The first thing you need to is to install/setup package manager control. To Install package control, We need to go from View- > Show console menu. It will load package control. You need to run following command from the console. It will install the package manager control.
import urllib.request,os,hashlib;
h = '2deb499853c4371624f5a07e27c334aa' + 'bf8c4e67d14fb0525ba4f89698a6d7e1';
pf = 'Package Control.sublime-package'; 
ipp = sublime.installed_packages_path();
urllib.request.install_opener( urllib.request.build_opener( urllib.request.ProxyHandler()) );
by = urllib.request.urlopen( 'http://packagecontrol.io/' + pf.replace(' ', '%20')).read(); dh = hashlib.sha256(by).hexdigest(); print('Error validating download (got %s instead of %s),
please try manual install' % (dh, h)) if dh != h else open(os.path.join( ipp, pf), 'wb' ).write(by)
You can also copy this command from the this url- https://packagecontrol.io/installation

Share:
Sunday, January 25, 2015

How to install Sublime Text 3 in Ubuntu

I am quite having fun with Ubuntu on Oracle virtual box.In last blog post, I have already shown you how you can run ASP.NET 5 (vNext) app in Ubuntu. Now we are going to setup development environment for ASP.NET 5(vNext) and my preferred choice of editor is sublime text. If you have not heard about Sublime Text you should visit following link.

http://www.sublimetext.com/3

As we all know Sublime Text is a popular editor and  now Sublime Text3 is available with beta version for both registered users and general public. The Webupd8 team created a Personal Package repository containing the installer for Ubuntu and Linux. So we can install it very easily on Ubuntu.

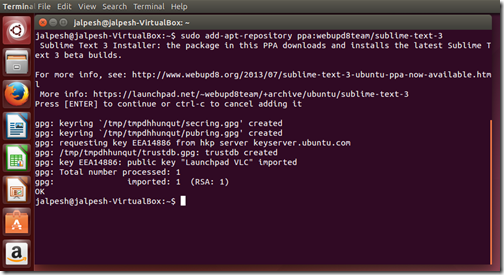
So first thing we need to do is add PPA repository to Ubuntu via running following command.
sudo add-apt-repository ppa:webupd8team/sublime-text-3
It will load PPA repository into Ubuntu like below.

ppa-webupdate8-team

Share:

ASP.NET 5(vNext) on Ubuntu 14.4(Linux)

As we all know Microsoft has recently launched ASP.NET 5 and Microsoft has made announcement that it will work on any version of Linux and OSx. So in this post we are going to learn how we can use ASP.NET 5 on Ubuntu.

Installing Ubuntu on Oracle Virtual Box:

As I don’t have spare computer where I can install Ubuntu so that I’m going to install it on Oracle Virtual Box. If you don’t know about Virtual Box then it it a powerful x86 and AMD/Intel 64  virtualization product for enterprise or home box. It is freely available as GNU Licence.

You can find more about  Oracle Virtual Box here- https://www.virtualbox.org/

There are few things you to consider before going this route.
  • You need to first make sure that your computer supports virtualization or not. There are some utilities available for that like Intel processor identification utility – You can download from the here- https://downloadcenter.intel.com/Detail_Desc.aspx?DwnldID=7838. It will tell you whether your processor supports Virtualization or not.
intel-processor-utility
  • After checking whether your processor supports virtualization, you need to enable virtualization from Bios. That is different as per your Processor and you can learn how you can enable virtualization on your pc via searching on internet.
  • Make sure you have at least 4 GB ram to run this virtual OS smoothly. If you less RAM then it will work but thing will be slow.
Share:
Sunday, January 4, 2015

Understanding KRE,KVM,KLR and KPM in ASP.NET 5(vNext)

ASP.NET 5(vNext) is a new upcoming version of ASP.NET that Microsoft has redesigned from the scratch. Recently Microsoft has released Visual Studio 2015 Preview and with that they have released ASP.NET VNext.  In ASP.NET 5 (vNext) it comes with new runtime environment called KRE(K Runtime Environment) . With this version you can also run your application through command prompt using various commands. In this blog post we are going to learn about all terms related K Runtime Environment.

KVM(K Version Manager):

K version manager is one of the first thing you need to run command . KVM is responsible for installing and updating different version of KRE. It’s a PowerShell script used to get and manage multiple version of KRE being it on same time on same machine. So one application can now have one version of KRE and another application can have another version of KRE on same time. You can find more information at https://github.com/aspnet/Home/wiki/version-manager
Share:

Assembly Neutral Interface in ASP.NET 5(vNext)


Recently Microsoft has open sourced it’s entire ASP.NET next version stack on GitHub and I have been closely watching this for a quite a some time to understand how they have created architecture of it and how they organize everything in such a large stack.

I have seen  [AssemblyNeutral] attribute in few of interfaces and I was curious why it was required. So I dig into it and learned about it.

Why we need Assembly Neutral Interfaces?

In earlier version of ASP.NET and Microsoft.NET Interfaces are bind to a assembly where it is declared. Let’s say I have written a interface under DotNetJalps namespace for my framework.
namespace DotNetJalps
{
    public interface ILogger
    {
        DoAmazingStuff();
    }
}
Now after some time this framework is super popular and everybody loves abstraction I have created and now they wants same abstraction so there are two ways we can do this.

  1. Convenience me to write this abstraction.
  2. Write implementation themself and maintain that.
Share:
Thursday, May 22, 2014

.NET Framework 4.5.2 released by Microsoft

Microsoft has released .NET Framework 4.5.2 before some time see the announcement from It’s .NET Framework team blog. It’s a compatible, in-place update for Microsoft.NET Framework 4.0,4.5 and 4.5.1.  This framework also run side by side with earlier version of .NET framework.

From where I can download .NET Framework 4.5.2?


Following are link from where you can download .NET framework 4.5.2.

.NET framework web installer- Internet required at the time installation. It will download required file runtime.A Boots trapper that pulls in components based on the target OS/platform specs on which the .NET Framework is being deployed.

Share:
Saturday, April 5, 2014

Converting a C# Object into JSON string

Some people might think why I am writing so much about basics but the things but in reality  I got lot of questions through email and other communities about very basic things. So I thought instead of replying them into single thread. It is a good idea to write blog post about it and as a result I am writing this blog post.

In this post we are going to learn how we can convert a object into JSON string It is very simple. Let’s first see how we can convert C# Object into JSON string.

Converting a C# object into JSON string:


So to demo this, I have created a employee class like following.

public class Employee
{
    public string FirstName { get; set; }
    public string LastName { get; set; }
}

Now let’s create object of this class and assign some value like following.

Employee employee=new Employee
                    {FirstName = "Jalpesh",
                    LastName = "Vadgama"};

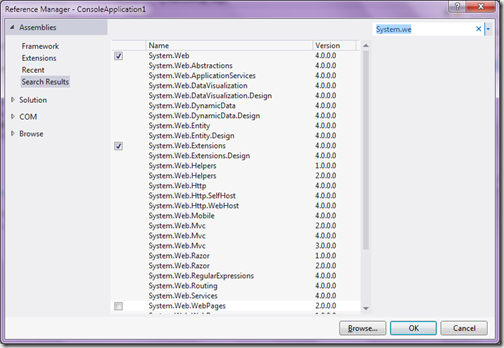
For this demo we are using console application so we have to add System.Web and System.Web.Extensions  reference to access the JavaScript Searilizer class through which we are going to convert this object into JSON string. We are going to add reference like following.

add-reference-serializtion-web-convert-chsarp-object-into-json

Now with JavaScript Searilizer class which belongs to System.Web.Script.Serialization namespace we can easily convert C# object into JSON string. Following is a code for that.

var javaScriptSerializer = new 
    System.Web.Script.Serialization.JavaScriptSerializer();
string jsonString = javaScriptSerializer.Serialize(employee);
Console.WriteLine(jsonString);

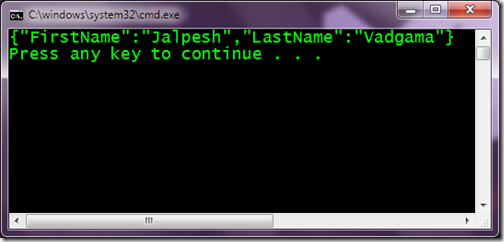
Now when run this console application. Following is a output as expected.

convert-c#-object-to-json-string-javascriptsearializer

Here its serialize object into JSON string. Same you can desterilize the JSON string into C# object with Deserialize function.

That’s it. It’s very easy. Hope you like it. Stay tuned for more..
Share:

ASP.NET Checkbox button Attributes in JavaScript.

This is a follow up post I have just written before some time- Getting tooltip of ASP.NET Radio button in java script. In that post I have explained that to render all properties properly in ASP.NET renders checkbox and radio button surrounded by Span tag. So one of the friend message me on facebook how we can add JavaScript attribute on ASP.NET Controls like checkbox or radio button. So I thought it will be good idea to write a quick blog post about it.

Adding JavaScript attribute to ASP.NET Checkbox and Radio button:


So Let’s see how we can write JavaScript attribute from server side with ASP.NET Checkbox and same will be applied to ASP.NET Radio button also. Following is a HTML code for ASP.NET checkbox.

<asp:CheckBox runat="server" ID="myCheckBox" 
Text="Yes" ToolTip="Yes"/>

Now I want to write a onBlur event for JavaScript so I have written a following function in JavaScript.

function onBlur() {
alert('Onblur Fired');
}

Normally we write JavaScript attribute from server side like below in page load event.

protected void Page_Load(object sender, EventArgs e)
{
myCheckBox.Attributes.Add("onblur", "onBlur();");
}

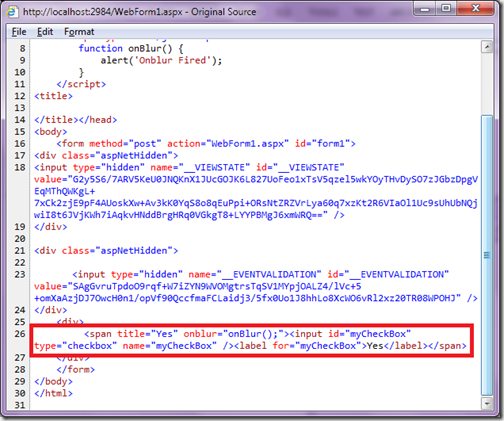
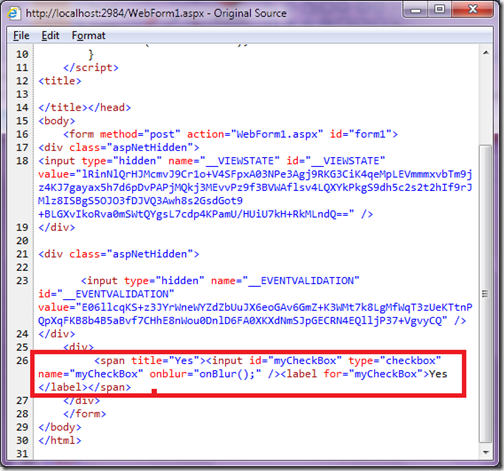
Now when you run this code in browser and see that in browser with View Source it will apply onblur event to span tag.

javascript-css-attribute-of-asp-net-checkbox-control

So it will not fire ‘onblur’ event of checkbox as this event is right now applied to span tag. So what should we do? Here is the fix. ASP.NET Checkbox and Radio Button provides InputAttributes attribute collection. So you can directly assign attributes to checkbox like below.

protected void Page_Load(object sender, EventArgs e)
{
myCheckBox.InputAttributes.Add("onblur", "onBlur();");
}

That's it. If you see in view source now it will assign JavaScript attribute in correct way and now it will fire event also.

javascript-css-attribute-of-asp-net-checkbox-control-correct-way

Note: You can add CSS Attribute in the same way as you do with JavaScript attribute.

Hope you like it. Stay tuned for more..
Share:

Getting tooltip of ASP.NET Radio button in java script.

This post in regards to a question that I have answered on stack overflow. Getting Tool tip of the Radio button in JavaScript. Where user asks why he is not able to get tooltip with document.GetElementById and Client Id of ASP.NET Radio button control like following.

document.getElementById('<%= rbSelectedIds.ClientID %>').title

While answering this question, I have found that there are lots of people not aware about this. So I thought it is a good idea to write a blog post about it.

By default ASP.NET Radio button and check box controls rendered under span when you have attribute like tooltip. Because System.Web.UI.WebControls namespace may render differently in  different browsers and to achieve same functionality in all the browsers they are rendering with span.

There is a complete discussion there one in one of the StackOverFlow.com

Why does ASP.Net RadioButton and CheckBox render inside a Span?

Example : Getting ASP.NET Radio button tooltip in JavaScript:


So let’s take same example as mentioned in that question. Following is my HTML Code. Below is radio button HTML code.
<div>
       <ASP:RadioButton runat="server" ID="myRadioButton" 
            Text="Yes" ToolTip="Yes"/>
</div>

Now when you run this in browser it will render this radio button is render with surrounded by span like follow.

how-to-get-tooptip-of-radio-button-in-java-script

You can see that title attribute is given to span tag instead of radio button. Now let’s create a ASP.NET button to get tooltip of that radio button like below.

<asp:Button runat="server" Text="Get Tooltip" 
        OnClientClick="getToopTip();"/>

So we are done with button now it’s time to write a JavaScript. Following is a code for JavaScript.
function getToolTip() {
    var sParentElement = document.getElementById("<%=myRadioButton.ClientID%>").parentElement;
    var tooltip = sParentElement.title;
    alert(tooltip);
}

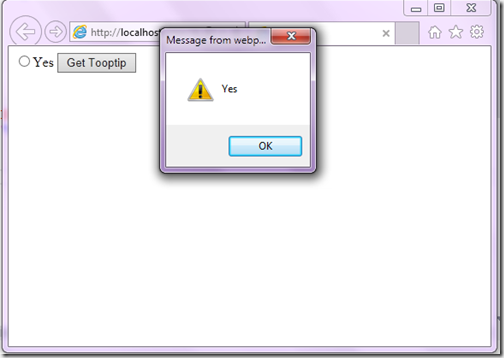
So we are done with code. Now it’s time to run this code in browser. And when you click on button it will show alert with tool tip of radio button.

getting-tooltip-in-javascript-asp-net-radio-button-and-checkbox

That’s it. Hope you like it. Stay tuned for more.
Share:

Overriding/set default button in master page in asp.net

Some time ago I have written a blog post about Default focus and default button in ASP.NET. In that post I have explained how we can set default button for form. Recently I got email related to that post asking that how we can set or override default button on a page with master page. 

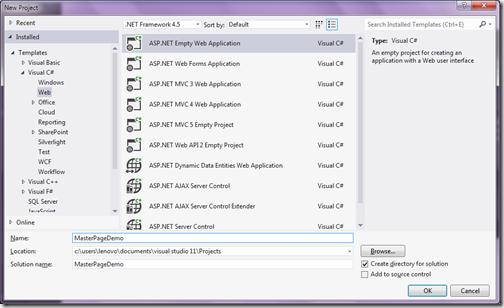
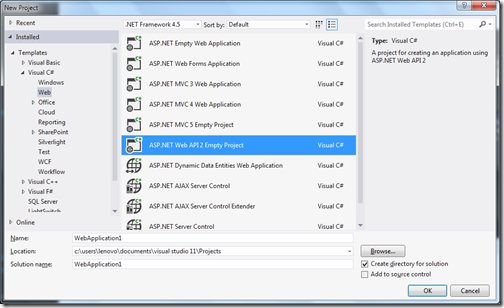
In this page we will learn how we can override default button in master page. So what we are waiting for? Let’s start by creating a an asp.net empty application via File –> New Project –> ASP.NET Empty web application.

overriding-setting-default-button-with-master-page-asp-net

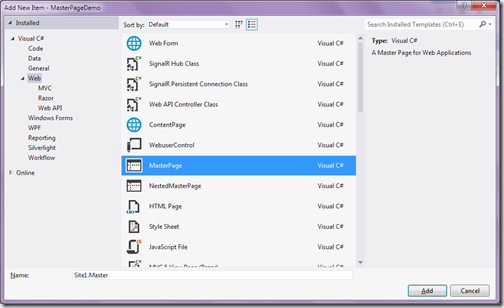
Once You are done with creating project it’s time to add a master page in solution via right click-> Add new Item.

adding-master-page-override-default-button

Following is HTML code ASP.NET master page.

<%@ Master Language="C#" AutoEventWireup="true" CodeBehind="Site1.master.cs"
     Inherits="MasterPageDemo.Site1" %>
<!DOCTYPE html>
<html xmlns="http://www.w3.org/1999/xhtml">
<head runat="server">
    <title></title>
    <asp:ContentPlaceHolder ID="head" runat="server">
    </asp:ContentPlaceHolder>
</head>
<body>
    <form id="form1" runat="server">
    <div>
        <asp:ContentPlaceHolder ID="ContentPlaceHolder1" runat="server">
        
        </asp:ContentPlaceHolder>
    </div>
    </form>
</body>
</html>

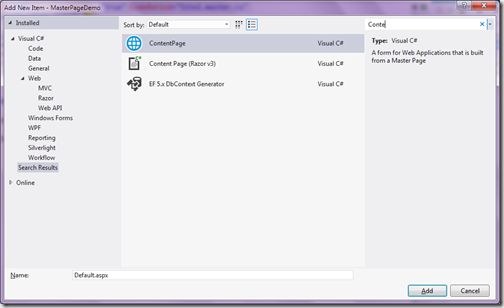
Now it’s time to add new content page with master page and selecting above master page.

adding-content-page-set-default-button-dynamically-master-page

Following is a code for content page.

<%@ Page Title="" Language="C#" MasterPageFile="~/Site1.Master" AutoEventWireup="true"
     CodeBehind="Default.aspx.cs" Inherits="MasterPageDemo.Default" %>
<asp:Content ID="Content1" ContentPlaceHolderID="head" runat="server">
    
</asp:Content>
<asp:Content ID="Content2" ContentPlaceHolderID="ContentPlaceHolder1" runat="server">
    <asp:TextBox runat="server" ID="Message"></asp:TextBox>
    <ASP:Button  runat="server" ID="DefaultButton"
        OnClick="DefaultButton_Click" Text="Default"/>
    <asp:Button runat="server" ID="AnotherButton"
        OnClick="AnotherButton_Click" Text="Another"/>
</asp:Content>
Here I have added two buttons “Default Button” and “Another button” and a textbox. Now I want to make this “Default Button” default dynamically. Below code I have written for both button’s click event. It will only print in textbox which button is clicked.

protected void DefaultButton_Click(object sender, EventArgs e)
{
    Message.Text = "Default Button Clicked";
}

protected void AnotherButton_Click(object sender, EventArgs e)
{
    Message.Text = "Another button clicked";
}

Now I want to make default button as default button of form so whenever I press enter it will fire click event of default button. So to dynamically set / override default button on master page form I have to write following code on content page page_load event.

protected void Page_Load(object sender, EventArgs e)
{
    Form.DefaultButton = DefaultButton.UniqueID;
}

Now when you run and press enter in browser output will be as expected as follows.

default-button-override-asp-net-masterpage-browser

That’s it. Hope you like it. Stay tuned for more..
Share:
Sunday, December 8, 2013

ASP.NET and Web Tools 2013.1 Tools for Visual Studio 2012

Recently Microsoft has released ASP.NET and Web Tools 2013.1 for visual studio 2012. There are tons of new feature and improvements are there. So Now it’s possible to have all the latest feature on ASP.NET stack on Visual Studio 2012 like ASP.NET MVC 5, ASP.NET Web API 2, Entity Framework 6.0 etc.
You can download this update from the following link.

http://www.asp.net/visual-studio/overview/2012/aspnet-and-web-tools-20131-for-visual-studio-2012

ASP.NET MVC 5:


Once you install this tools, ASP.NET MVC 5 templates are also installed.

ASPNETMVC5VisualStudio2012ProjectTemplate

So now you can use all the ASP.NET MVC 5 feature like One ASP.NET, ASP.NET Identity,Bootstrap MVC template, Authentication Filters,Filter overrides etc.

ASP.NET Web API 2:


ASP.NET Web API2 is also available here.

ASPNETWebAPI2VisualStudio2012ProjectTemplate 

So all ASP.NET Web API2 features like attribute routing, Cross Origin Resource Sharing, OWIN (Open Web Interface for .NET), IHttpActionResult, Web API Odata all are available Visual Studio 2012.

Twitter BootStrap Template:


Now ASP.NET MVC 5 application comes with Twitter Bootstrap, So all goodies of Twitter Bootstrap will be there with your ASP.NET MVC application.

Entity Framework 6.0:


It’s also comes with Entity framework 6.0. Where you have some new great features like Async Query and Save,Connection Resiliency, Code-Based Configuration, Dependency Resolution, Interception/SQL Logging, Improved transaction support etc will be available in Visual Studio 2012 itself.

Also there is a new version of Nuget is also available with this release. So now if one developer has Visual Studio 2012 and another one is having Visual Studio 2013 then also they can work on same project.

This post is a just an overview of all the new features that are available with this release. I will write in detail about all this new features. Stay tuned for more..
Share:

Support this blog-Buy me a coffee

Buy me a coffeeBuy me a coffee
Search This Blog
Subscribe to my blog


My Mvp Profile
Follow us on facebook
Blog Archive
Total Pageviews