Showing posts with label Ubuntu. Show all posts
Saturday, March 10, 2018

Solution: (Error)Unable to Correct problems, You have held broken packages–Install .NET Core on Ubuntu

Recently, I have been using Linux(Ubuntu) machine on my virtual box quite a bit and as  Microsoft.NET Developer I want to install .NET Core on Ubuntu. So I tried following the instruction from below link to install .NET core on Ubuntu 16.04.

https://docs.microsoft.com/en-us/dotnet/core/linux-prerequisites?tabs=netcore2x

But I was not unable to install .NET Core and I was getting following errors.

The following packages have unmet dependencies:
  dotnet-sdk-2.1.4 : Depends: dotnet-runtime-2.0.5 but it is not going to be installed
E: Unable to correct problems, you have held broken packages.
You can see the same error in the following screenshot.

error-ubuntu-net-core-214

I was a little bit curious about that and then I have read carefully the documentation mentioned on the above link and I have found that .NET Core require following require following Ubuntu distributions as Prerequisites.

  • libunwind8
  • liblttng-ust0
  • libcurl3
  • libssl1.0.0
  • libuuid1
  • libkrb5-3
  • zlib1g
  • libicu52 (for 14.X)
  • libicu55 (for 16.X)
  • libicu57 (for 17.X)

Most of the time it should be installed by default with sudo apt-get update and sudo apt-get upgrade command but sometimes it does not. So what I did install all these distributions one by one via sudo apt-get install command and in my case, I was not having liblttng-ust0 distribution on my machine. So I have installed it via the following command.

sudo apt-get install liblttng-ust0
You can also see below screenshot for the same.

install-ubuntu-distribution-for-netcore

Then I was able to install .NET Core on my machine via following above link on documentation.
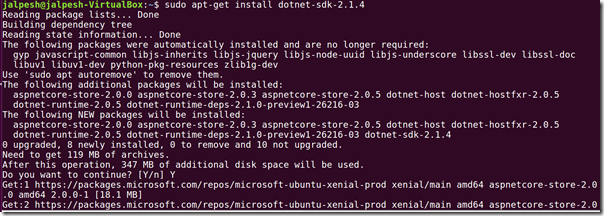
install-netcore-ubuntu

And now it’s running .NET Core v 2.1.4 on my Ubuntu VirtualBox as you can see it in below dotnet version command.

net-core-version-command

I was able to solve my problem this and so I thought it will be a good idea to share it on my blog so it will help people who are having the same problem.

Stay tuned for more there is a lot more coming for asp.net core and node.js on Linux on future blog posts.
Share:

How to install Robo3T(Formerly RobMongo) on Ubuntu

Robo3T formerly known as RobMongo is one of best GUI tools for the managing and querying MongoDB database. I have been using it quite often for creating applications with MongoDB and Node.js. Recently a new version made available but there were no instructions for installing it on Ubuntu. So I thought it would be a great idea to write a blog post about it.

To install it. First, we need to open terminal and download tar.gz file from official site with the following command.
wget https://download.robomongo.org/1.2.1/linux/robo3t-1.2.1-linux-x86_64-3e50a65.tar.gz
robo3t-install-download-ubuntu

Once download will complete we need to extract tar.gz file with following command
tar -xvzf robo3t-1.2.1-linux-x86_64-3e50a65.tar.gz
extract-tar-file-robo3t-robmongo-ubuntu

As now we have extract it into the folder we need to move that under /usr/local/bin directory to make it available for all the users. So todo that we need to first create robo3t directly under /usr/local/bin folder with following command.
sudo mkdir /usr/local/bin/robo3t
mkdir-robo3t-robmongo-ubuntu

Then we need to move all the files of extracted folder into robo3t folder under /usr/local/bin directory with following command.
sudo mv  robo3t-1.2.1-linux-x86_64-3e50a65/* /usr/local/bin/robo3t
move-content-to-robo35-ubuntu

Now, We need to give permission to newly created directory with following command.
sudo chmod +x robo3t ./robo3t
permission-robo3t-robmongo-ubuntu

Once you are done with it. You are ready to use robo3t. You can run it from command line from usr/local/bin directory via following command.
./robo3t
run-robo35-command-line

And it will run the Robo3t like following.

robo3t-on-ubuntu

That’s it. Hope you like, Stay tuned for more!!.
Share:
Wednesday, March 7, 2018

How to install Visual Studio code on Ubuntu

Recently I presented a Webinar on ASP.NET Core on Linux. Here I have displayed how we can use Visual Studio Code a Free Open Source Editor from Microsoft to develop application. One of frequently ask question was How I can install Visual Studio Code on Linux. Since lots of People are using Ubuntu as Development Machine I thought it will be a good idea to write a blog post about how to install Visual Studio code on Linux(Ubuntu Machine).

So first thing we need to do it open a terminal in Ubuntu and then we need to type following command one by one.
curl https://packages.microsoft.com/keys/microsoft.asc | gpg --dearmor > microsoft.gpg
Install-Visual-Studio-Code-Ubuntu

Then you need to run the following command to move gpg file download via Curl to etc/apt folder.
sudo mv microsoft.gpg /etc/apt/trusted.gpg.d/microsoft.gpg
Install-Visual-Studio-Code-Ubuntu2-move-folder

Now, You need to run following command.
sudo sh -c 'echo "deb [arch=amd64] https://packages.microsoft.com/repos/vscode stable main" > /etc/apt/sources.list.d/vscode.list'
package-cache-insert-vscode-ubuntu-linux

After that, you need to run Apt-get Command to update package cache and Apt-get install command to install visual studio code.
sudo apt-get update
sudo apt-get install code
pakcage-install-visual-studio-code

That’s it. You are done with installing Visual Studio Code. You can find more information about different Linux flavors at following  link on Visual Studio code.

https://code.visualstudio.com/docs/setup/linux

Hope you like it. Stay tuned for more!!
Share:
Saturday, January 31, 2015

Install Go Language and Lite IDE on Ubuntu

Note: I’m not moving to Another world. Still C# and ASP.NET is my bread and butter.
Recently I have installed Ubuntu as Virtual OS in Oracle Virtual Box. This was one of first exposure I got Linux base operating system.  Earlier I have used Linux when I was doing my masters as part of their curriculum.  So far I am having fun Ubuntu and other Linux base operating system has come far.

After installing Linux, I thought why should I try some other language which is completely different then which I am working right now. This make me Polyglot  programmer and I could learn something from trying a new language and so I gone through various language and choose Go language.

Why Go Language?

Here are the reasons why I have choose to learn GO programming language.
  • It’s backed by Google so will not go away near future.
  • High performance :  Makers of Go language claims that it will perform as fast C and C++ language.
  • Fairly easy language to run.
  • Statically typed just like C#.
  • It has Garbase collection so I don’t have to worry about memory management like C and C++
  • Concurrency is in built
To know more about go language you can visit following site. It has got ton of resources.
http://golang.org/
Share:
Monday, January 26, 2015

Setting up development environment for ASP.NET 5(vNext) on Ubuntu

I am really enjoying working on Ubuntu. In previous post, We have learn how to install Sublime Text and in this blog post we are going to learn how we can setup development environment for ASP.NET 5(vNext). So what we are waiting for let’s go.

Note: First thing you need to make sure that Python 3.0 or higher version is installed. I have installed latest version of Ubuntu which already has Python preinstalled.

Setting up package manager control:

The first thing you need to is to install/setup package manager control. To Install package control, We need to go from View- > Show console menu. It will load package control. You need to run following command from the console. It will install the package manager control.
import urllib.request,os,hashlib;
h = '2deb499853c4371624f5a07e27c334aa' + 'bf8c4e67d14fb0525ba4f89698a6d7e1';
pf = 'Package Control.sublime-package'; 
ipp = sublime.installed_packages_path();
urllib.request.install_opener( urllib.request.build_opener( urllib.request.ProxyHandler()) );
by = urllib.request.urlopen( 'http://packagecontrol.io/' + pf.replace(' ', '%20')).read(); dh = hashlib.sha256(by).hexdigest(); print('Error validating download (got %s instead of %s),
please try manual install' % (dh, h)) if dh != h else open(os.path.join( ipp, pf), 'wb' ).write(by)
You can also copy this command from the this url- https://packagecontrol.io/installation

Share:
Sunday, January 25, 2015

How to install Sublime Text 3 in Ubuntu

I am quite having fun with Ubuntu on Oracle virtual box.In last blog post, I have already shown you how you can run ASP.NET 5 (vNext) app in Ubuntu. Now we are going to setup development environment for ASP.NET 5(vNext) and my preferred choice of editor is sublime text. If you have not heard about Sublime Text you should visit following link.

http://www.sublimetext.com/3

As we all know Sublime Text is a popular editor and  now Sublime Text3 is available with beta version for both registered users and general public. The Webupd8 team created a Personal Package repository containing the installer for Ubuntu and Linux. So we can install it very easily on Ubuntu.

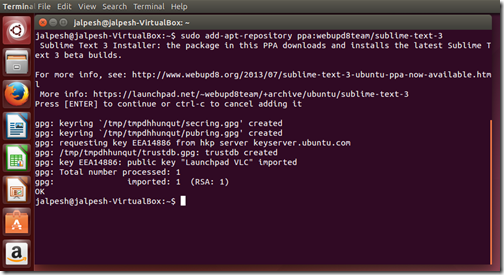
So first thing we need to do is add PPA repository to Ubuntu via running following command.
sudo add-apt-repository ppa:webupd8team/sublime-text-3
It will load PPA repository into Ubuntu like below.

ppa-webupdate8-team

Share:

ASP.NET 5(vNext) on Ubuntu 14.4(Linux)

As we all know Microsoft has recently launched ASP.NET 5 and Microsoft has made announcement that it will work on any version of Linux and OSx. So in this post we are going to learn how we can use ASP.NET 5 on Ubuntu.

Installing Ubuntu on Oracle Virtual Box:

As I don’t have spare computer where I can install Ubuntu so that I’m going to install it on Oracle Virtual Box. If you don’t know about Virtual Box then it it a powerful x86 and AMD/Intel 64  virtualization product for enterprise or home box. It is freely available as GNU Licence.

You can find more about  Oracle Virtual Box here- https://www.virtualbox.org/

There are few things you to consider before going this route.
  • You need to first make sure that your computer supports virtualization or not. There are some utilities available for that like Intel processor identification utility – You can download from the here- https://downloadcenter.intel.com/Detail_Desc.aspx?DwnldID=7838. It will tell you whether your processor supports Virtualization or not.
intel-processor-utility
  • After checking whether your processor supports virtualization, you need to enable virtualization from Bios. That is different as per your Processor and you can learn how you can enable virtualization on your pc via searching on internet.
  • Make sure you have at least 4 GB ram to run this virtual OS smoothly. If you less RAM then it will work but thing will be slow.
Share:

Support this blog-Buy me a coffee

Buy me a coffeeBuy me a coffee
Search This Blog
Subscribe to my blog


My Mvp Profile
Follow us on facebook
Blog Archive
Total Pageviews