Friday, October 2, 2015

My Interview on Geek.Fest - What's new in C# 6

I have been featured on Geek.Fest a you channel by Fanie Reynders. I have lots of fun while talking about latest C# features. We had interesting discussion and demo of latest c# features. Following is a video on the you tube.


You can find blog from Fanie at following location.
http://reynders.co/2015/10/01/geekfest-9-whats-new-in-csharp-6/

Following is the sample code and demo for the discussion.
https://github.com/dotnetjalps/LatestCSharpFeatures

Thank you very much Fanie Reynders and Geek.Fest for featuring me.
Share:
Friday, September 18, 2015

Why it's the right time to learn TypeScript.

In Today's world, If you are an web developer and you don't know JavaScript then you will feel left behind. It's never been a good time to be a JavaScript developer than now. With the rise of Node.js  JavaScript is everywhere now. But as you know when Size and Complexity of your JavaScript is Increased it's very difficult to maintain and mange. That's where TypeScript comes into picture. It is a life saver some times. So in this blog post we will see Why It's the right time to learn TypeScript.

What is TypeScript?


TypeScript is a free and open sourced programming language developed and Maintained by Microsoft. It works as a super set of JavaScript. As we all know that JavaScript is very liberal language by nature. So that we tend to make more mistakes and we does not know all the errors at run time. TypeScript is a strict super set of JavaScript so that you can get most of errors at compile time only.  As per official website of TypeScript it's a language that lets you write JavaScript in the way you really want to. TypeScript offers all the features that you need for Object oriented programming. You can find more information about TypeScript on it's official web site on below link.

http://www.typescriptlang.org/

ECMAScript and TypeScript:


ECMAScript is the specification standard of the JavaScript. So right not standard stable version if ECMAScript 5 and some of the browsers support ECMAScript 6. ECMAScript 6 features are being adopted by latest browsers.While TypeScript follows most of syntax of ECMAScript 6 so that you don't have a feel of the learning new language. As per official road map of Typescript 1.6 comes with ES6 Generator so you can convert your script code into ECMAScript6. Your can find more about that on following blog post.

http://blogs.msdn.com/b/typescript/archive/2015/09/16/announcing-typescript-1-6.aspx

TypeScript is everywhere:


As we know TypeScript is a fully Object Oriented language, It's provide great productivity boosts than JavaScript and it's super set of JavaScript so it will be compiled into JavaScript itself. So because of this lots of great framework started using TypeScript like following.
  1. Angular JS
  2. Iconic Framework for creating frond end mobile App
  3. Native Script from Telerik is also completely written TypeScript itself.
Take a example of AngularJs, It is one of the most popular JavaScript Framework on earth. With Angular.js 2.0 it will be fully written with TypeScript.

Tooling:


Most of Web Development editor whether it's paid or free are having TypeScript tooling.  Most popular editors like Visual Studio, Visual Studio Code, WebStorm, Atom, Sublime text and Eclipse are having great tooling for TypeScript.

Why to use TypeScript:


Followings are reason why we should use TypeScript instead of JavaScript.
  1. Fully Object Oriented support with classes and interfaces. So It's a great productivity boost for any developer and easily maintainable and understandable.
  2. It's provide most of the errors compile time while JavaScript is more liberal than this. So less run time error means less bugs for your application.
  3. Refactoring is very easy in TypeScript compare to JavaScript.
So it's never been late. It is the right time to learn TypeScript. Hope you like it. Stay tuned for more!.
Share:
Thursday, September 17, 2015

Which visual studio themes you use? Interesting Survey

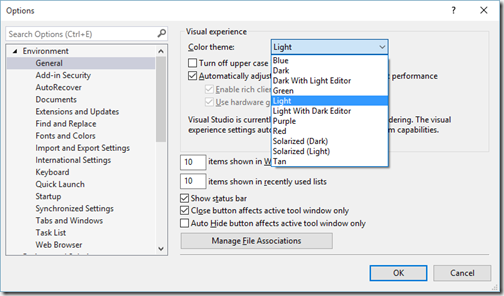
I have been using Visual studio since 2003 version and it's been decade and still my favorite editor. With visual studio 2010 they have introduced blue theme and With Visual Studio 2012 they also introduced a black theme. Lots of people are using lots of different themes. Some people like black themes and some does not. I had always argument with my friends about visual studio themes. So I thought it will be a good idea to get survey about themes and so what I have done is to put a survey on my blog. As you know this blog is technical blog so most of my readers will be developers. So far I have got a interesting data so I thought it will be a good idea to write a blog post and share those data with you.

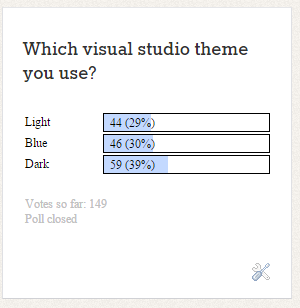
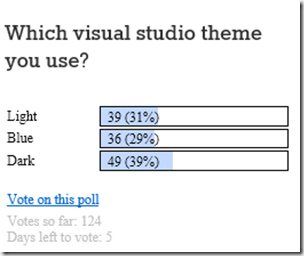
So till now I have got total 124 votes for my survey  and here is the result of the survey till now.

visual-studio-theme-survey

From, the above survey I get following fact.
  1. Lots of people like black themes out of 124 votes I got 49 for black themes. So black theme is most the popular one.
  2. To my surprise light theme comes second which I thought will be a third place but I got 39 votes for that.
This survey is still open for the five days. So if you are new to this blog and still not cast your votes then its right time to do.

Where I can get customize Color themes:


If you need more customized colour  themes than I request you to visit http://studiostyl.es/. It got thousand of customized colour themes.

Visual Studio Theme editor extension:


If you need more option than this three themes and then you should also try visual studio color theme editor extension. It's available from visual studio 2010. Here is the links for different visual studio versions color theme editor extensions.

Visual Studio 2010:
https://visualstudiogallery.msdn.microsoft.com/20cd93a2-c435-4d00-a797-499f16402378

Visual Studio 2012:
https://visualstudiogallery.msdn.microsoft.com/366ad100-0003-4c9a-81a8-337d4e7ace05

Visual Studio 2013:
https://visualstudiogallery.msdn.microsoft.com/9e08e5d3-6eb4-4e73-a045-6ea2a5cbdabe

Visual Studio 2015:
https://visualstudiogallery.msdn.microsoft.com/6f4b51b6-5c6b-4a81-9cb5-f2daa560430b

Once you install you will get lots of default color theme choice as well you can customize your theme and save it.

visual-studio-theme-editor-default-options

Which color theme I'm using:


Now it's time to write about my personal preferences. It totally depends on the lighting condition where I am using visual studio. If there a lots of light I prefer to use light theme while if it is dark then I like to have dark visual studio theme.

Hope you like it. Stay tuned for more. Still this survey is open for next five days. Please do vote for your favorite themes.

Update on 1st October 2015

Here is the latest update for the survey, the survey are closed now and here is the final result.


Here are the some statistics

Survey period : 1 Month
Total votes so far: 149
Winner : Black

Clearly Black themes are more popular!.

Thank you all who participated on survey!!. Keep reading my blog and participate in this kind of survey
Share:
Saturday, August 8, 2015

New milestone achieved- 2 million pages view for my blog - www.dotnetjalps.com

Today, I have came to know that my blog has completed 2 million page views. I am not crazy about milestone and normally I don't share my milestones publicly but this is huge milestone so I'm sharing with you and there is another reason behind it. I want to say huge thank you to all my blog readers. Thank you from bottom of my heart.

I host my blog on blogger.com. So here is the statistics from blogger official statistics.

pageviews-blogger

Till 2010, I have not started tracking page views, But after that I have started tracking page views for my blog and I am almost getting 59k page views every month and approx. 2.5 page views everyday.
Here are the top 10 blog post all time as per blogger statistics.

top-ten-blog-post-blogger 

So once again, Thank you very much dear readers and I promise I continue to write blogs in my free time.

Also, last but not least I would like thank my family specially my wife who sacrifices her time some time as I am busy writing blog post for my blog post. So thank you dear wife!. My brother and father for continue providing all the support and my little rock star from where I get all energy to write blog post.
Share:
Sunday, July 26, 2015

Video - Custom Layout in Visual Studio 2015

Recently Microsoft has launched Visual Studio 2015 with loads of features. I have created a video for a feature called custom layouts in Visual Studio 2015. Followings are link for Youtube and Vimeo

Youtube- https://www.youtube.com/watch?v=IZ4LDZU7c_s
Vimeo- https://vimeo.com/134507008


If you  don't want to watch video then I have already written a blog post. Following is a link for that.

Custom Windows Layout in Visual studio 2015

Hope you like it. Stay tuned for more!.
Share:
Wednesday, July 22, 2015

Video - Difference between var and dynamic keyword C#

I have recently produced one video about difference between var and dynamic keyword. Please go through it and let me know how it was.

You can find complete video at following URL.

https://www.youtube.com/watch?v=FPNZ_sTfZBo


Hope you like it. Stay tuned for more!.
Share:
Sunday, July 19, 2015

SQL Server- Guest Post - Solutions for SQL Server Master Database Corruption

This blog post a Guest Post from one of my friend Priyanka Chouhan.

About Author:


Priyanka Chouhan is a technical writer in “Stellar Data Recovery “with 5 years of experience and has written several articles on SQL. She has the fine knowledge of SharePoint and SQL Server. In the spear time she loves reading and gardening.

Here is the her blog about - Solutions for SQL Server Master Database Corruption

Master database is a backbone of the SQL Server database. It is a must have database and user cannot start the SQL Server without master database. It contains the all information about server configuration. When a user installs a SQL Serverthen, it usually creates master, model, MSDB and TEMPDB system databases by default. MSDB and TEMPDB depend on the version of SQL Server database. All system databases performs the different task like: master database is used to store all system level information, TEMPDB stores the information about temporary tables and temporary stored procedures, model is worked as a template for all system created database and MSDB is used by the SQL Server Agent to schedule alerts and jobs.

Corruption in the master database is not a new thing. I will advise to all database users to take the backup of master database because without master database, SQL Server cannot be started. If corruption is high in the master database then SQL Server does not allow starting the database. In this case user can rebuild it by using command prompt or restore from the latest backup (Scroll down to see detailed information). In case of minor corruption, it might be possible that user may start the database but SQL server does not allow to access the details inside the database.

Restore from the Backup


These are the steps to restore the master database from the backup:
Start SQL Server Configuration Manager then click on the SQL Server Services.
Stop SQL Server Agent (it might connect first and prevent you to connect as a second user).
Right-click SQL Serverandthen click Properties.
Advanced tab, in the Startup Parameters box, insert –mto start the SQL Server in the Single User Mode.
Now Start SQL Server.
Start cmd.exe from start menu
Type SQLCMD on command prompt
Restore the master database using command:
RESTORE DATABASE master FROM DISK = ‘D:\MyFolder\master.bak’ WITH REPLACE
Now remove the startup parameter –m.
Start SQL Server.

This is the best way to fix master database corruption issues. If backup of corrupt master database is not available then user can easily rebuilt it by following below steps.

Rebuild System Database


Rebuild the system database means we are going to drop the re-create in their real location.

Open the command prompt and change the directories to the location of setup.exe file on the local server. Its default location in the server is C:\Program Files\Microsoft SQL Server\130\Setup Bootstrap\Release.
Enter the following command in the command prompt Setup
Setup /QUIET /ACTION=REBUILDDATABASE /INSTANCENAME=Instance_Name /SQLSYSADMINACCOUNTS=accounts [ /SAPWD= StrongPassword ] [ /SQLCOLLATION=Collation_Name]
Once the rebuild process completes then it returns the command prompt without any message. User can view the Summary.txt log file to verify the process. The default location of theSummary.txt log file is C:\Program Files\Microsoft SQL Server\130\Setup Bootstrap\Logs.

Conclusion:

These are the methods to solve the corruption in the master database. Sometimes antivirus software can be the reason of master database corruption. So read the guidelines here to choose the antivirus https://support.microsoft.com/en-us/kb/309422/en-us


Share:
Sunday, July 5, 2015

Dependency Injection with Autofac: Keyed Registration

This will going to be a fifth post in my Dependency Injection series with Autofac. If you have not gone through all the previous post of this series then I would like to encourage you to go through it. Following is a list of blog posts.
Dependency Injection with Autofac : Getting Started
Dependency Injection with Autofac : Constructor Injection
Dependency Injection with Autofac : Module Feature
Dependency Injection with Autofac : Registration Ordering
Dependency Injection with Autofac: Named Registration

Keyed Registration:

There are multiple ways of register and resolving type in Autofac and keyed registration is one of them. Just liked named registration here you can resolve a type with a key. That key can be a valid C# object. Let’s create a sample console application for it. I have added reference of Autofac via NuGet package as did in my previous blog post. Following is a Customer class that I’ve created for the Keyed registration demo.


After creating Customer class following is a code that I’ve written for demo of Keyed Registration with Autofac.
If you see above code carefully, You can see that first I have created a object of customer as keyCustomer then I’ve register customer type with that keyCustomer Object.  After that I’ve resolved customer with that keyCustomer object and assigned few properties and then Print that customer with “PrintCustomer” object.
One thing to note that when you register type with Keyed Registration It can not be resolve without it. You can only resolve that type with same key you have registered.
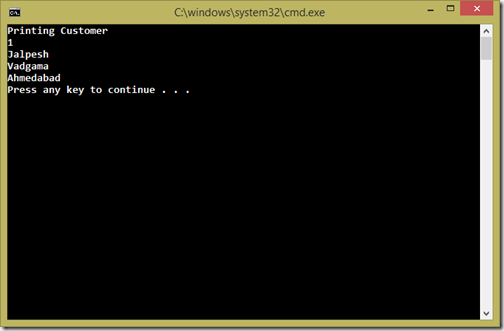
Now when you run this application. You will following output as expected.

autofac-keyed-registration-output
That’s it. Hope you like it. Stay tuned for more!!.
You can find complete source code of this Autofac series on Github at - https://github.com/dotnetjalps/AutofacSamples
Share:
Friday, July 3, 2015

Dependency Injection with Autofac : Named Registration

I’m really having fun with Autofac and It is a great IOC container.  As its tag line suggest it it a addictive IOC container.  This post will be a part of Autofac series. If you have not gone through my previous blog post then I would suggest you go through it. Following is a list of blog post I’ve written for Autofac series.

Dependency Injection with Autofac : Getting Started
Dependency Injection with Autofac : Constructor Injection
Dependency Injection with Autofac : Module Feature
Dependency Injection with Autofac : Registration Ordering

Named Registration:

Named registration can be very useful when you have to create multiple object of same type with different states. Autofac provides that functionalities with Named Registration. I’m going to create a sample console application and added Autofac via Nuget package.  To demonstrate named registration I’ve created customer class like following.


Now let’s write some code to create named instance like following.
As you can see in above code, I have created a named registration with build container and then I have resolve the instance with same name which I have done registration for it. Then I populated properties of Customer and Printed that customer with “Print” function.
One thing to note here that when you register types with named instance then it can not be resolved without name. If try to resolve it it will give error.
Now when you run this application. It will print Customer as expected.

Autofac-named-registration

That’s it. Hope you like it. Stay tuned for more!.
You can find complete source code of  this Autofac series on Github at - https://github.com/dotnetjalps/AutofacSamples
Share:
Thursday, July 2, 2015

I’m Microsoft MVP again. Thank you all

Today is one of the great day in my life. I’m again an Microsoft MVP for .NET and I’m happiest person on the earth and proud of it. Today’ I got this award for fourth time. Earlier I got this award for year 2010,2011 and 2012 for Visual C#.

I would like to thank all of you readers for making my blog so much popular. Thank you my family who has sacrificed lot of time for writing blog and other community activities. Also  I would like to Mention few people without their support and encouragement it would not have been possible. So special thanks to Mahesh Dhola, Kaushal Bhavsar, Ahmedabad .NET User group , Biplab Paul  and Gandharv Rawat.

I would also like to thank my current and previous Employers who has providing excellent opportunity to be part of .NET Technology world.

11034899_10153010450113437_8068327835173356049_n

Thank you all!.  Stay tune fore more!!.
Share:
Tuesday, June 30, 2015

Dependency Injection with Autofac: Registration Ordering

This post will be part of on going series for Dependency Injection with Autofac. If you have not gone through my previous post I would encourage you to go through it. Followings are links for that.

Dependency Injection with Autofac – Getting Started
Dependency Injection with Autofac – Constructor Injection
Dependency Injection with Autofac- Modules Feature

In this this blog we are going to learn about Registration ordering in Autofac.  If you register same interface multiple times then by default the last registration will be preserved. So when you resolve things it will be resolved by last registration. You can also prevent that via “PreserveExistingDefaults” method which is a second behaviour where first registration will be preserved. We will look both in details in this post.

Registration Ordering:


To demonstrate registration ordering, We are going to create a simple Employee class like below.

After creating a Employee class following is a code for my console application.

If you see code carefully, The important thing is two functions “DefaultBehaviour” and “AnotherBehaviour”. First function I’ve register two employee object one by one then. I tried to resolve employee object and with the help of "PrintEmployee" method I have printed Employee object.  Here I’ve used default behaviour so it will print secondEmployee as last registration will be resolved.

While in “AnotherBehaviour” function, I have used “PreserveExistingDefaults” function while registering secondEmployee object. So it will preserve first registration. So when you resolve object it will resolve first registration. So when you print employee object with “PrintEmployee” method it will print firstEmployee object.

When you run this console application. Following will be output as expected.

autofac-registration-ordering

That’s it. Hope you like it. Stay tuned for more!.
You can find complete source code this Autofac series on Github at - https://github.com/dotnetjalps/AutofacSamples
Share:
Sunday, June 28, 2015

Dependency Injection with Autofac : Modules feature

I’m having fun with Autofac as IOC containers and this is third post in series. In this blog post we are going to learn about Autofac modules. If you have not gone through first two blog posts then I would encourage you to go through it. Followings are link for that.

Dependency Injection with Autofac- Getting Started
Dependency Injection with Autofac – Constructor Injection

What is Autofac Modules?

Autofac modules provides greater flexibility  for structuring large application. Register all the component in single class will work for small applications. But for larger applications that will be quite difficult class. In this situation Autofac modules can help.  Autofac modules allow us to break registrations of component in different classes. Then later all you can load all the modules at single places.

So what we are waiting for, Let’s write some code to demonstrate the power of Autofac Modules. For that I’ve created a simple console application called “AutofacModules” and added Autofac nuget package to get reference of application. In this application we are going to create two separate module for “Student” and “Teachers”. So lets start by creating student model class like following.


Following is a student repository interface which contains a "Print" Method to print Student.
 And here is the implementation for Student Repository Inteface.

Now it's time to create Teacher model class like following.

Following is a interface created for Teacher repository which contains "Print" Method to print Teacher.
And here is the implementation of Teacher repository interface.
Now we are done with creating basic classes and interfaces for Student and Teacher It's time to create a modules for them. To created a module for them we need to create a separate class for Teacher and Student Module which got inherited from the Autofac module class. Following is a code of Student module.
And same for teacher module.
 If you see code of both classes carefully then you will realize that it is inherited from the Module classes and It's got a Load method override where we have done registration of repositories. Now our modules are also ready so It's time to write our main console application code. Following is a code for that.
If you see above code carefully the important thing is "BuildContainer" method where I've registered our module with RegisterModule method.Rest I have created teacher and student object and created object with Autofac Container and print respective objects. When you run application following is a output as expected.

autofac-module-console-application-output

That’s it. Hope you like it. Stay tuned for more post about Autofac features.
You can find whole source code of this Autofac series at Github on following location -https://github.com/dotnetjalps/AutofacSamples
Share:
Saturday, June 27, 2015

Dependency Injection with Autofac : Constructor Injection

Recently I’m playing with Autofac and I’m having fun with it. This blog post a part of same series. In this blog post we are going to look into how we can do constructor injection with Autofac. If you are not familiar with Autofac you can go through my introductory blog at following location.

Dependency Injection with Autofac: Getting Started

In this blog, We are going to see how we can do constructor injection with Autofac. So for that I’ve created a small console application. After creating a application, first thing you need to do is to add reference of Autofac via Nuget Package. You can do that via following nuget package.


Now it’s time to write some code. I’ve created a sample basic “Employee” model class like following.


After that I’ve created a interface “IEmployeeRepository” which has one method to print employee and expects Employee object parameter.


And following is a implementation class for Employee Repository.


Now it’s time to write Employee Service class code like following.


If you see above class carefully, You can see that it’s expect a constructor parameter of Employee Repository parameter and there we need to constructor injection.  So let’s write some Autofac code for constructor injection like following.


Here in the above code, You can see I have “BuildContainer” static method. Which created a Container Builder object and It’s register type of employee repository and employee service and it’s return a container object. In main method code I’ve resolve employee service class object with container and it’s automatically inject our constructor requirement of employee service class. Then I’ve created a employee class object and print it with print method. Once you run the application. You will get following output as expected.

constructor-injection-autofac-output

That’s it. You can see it’s very easy to do constructor injection with Autofac. In future post we are going to look at some other features provided by Autofac. Stay tuned for more.
You can find complete example of above blog post at following location on github- https://github.com/dotnetjalps/AutofacSamples
Share:

Dependency injection with Autofac : Getting started

I have been using dependency injection a lot in my projects. As it’s provide great flexibility to wire up things. Recently in free time I have been looking into some of open source architecture like Orchard and Nopcommerce. Both are using Autofac as dependency injector. As this IOC container are used in one of top successful project I got interested in Autofac and I started learning Autofac. I thought it will be a good idea to start a blog series for my learning so other can get benefit of it.

What is Autofac?

As per Autofac.org a site for Autofac
Autofac is an addictive Inversion of Control container for .NET 4.5, Silverlight 5, Windows Store apps, and Windows Phone 8 apps.
It is used in lots of application and one of the most popular IOC container in .NET world.  As per official documentation here is the basic pattern for integrating Autofac in your application.
  • Structure you application with Inversion of Control in mind
  • Add Autofac references( I prefer it using Nuget Package).
  • At application startup create a container builder
  • Register a component
  • Build container and store it for a later use.
  • Create lifetime scope of container during application execution.
  • Use lifetime scope to resolve instances of application.

Autofac Example:

So what we are waiting for, Let’s create a simple example. I’m going to create a sample application like following.

AutofacBasicConsoleApplication

After creating application, I have created a my interface IPrintService as following.
namespace AutoFacBasic
{
    public interface IPrintService
    {
        void PrintSomething(string text);
    }
}

Here is the implementation of interface in class like following.
using System;

namespace AutoFacBasic
{
    public class PrintService : IPrintService
    {
        public void PrintSomething(string text)
        {
            Console.WriteLine(text);
        }
    }
}

Now, We have done with basic stuff so it’s time to wire up component with Autofac. To add references for Autofac I’m going to use following nuget package.

nuget-package-autofac

After adding a Autofac reference via nuget package. I have written following code for that sample console application.
using Autofac;
using System;

namespace AutoFacBasic
{
    class Program
    {
        static void Main(string[] args)
        {
            //registering interface with class that implemented
            var builder = new ContainerBuilder();
            builder.RegisterType<PrintService>().As<IPrintService>();

            //Resolving inteface with autofac
            var container = builder.Build();
            var printService = container.Resolve<IPrintService>();
            printService.PrintSomething("Hello World");
            Console.ReadKey();
        }

    }
}

Here in the above code, If you see carefully. First I have created a object of Container Builder and then I have register type with print service. Then I have build container builder to get container object. After that I have resolved print service with container and get the object of printer service. Then I have printed Hello world with PrintSomeThing method. When you run application. Here is the output as expected.

autofac-console-application-output

That’s it. You can see how easily we can wire up things with Autofac. In future posts we will see some advance features of Autofac. Stay tuned for more!!.

You can find complete source code of this application at following location at github- https://github.com/dotnetjalps/AutofacSamples/
Share:
Wednesday, June 24, 2015

Completed 725 blog post and still counting

I’m not a fan of counting milestones but today it was huge one so I could not resist myself to write a blog post about it. Today this blog has been completed 725 Blog post.

I still could not believe this blog has come so far!. This will would not have been possible without you guys.

I promise that I try to keep updated this blog in weekly.  Also on this occasion I would also like to thank my family. Specially my wife who is continuously supporting me and sacrifice her time for my blog post.

Thanks you all again! . Also today I have changed my blog theme to a modern look. Hope you like it. Stay tuned for more. Keep reading my blog. 
Share:
Saturday, June 13, 2015

Double quotes not working with Visual Studio

Recently, In one of the development machine with Windows 7, I was having strange problem with Visual Studio 2013, When I type double quote first time it was not there and then after once again type I type then it was there. I was wondering what is going on. After digging into little deep, We figure out it was due to language settings and that is creating problem. After fixing languages I was able to fix this issue. I thought it will be good idea to write a blog post about it. So other can be benefits also.

So problem I was having is I have to type double quotes two times. To fix that problem first thing you need to do is Goto  control panel-> region and language options. There you need to go to Keyboard tab. In windows 8.1 Go to search and search for language preferences.

Once you go to language preferences select English US Keyboard. Set that as default.
Now once you are done with your control panel settings. It’s time to make settings changes in Visual Studio. To Change the settings in visual studio go to Tools –> Options –> Environment Settings –> International Settings.
Share:
Wednesday, May 13, 2015

Visual Studio 2015 Github tools

I love open source and that’s why I’m making all the source code of my blog post on Github. Now with Visual studio 2015 RC Microsoft and Github released a GitHub tools for visual studio. So now you can directly interact with your Github repositories from team explorer itself. Working with Github never be easy now.

Once you install, Github tools for Visual studio with visual studio 2015 installation. It will be available on Team explorer like below.

githu-tools-for-visual-studio

Share:
Saturday, May 2, 2015

My sample code for 2015 Global Azure Bootcamp Ahmedabad

Lots of people ask for my sample code application for my presentation on “Azure Storage Services”.  So here is source code(Sample application) for 2015 Global Azure Bootcamp, Ahmedabad.

Source code of sample application for  2015 Global Azure Bootcamp , Ahmedabad:

You can find source of sample application which I have created at following location on GitHub.
https://github.com/dotnetjalps/GlobalAzureBootcampDemo
Share:

Azure Frequently Ask Questions: How to create a storage account with new portal

After presenting About Azure Storage Services at Global Windows Azure boot camp at Ahmedabad. I got lot of feedback and questions. One of the frequently asked question was how we can create a storage account with new Azure portal Preview. So I thought it would be a great idea to write a walk through post for it.

As you know, Before few months Microsoft has launched a new Azure portal in preview mode. It’s amazing there are lots of features available. You can find azure portal at portal.azure.com. You can do lots of stuff and monitoring that were not possible with current portal. I've tried and really like it. Please do try it and tell community about your feedback.

How to create a storage account with new azure portal:

So what we are waiting for let’s start our walk through of creating a storage account with new portal. So once you put url in browser it will be ask for login with your azure live account.

Share:
Sunday, April 19, 2015

Structure and Operator overloading in C#

Recently I have been playing with structure and It’s fun. In this blog post we are going to learn how we can use operator overloading with structure in C#.  You can find my blog post that I have already written about structure  at following location.

Structure in C#
Structure with constructor in C#
Structure with Interface in C#

So as usual I've created a console application to demonstrate operator overloading in C#. Here I have created a structure with equals operator overloading and following is a code for that.
Share:

Support this blog-Buy me a coffee

Buy me a coffeeBuy me a coffee
Search This Blog
Subscribe to my blog


My Mvp Profile
Follow us on facebook
Blog Archive
Total Pageviews