Friday, September 9, 2011

Entity framework and Stored procedure output parameter

One of my friend was having problem in Entity framework and stored procedure output parameter. He was confused how to use output parameter with stored procedures.So I did some search on internet and I found a great way to use output parameter so I thought I should write a blog post for the same. So in this blog post I am going to explain you how we can use output parameter of entity framework.

So let’s start coding for that.For demo, I have create a table called ‘Customer’ which contains just two columns CustomerId and CustomerName. Following is the script for that.

/****** Object:  Table [dbo].[Customer]    Script Date: 09/09/2011 00:18:33 ******/
SET ANSI_NULLS ON
GO

SET QUOTED_IDENTIFIER ON
GO

CREATE TABLE [dbo].[Customer](
    [CustomerId] [int] NOT NULL,
    [CustomerName] [nvarchar](50) NOT NULL,
 CONSTRAINT [PK_Customer] PRIMARY KEY CLUSTERED 
(
    [CustomerId] ASC
)WITH (PAD_INDEX  = OFF, STATISTICS_NORECOMPUTE  = OFF, IGNORE_DUP_KEY = OFF, ALLOW_ROW_LOCKS  = ON, ALLOW_PAGE_LOCKS  = ON) ON [PRIMARY]
) ON [PRIMARY]

GO

Now as our table are ready. Let’s create a stored procedure which will return the number of records as output parameter. Following is script for that.

/****** Object:  StoredProcedure [dbo].[esp_GetCustomerCount]    Script Date: 09/09/2011 00:20:21 ******/
SET ANSI_NULLS ON
GO

SET QUOTED_IDENTIFIER ON
GO

CREATE PROCEDURE [dbo].[esp_GetCustomerCount]
    @CustomerCount INT OUTPUT
AS
    select @CustomerCount=COUNT(customerId) from Customer
GO

Now our database part is ready so its time to create a entity model. So first I have created a console application and I added a new entity model via project-> right click-> Add new item and selected ADO.NET Entity Model like following.
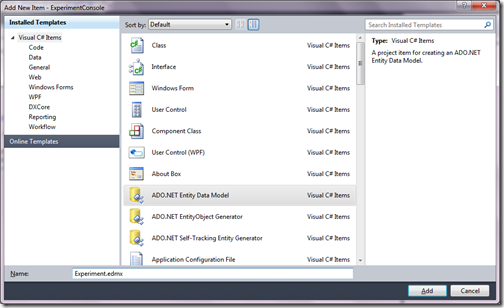
Entity Data Model for stored procedure output parameter

Once I clicked add a wizard will start asking for choosing model contents like following.
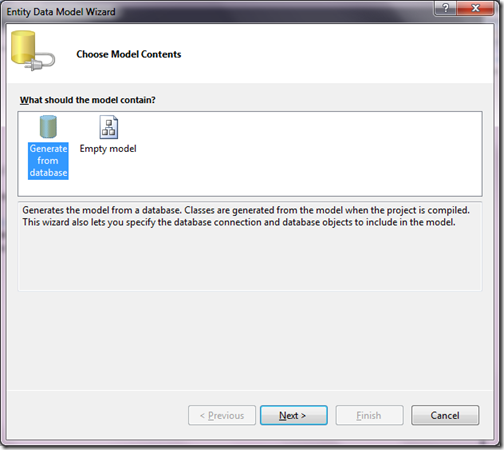
Choose model context for entity framework stored proecdure output parameter

Here I have selected Generate from database and clicked next it will ask for connection string. I have selected connection string and click next it will ask to select object of database. Here I have selected tables and  stored procedure which we have created earlier like following.
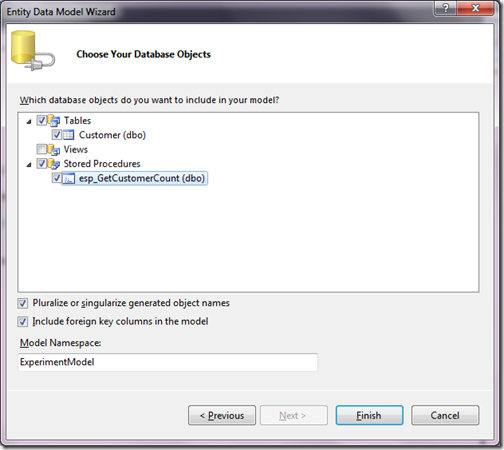
Stored procedure and tables with Entity Framework

Now once we have done our model creation its time to create a function import for store procedure. So do that we need to first open Experiment.edmx in visual studio like below.
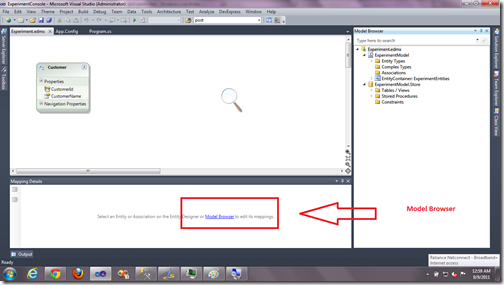
Model Browser for Entity framework for stored procedure without parameter

Once you click Model browser it will  reopen model browser in right side of your edmx like following.
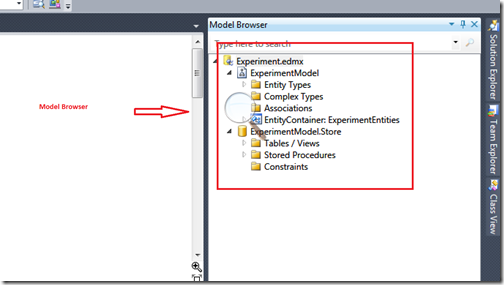
Model Browser in entity framework

Now in your store you need to expand store part and select stored procedure and click Add function import like following to create function for stored procedure.
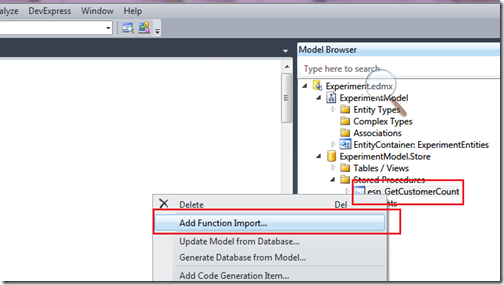
Fuction import for entity framework stored procedure output parmeter

Once you click Add function import a dialog box will open to select stored procedure and return type like following.
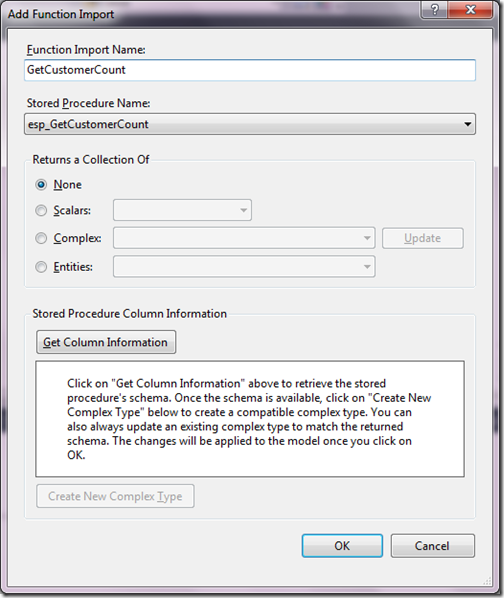
GetCustomerCount function for Entity framework stored procedure output parameter


Here I have changed name of function called ‘GetCustomerCount’ now once you click OK it will create a function called ‘GetCustomerCount’ in entity framework model. Now its time to use that in code. Following is the code from where can find the output parameter value.

using System;

namespace ExperimentConsole
{
    class Program
    {
        static void Main(string[] args)
        {
            using (ExperimentEntities myContext = new ExperimentEntities())
            {
                System.Data.Objects.ObjectParameter output = new System.Data.Objects.ObjectParameter("CustomerCount", typeof(int));
                myContext.GetCustomerCount(output);
                Console.WriteLine(output.Value);
            }
        }
    }
}

Here in above code you can see that I have created a object parameter and passed that to function as output parameter is there. Once this function will complete execution it will return value and you can get value with .value property. I have printed that in console application. Following is the output as expected as I have added four records in database.
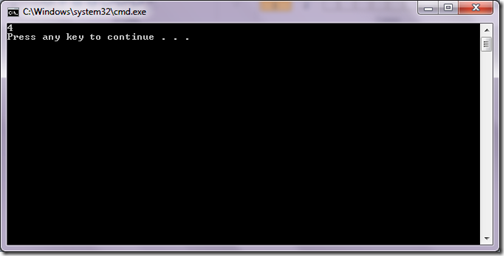
Output paremeter result for entity framework

So that’s it. It’s very easy to use output parameter. Hope you liked it. Stay tuned for more. Till then happy programming.. Namaste!!

Shout itkick it on DotNetKicks.com
Share:
Thursday, September 8, 2011

Jquery and ASP.NET- Set and Get Value of Server control

Yesterday one of my reader asked me one question that How can I set or get values from Jquery of server side element for example. So I decided to write blog post for this. This blog post is for all this people who are learning Jquery and don’t know how to set or get value for a server like ASP.NET Textbox. I know most of people know about it as Jquery is very popular browser JavaScript framework. I believe jquery as framework because it’s a single file which has lots of functionality.

For this I am going to take one simple example asp.net page which contain two textboxes txtName and txtCopyName and button called copyname. On click of that button it will get the value from txtName textbox and set value of another box. So following is HTML for this.

<%@ Page Language="C#" AutoEventWireup="true" CodeBehind="Index.aspx.cs" Inherits="Experiment.Index" %>

<!DOCTYPE html PUBLIC "-//W3C//DTD XHTML 1.0 Transitional//EN" "http://www.w3.org/TR/xhtml1/DTD/xhtml1-transitional.dtd">

<html xmlns="http://www.w3.org/1999/xhtml">
<head runat="server">
    <title></title>
       
</head>
<body>
    <form id="form1" runat="server">
    <div>
            <asp:TextBox ID="txtName" runat="server" />
            <Br />
            <asp:TextBox ID="txtCopyName" runat="server"/>
            <Br />
            <asp:button ID="btnCopyName" runat="server" Text="Copy"  OnClientClick="javascript:CopyName();return false;"/>
    </div>
    </form>
</body>
</html>

As you can see in following code there are two textbox and one button which will call JavaScript function called to CopyName to copy text from one textbox from another textbox.Now we are going to use the Jquery for this. So first we need to include Jquery script file to accomplish the task. So I am going link that jquery.js file in my header section like following.

<head >
    <title></title>
    <script src="http://ajax.aspnetcdn.com/ajax/jquery/jquery-1.6.2.js"></script>  
</head>

Here I have used the ASP.NET Jquery CDN. If you want know more about Jquery CDN you can visit this link.

http://www.asp.net/ajaxlibrary/cdn.ashx

Now it’s time to write query code. Here I have used val function to set and get value for the element. Following is the code for CopyName function.

function CopyName() {
    var name = $("#<%=txtName.ClientID%>").val(); //get value
    $("#<%=txtCopyName.ClientID%>").val(name); //set value
    return false;
}

Here I have used val function of jquery to set and get value. As you can see in the above code, In first statement I have get value in name variable and in another statement it was set to txtCopy textbox. Some people might argue why you have used that ClientID but it’s a good practice to have that because when you use multiple user controls your id and client id will be different. From this I have came to know that there are lots of people still there who does not basic Jquery things so in future I am going to post more post on jquery basics.That’s it. Hope you like it.Stay tuned for more.. Happy programming and Namaste!!

Shout itkick it on DotNetKicks.com
Share:
Sunday, September 4, 2011

ReCaptcha in ASP.NET MVC3

As a web developer we know what is captcha is. It’s way to confirm users as they are human.Following is captcha definition per WikiPedia.
A CAPTCHA (play /ˈkæpə/) is a type of challenge-response test used in computing as an attempt to ensure that the response is generated by a person. The process usually involves one computer (a server) asking a user to complete a simple test which the computer is able to generate and grade. Because other computers are assumed to be unable to solve the CAPTCHA, any user entering a correct solution is presumed to be human. Thus, it is sometimes described as a reverse Turing test, because it is administered by a machine and targeted to a human, in contrast to the standard Turing test that is typically administered by a human and targeted to a machine. A common type of CAPTCHA requires the user to type letters or digits from a distorted image that appears on the screen.
You can find more details about that on following link.

http://en.wikipedia.org/wiki/CAPTCHA.

Google ReCaptcha Service:

Google provide Recaptcha service free of charge to confirm users whether they are human or computer. We can directly use the recaptcha service with there api. You have to create a private key for that and that key will validate domains against it. Even we can create the global key for all the keys. You can find more information about it from below link.

http://www.google.com/recaptcha/learnmore

ReCaptcha Web helpers in ASP.NET MVC 3:

As per I have also written in my previous post. ASP.NET Web helpers from Microsoft comes inbuilt with tools update. If you not installed it then you have to download NuGet package for it. You can refer my previous post for this.

Now we have all things ready its time to write ReCaptcha code in ASP.NET MVC. First we have create key for recaptcha service. I have created it via following link. It’s very easy.

https://www.google.com/recaptcha

Now let’s start coding. Recaptcha web helper renders a captcha control in your web form so you can validate this. Following is code which will render captcha control.
@ReCaptcha.GetHtml(theme: "red")
It's take four argument
  1. Theme- theme specify the color and look for ReCaptcha control. You can have to put theme name over there
  2. Language- You need to specify the captcha challenge language
  3. TabIndex- Tab Index for this control
  4. PublicKey- A unique public key which we have created for our domain.

Following is a code how to use above code in real time. I have updated standard logon control template for ASP.NET MVC.
@model CodeSimplifiedTest.Models.LogOnModel

@{
    ViewBag.Title = "Log On";
    ReCaptcha.PublicKey=@"6LedqMcSAAAAAJgiIjKlyzzV2czbGOPvij1tc39A";
}

<h2>Log On</h2>
<p>
    Please enter your user name and password. @Html.ActionLink("Register", "Register") if you don't have an account.
</p>

<script src="@Url.Content("~/Scripts/jquery.validate.min.js")" type="text/javascript"></script>
<script src="@Url.Content("~/Scripts/jquery.validate.unobtrusive.min.js")" type="text/javascript"></script>
<script src="@Url.Content("~/Scripts/jquery-1.5.1.min.js")" type="text/javascript"></script>
@Html.ValidationSummary(true, "Login was unsuccessful. Please correct the errors and try again.")

@using (Html.BeginForm()) {
    <div>
        <fieldset>
            <legend>Account Information</legend>

            <div class="editor-label">
                @Html.LabelFor(m => m.UserName)
            </div>
            <div class="editor-field">
                @Html.TextBoxFor(m => m.UserName)
                @Html.ValidationMessageFor(m => m.UserName)
            </div>

            <div class="editor-label">
                @Html.LabelFor(m => m.Password)
            </div>
            <div class="editor-field">
                @Html.PasswordFor(m => m.Password)
                @Html.ValidationMessageFor(m => m.Password)
            </div>

            <div class="editor-label">
                @Html.CheckBoxFor(m => m.RememberMe)
                @Html.LabelFor(m => m.RememberMe)
            </div>

            <p>
               @ReCaptcha.GetHtml(theme: "red")
            </p>
           
        </fieldset>
    </div>
}

As you can see in above code for recaptcha public key and Recaptcha.GetHtml part. Now its time to captcha validation in server side code in controller. As I have used standard logon template for this.I have modified Logon Action Result in Account controller like following.

[HttpPost]
public ActionResult LogOn(LogOnModel model, string returnUrl)
{
    if(!ReCaptcha.Validate(privateKey:"6LedqMcSAAAAAJgiIjKlyzzV2czbGOPvij1tc39A"))
    {
        return Content("Failed");
    }
  
    if (ModelState.IsValid)
    {
        if (Membership.ValidateUser(model.UserName, model.Password))
        {
            FormsAuthentication.SetAuthCookie(model.UserName, model.RememberMe);
            if (Url.IsLocalUrl(returnUrl) && returnUrl.Length > 1 && returnUrl.StartsWith("/")
                && !returnUrl.StartsWith("//") && !returnUrl.StartsWith("/\\"))
            {
                return Redirect(returnUrl);
            }
            else
            {
                return RedirectToAction("Index", "Home");
            }
        }
        else
        {
            ModelState.AddModelError("", "The user name or password provided is incorrect.");
        }
    }

    // If we got this far, something failed, redisplay form
    return View(model);
}

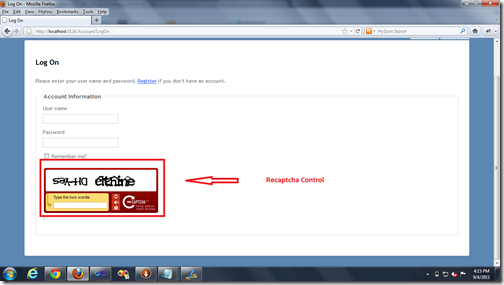
Here I have validated the captcha control with public key and if validation failed then it will sent failed message. Now it’s time to run that in browser and let’s see output.

RecapthaControlOuput

That’s it. Its easy to integrate. Hope you like it..Stay tuned for more.. Till then Happy Programing..Namaste!!

Shout itkick it on DotNetKicks.com
Share:
Saturday, September 3, 2011

www.dotnetjalps.com new domain for personal blog

After more then 4 years of blogging I have decided to migration my personal blog to its own domain http://www.dotnetjalps.com. There are few reasons why I have migrated my blog to new domain.
  1. Custom domain is your own identity. So you can create your brand.
  2. Now all page ranks and All SEO belongs to my custom domain instead of blogger platform.
  3. SEO will be more easy then standard custom domain.
  4. I want to reach more people and its easy with your custom domain
  5. People will share bookmarks with my custom domain. So If I migrated my blog to another plate all things will remain same.
  6. PageRank was increasing with subdomains very slowly. While with custom it will increase faster.
  7. In lots of companies I have seen block blog word with custom domain its will removed. So more people can reach at my blog when they need me.
Here is a great link which inspired me a lot for migrating my blog to http://jalpesh.blogspot.com to http://www.dotnetjalps.com.

Note: I have not change my feeds address for personal blog. So RSS feeds will remain same at- http://feeds.feedburner.com/blogspot/DotNetJalps.

On this opportunity once again I would like thanks my reader and my supporters for making me whatever I am. Without you guys it would not have been possible. You are the real hero for me. So please keep reading my blogs and send me suggestions to make better and better.

One another great news is that DZone people send me a certificate for my DZone MVB. So I would like to take this opportunity to  share with you guys.

DZoneCertificate

That’s it. Please comment your views about my blog. Stay tuned for more..Till then Happy Programming.. Namaste!!!

Shout it
Share:
Tuesday, August 30, 2011

Chart Helpers in ASP.NET MVC3- Create chart with asp.net mvc3

I am exploring ASP.NET MVC3 and everyday I am learning something new. In today’s post I am going to explain how we can create chart with ASP.NET MVC3.

Chart is one of greatest way of expressing figures. We all need that functionality in any commercial application. I am still remembering old days with ASP.NET  where we have to use the third party controls for charts or we have to create it with the use of CSS and Server side controls. But now with ASP.NET MVC Helpers you can very easily create chart in few lines of code.

ASP.NET MVC Chart helper and other helpers comes inbuilt with the latest ASP.NET Tools update. If you don’t have ASP.NET MVC Chart helpers then you can find more information about it from here.

http://haacked.com/archive/2011/04/12/introducing-asp-net-mvc-3-tools-update.aspx

But still if you have not updated it then don’t worry about it. There is nuget package called “ASP.NET Webhelper Library”. You can add that package like following and still use same functionality.

ChartHelper-ASP.NET Web Helpers Library Pacakge

Now once you have all set for reference. We can start working on coding part. So draw a chart I have taken simple example like number of records vs time take chart. This Chart Helper support there types of cjart.
  1. Bar Chart
  2. Pie Chart
  3. Column Chart
In this example we are going to use Bar Chart. Following is code for that. I have create one simple action result called “DrawChart” which will return chart as PNG format.

using System;
using System.Collections.Generic;
using System.Linq;
using System.Web;
using System.Web.Mvc;
using System.Web.Helpers;

namespace CodeSimplifiedTest.Controllers
{
    public class HomeController : Controller
    {
        public ActionResult Index()
        {
            ViewBag.Message = "Welcome to ASP.NET MVC!";

            return View();
        }

        public ActionResult About()
        {
            return View();
        }

        public ActionResult DrawChart()
        {
            var chart = new Chart(width: 300, height: 200)
                .AddSeries(
                            chartType: "bar",
                            xValue: new[] { "10 Records", "20 Records", "30 Records", "40 Records" },
                            yValues: new[] { "50", "60", "78", "80" })
                            .GetBytes("png");
            return File(chart, "image/bytes");
        }
    }
}

Here you can see that first I have included System.Web.Helper name space on top and then in DrawChart Action Result I have created chart variable where I have specified the height and width of chart and in add series method of it I have provided the chart type and x axis and y axis value. Now as we have to display it as image so for that I have used @URL.Action to point src to our Action Result DrawChart like following.
<img src="@Url.Action("DrawChart")" alt="Drawing chart with HTML Helper" />

Now let’s run this application in browser via pressing Ctrl+F5 and following is the output as expected.

Output

That’s it. You can see its very to create any kind of chart with Chart Helpers in ASP.NET MVC 3. Hope you like it. Stay tuned for more.. Till then happy programming and Namaste!!

Shout itkick it on DotNetKicks.com
Share:
Sunday, August 28, 2011

Visual Studio 2010 Features post list on my blog

Share:
Saturday, August 27, 2011

ILSpy-Alternative of .NET Reflector

Sometimes we need to have decomposer tool or reflector tool for our applications to improve the performance or to know the internals of the assembly we have created. I was using Red Gate .NET Reflector earlier for same as it was free. Now Red Gate has made that tool paid version so I was finding some tools from that I can decompile the stuff. After digging some time on the internet I have found a great tool ILSpy which almost giving same functionalities like .NET Reflector. You can download that tool from following link.

http://wiki.sharpdevelop.net/ilspy.ashx

You will get following features in ILSpy. It is also listed on above page.
  • Assembly browsing
  • IL Disassembly
  • Decompilation to C#
    • Supports lambdas and 'yield return'
    • Shows XML documentation
  • Saving of resources
  • Search for types/methods/properties (substring)
  • Hyperlink-based type/method/property navigation
  • Base/Derived types navigation
  • Navigation history
  • BAML to XAML decompiler
  • Save Assembly as C# Project
  • Find usage of field/method
  • Extensible via plugins (MEF)

Now let’s see how we can use ILSpy for decompiling our application. I have created a very basic console application which will concat string and print name. Here I have intentionally used string concatenation instead of StringBuilder class to show what’s going internally with ILSpy. Following is code for that.

using System;
namespace ThisExample
{
     class Program
     {
          static void Main(string[] args)
          {
              Test test = new Test();
              test.PrintName();
           }
     }
     public class Test
     {
          private string name = "Jalpesh Vadgama";
          public void PrintName()
          {
              name += " vishal vadgama";
              Console.WriteLine(name);
          }
     }
}

Once we are done with code let’s run that application and following will be a output.

Output window for ILSpy-Alternative of .NET Reflector

Let’s check that console application with the ILSpy. Once you double click exe of ILSpy it will look like following.

ILSpy- Alternative of .NET Reflector

Now let’s open our application via File->Open Menu. So it will load our application like following


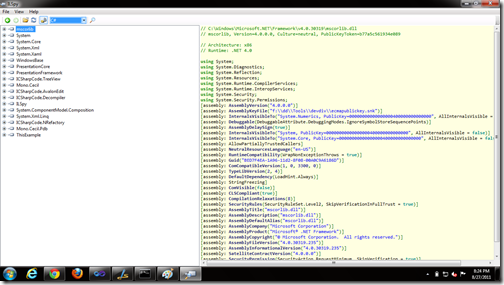
ClassHirerchay with ILSpy-.NET Reflector Alternative

As you can see in above screenshot It has loaded whole class hierarchy of console application we have just created as we can see Program and Test class directly and on right hand pane it has loaded whole assembly information for this application. You can see that in below image.


AssemblyInformation from ILSpy- Alternative of .NET Reflector

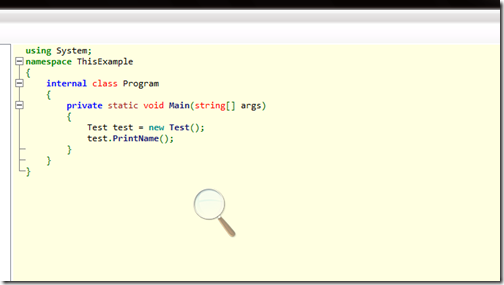
Now once you click on program it will load program information on right pane like following.

RightPane of code from ILSpy-.NET Reflector Alternative

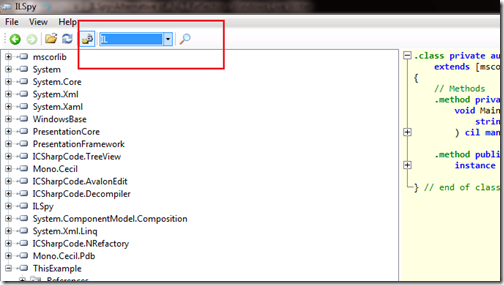
Event it’s provide IL mode also so you can see what’s going on internally on top its having button like this.

You can select IL from ILSpy-Alternative .NET Reflector

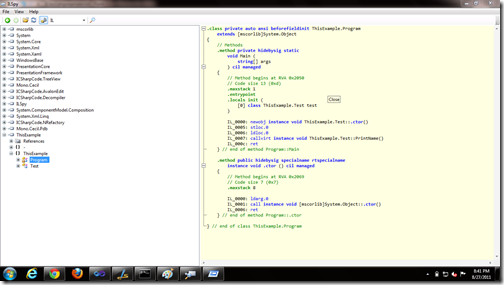
Once you select IL you right pane will load IL like following.In that you can see its using concat method

ILRightPane

So you can see its almost providing functionalities which was provided by .NET Reflector. Hope you like it.. stay tuned for more..till then happy programming.

Shout it
kick it on DotNetKicks.com
Share:

Support this blog-Buy me a coffee

Buy me a coffeeBuy me a coffee
Search This Blog
Subscribe to my blog


My Mvp Profile
Follow us on facebook
Blog Archive
Total Pageviews