Monday, March 28, 2011

Three new Action Result Type in ASP.NET MVC 3

In ASP.NET MVC incoming browser request mapped to a controller’s action method and that action method returns type of ActionResult in response to the browsers request. I was playing bit with ASP.NET MVC3 to check out new features of ASP.NET MVC 3 and I have found three great new ActionResult Type. Below is details explanation of each one.

  1. HttpNotFound: This return type returns a error 404 on client. This action result type can be very useful when we have resources that are not found and so we can notify the client with 404 error.
  2. RedirectResult:This returns a temporary redirect code 302 or permanent redirect code 302 depending upon a Boolean flag. This kind of redirection is very important for Search Engine optimization. I have already discussed this feature with asp.net 4.0 here.
  3. HttpStatusCodeResult: Returns a user specified code so developer have choice to return specific error code.

Here are code example of Action ResultType how we can use that in code.

public ActionResult SpecificResult()
{
return new HttpStatusCodeResult(404);
}

public ActionResult NotFound()
{
return HttpNotFound();
}

public ActionResult PermanentRedidrect()
{
return new RedirectResult("http://jalpesh.blogspot.com");
}
Hope you liked it.. Stat tuned for more..Happy Programming
Technorati Tags: ,
Shout it
kick it on DotNetKicks.com
Share:

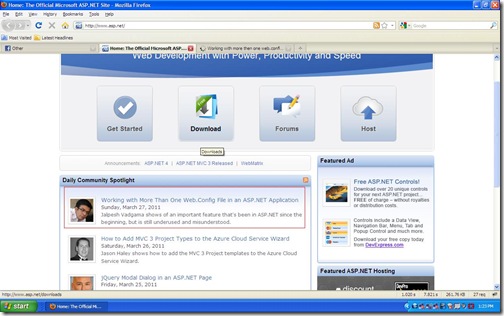
My blog post is appearing on Microsoft Official ASP.NET site.

Today I got a surprise from the Microsoft. One of my friend Hajan Informed me that my blog post is appearing on the Microsoft Official asp.net site www.asp.net. This is great surprise and honor for me that my blog post are appearing on Microsoft official site.

MicrosoftASP.NET

I would like to thanks all the peoples who are supporting me and all the people who are their to correct me If I am wrong. Thank you once again!!. I will continue to writing my blogs to serve community and this kind of encouragement give more boost for writing blogs.

Stay tuned for more.. I will keep writing.. Thank you readers..

Technorati Tags: ,
Shout it
Share:
Wednesday, March 23, 2011

Working with more then one web.config files in asp.net application.

Recently one of reader of my blog how we can work with more then one web.config files in asp.net application. So I decided to blog about that. Here is the my reply for that.

You can work with more then one web.config file in asp.net. But you can not put more then one web.config in each folder. Let’s first understand the hierarchy of web.config and other configuration file settings. On the top of the every configuration files you will have machine.config file which will have all system wide configuration settings.You can find this file in your OS drive like C: /windows/Microsoft.NET/vFrameworkNumber/Config folder. Here framework number with what ever framework you are using 1.1/2.0 or 4.0. You can override those settings in web.config file at the your application root folder. Same way you can add more web.config file in subfolder and can override the setting of parent folder web.config file. So we will hierarchy like below.
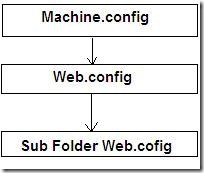
Hirerchay

Now let’s Create Project for it. In that I have create two web.config and 2 pages. First I have putted the web.config in root folder and then I have putted web.config in subfolder. Same way I have created a sub folder and then I have putted the web.config in sub folder. I have also putted one asp.net page in root as well as subfolder to use respective web.config settings. Here are my folder structure like below.
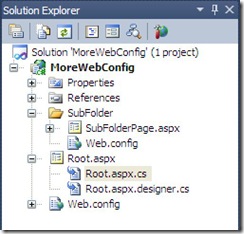
FolderStructure

Below is code for root folder web.config

<?xml version="1.0"?>
<configuration>
<system.web>
<compilation debug="true" targetFramework="4.0" />
</system.web>
<appSettings>
<add key="root" value="This is from root web.config"></add>
<add key="MySetting" value="This my settings is from root web.config"></add>
</appSettings>

</configuration>

and following is code for sub folder web.config.

<?xml version="1.0"?>
<configuration>
<system.web>
</system.web>
<appSettings>
<add key="sub" value="This is from sub web.config settings"></add>
<add key="MySetting" value="This my settings is from sub folder web.config"></add>
</appSettings>
</configuration>


After that I have written a code in root asp.net page to print settings from web.config folder like this following.

using System;
using System.Collections.Generic;
using System.Linq;
using System.Web;
using System.Web.UI;
using System.Web.UI.WebControls;

namespace MoreWebConfig
{
public partial class Root : System.Web.UI.Page
{
protected void Page_Load(object sender, EventArgs e)
{
Response.Write(System.Web.Configuration.WebConfigurationManager.AppSettings.Get("Root"));
Response.Write("<BR>");
Response.Write(System.Web.Configuration.WebConfigurationManager.AppSettings.Get("MySetting"));

}
}
}

Same way I have wrriten code in subfolder like following.

using System;
using System.Collections.Generic;
using System.Linq;
using System.Web;
using System.Web.UI;
using System.Web.UI.WebControls;

namespace MoreWebConfig.SubFolder
{
public partial class SubFolderPage : System.Web.UI.Page
{
protected void Page_Load(object sender, EventArgs e)
{
Response.Write(System.Web.Configuration.WebConfigurationManager.AppSettings.Get("Sub"));
Response.Write("<BR>");
Response.Write(System.Web.Configuration.WebConfigurationManager.AppSettings.Get("MySetting"));

}
}
}

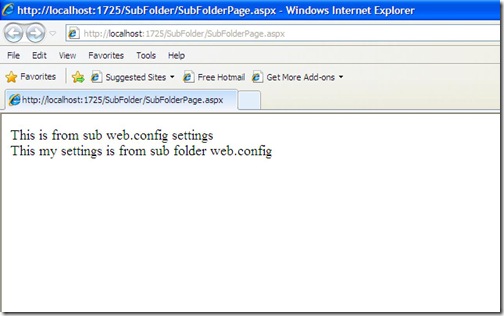
Now let’s run the both pages in browser one by one and you can see root folder application page is fetching settings from root folder web.config while sub folder application page is fetching setting from subfolder web.config even if key ‘mysetting’ is same on both as expected. You can see out put in browser below.

Root.aspx
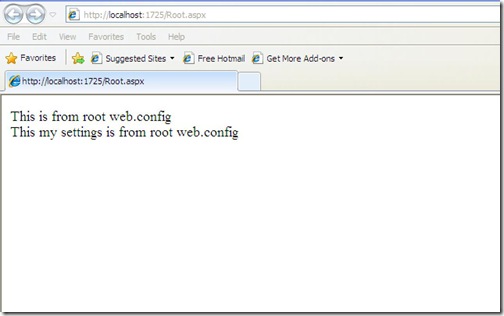
Root

SubFolderPage.aspx

SubFolder

So it’s very easy to work with multiple web.config. The only limitation of this you can not access sub folder web.config settings from root folder page. Except all you can use anything. Hope you liked it. Stay tuned for more..Happy programming..


Technorati Tags: ,
Shout it
kick it on DotNetKicks.com
Share:
Monday, March 14, 2011

TSQL Quiz 2011 on beyondrelational.com

One of the my friend Jacob Sebastian running a SQL Server TSQL quiz on his site beyondrelational.com. This is a great opportunity to learn TSQL and win great price Like Apple IPad and other lots of cool stuff. So if you are expert and if you learning TSQL then its a great way to test your knowledge.

For whole month of march selected quiz master will ask a question and you have to answer all this question day by day and at the end of month you will have great chance to win Apple Ipad.

For more details you can visit following link:

http://beyondrelational.com/quiz/SQLServer/TSQL/2011/default.aspx

Hope you liked it.Stay tuned for more..

Shout it
Share:
Tuesday, January 25, 2011

Installing Nuget package with package manager console step by step overview.

I have already blogged about NuGet in earlier post about how to install NuGet packages to your project with wizard. NuGet Extension also provides an package manager console to add library to your projects. Let’s install a blogml package via package manager console. So if you still not installed NuGet exntension then please read my earlier post here that explains how to install the NuGet Extension.

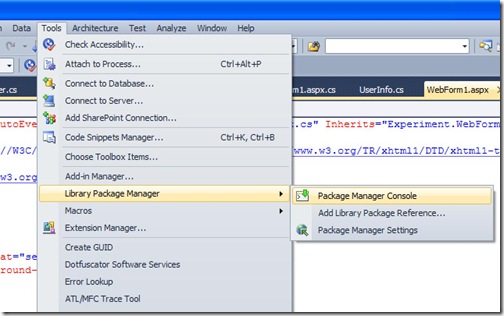
Once you are done with installing NuGet Extension to go to package manager console. You have to click Tools->Library package manager –>Package Manager console like following.

PcakgeManagerConsole

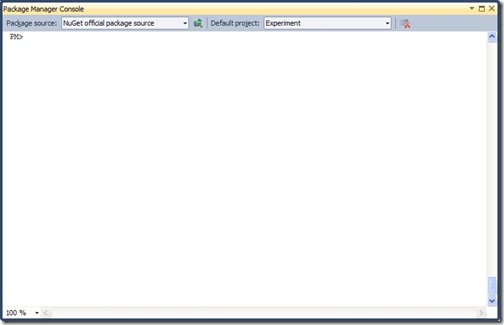
Once you click that menu you will get package manager console like following. PackageManagerConsolewindow

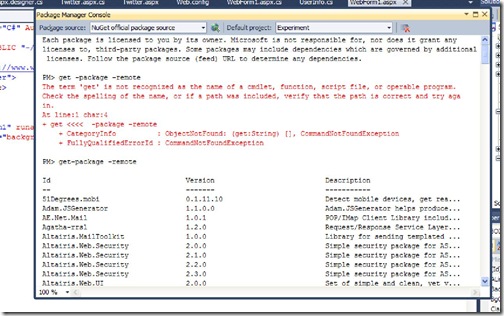
One you load an command line is available to you just need to write command to find packages and then you need to write command to install packages. let’s first see how many packages are available with the NuGet Extension. So first you have to write ‘get-package –remote’ command in command line to see what packages are available as following.

PackageCommand

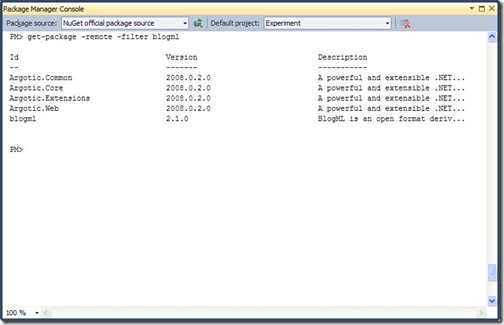
So It will load all the packages available in NuGet Now let’s filter some package via command. Suppose I want to install BlogML library to my project then I have to type ‘get-package –remote filter blogml’ and it will load all the packages that will contain BlogML like following.

FilterBlogML

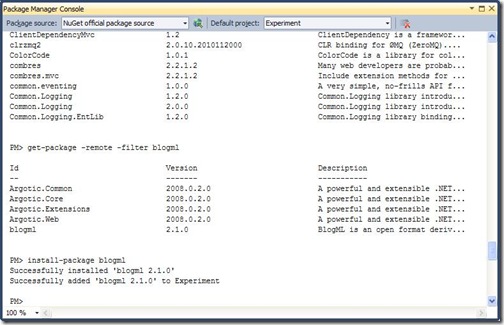
Now let’s install BlogML library to my project for that I have to type ‘install-package blogml’ and it will install the package like following.

InstallingPackage

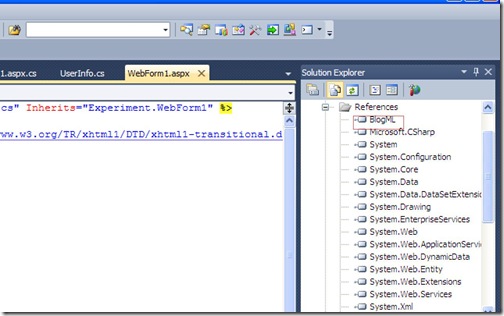
That’s it you can see Now your package is installed on your project and you find it in reference of your project like following.

BlogMLReference

It will also create packages.config and you can see installed packages there like following.

<?xml version="1.0" encoding="utf-8"?>
<packages>
<package id="blogml" version="2.1.0" />
</packages>

So that’s it as you can see its very easy to install NuGet package and its very convenient to install packages with this. Hope this help you. Stay tuned for more… Happy Programming..


Technorati Tags: ,,
Shout it
Share:
Monday, January 24, 2011

Getting Started with NuGet Packages step by step overview.

We can all see lots of buzz about NuGet in asp.net world. So I decided to explore it. let’s explore it in some details. Following is a explanation of NuGet Extension on the code plex here.


"NuGet is a Visual Studio extension that makes it easy to add, remove, and update libraries and tools in Visual Studio projects that use the .NET Framework. When you add a library or tool, NuGet copies files to your solution and automatically makes whatever changes are needed in your project, such as adding references and changing your app.config or web.config file. When you remove a library, NuGet removes files and reverses whatever changes it made in your project so that no clutter is left."

So in simple words is a Visual Studio Extension which will help you the add,remove and update libraries in your visual studio project.

Installing NuGet

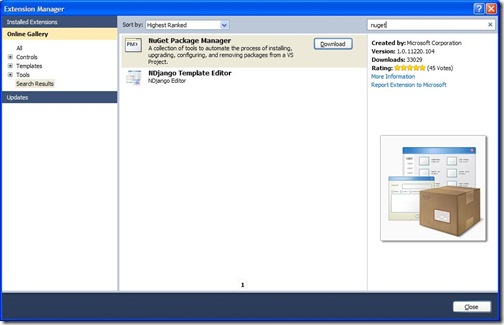
Let’s see how we can install it. For that first you have to go thorough the Tools->Extension Manager and then search for nuget and it will appear in the list like below.

NugetInstallation

After that click on download and it will download and install it from the web. Make sure your computer has access to internet. Once you download your nugest extension it will ask you to restart visual studio. So once your are restarted you are ready with nuget packages.

How to install packages with NuGet

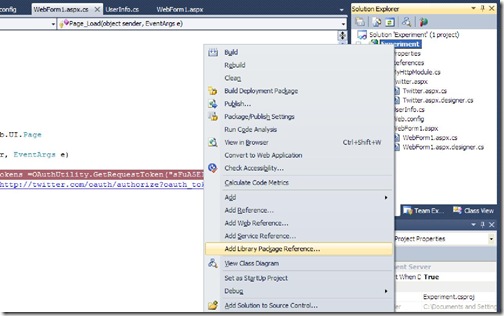
Here, I am going to install Entity Framework code first CTP 5 package with NuGet. To install that package first you have to go right click your project and then click add Library Reference Package like following.

AddLibraryPackage

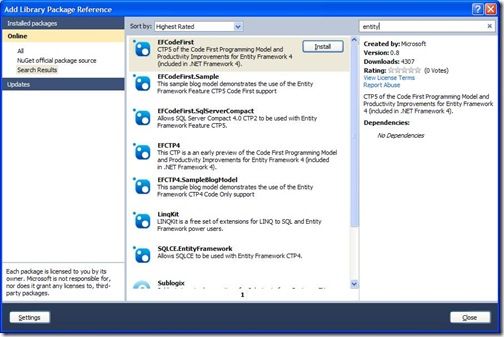
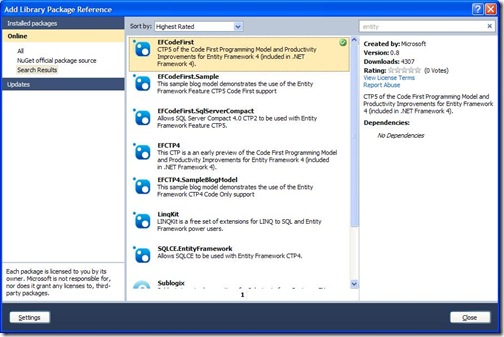
After that a reference dialog will appear their you have click online and search entity as we need to install entity framework ctp. After searching the right package click on install it will start installing your package. Following is screen host of add library package reference dialog.

EntityFramework

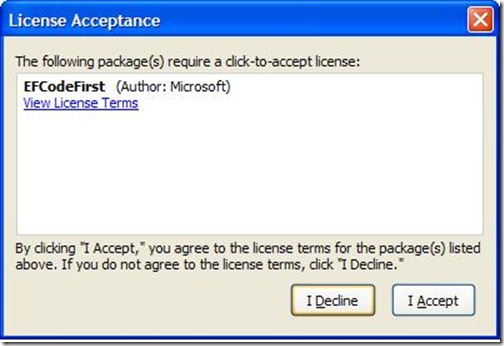
After clicking install EFlicence dialog will appear like this.

EFCodeFirst

Click on I Accept and install will install package.After installing package a green icon will appear on top as indication of your successful installation like following.

AfterInstallation

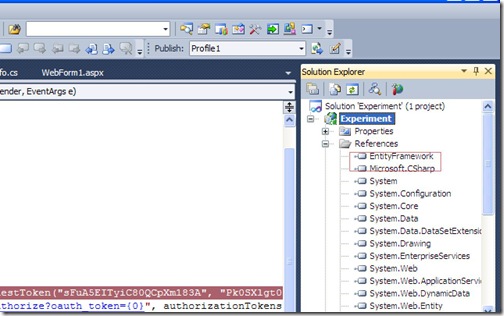
Now after clicking on close if you see on your project reference An Entity framework is added to your project reference like following.

EntityFrameworkReference

Also you can see a package.config will be added to your project. like following.

<?xml version="1.0" encoding="utf-8"?>
<packages>
<package id="EFCodeFirst" version="0.8" />
</packages>
That's it your package is installed and ready to use in your application. There is another way of adding packages with package console is also there. I will explain this on future blog posts. Hope you liked this. Stay tuned for more..
Technorati Tags: ,
Shout it
Share:

Programmatically creating asp.net request and handling response

Recently one of the my friends asked about how to create a web request in asp.net to a url outside of project. So I decided to write a small blog post regarding this. This web request can be easily created with httpwebrequest class and you can easily consume the response we are getting from this. This kind of request can be very useful when you are implementing payment gateways or other third party components. Following is a code for it. It is very easy.

using System;
using System.Collections.Generic;
using System.Linq;
using System.Web;
using System.Web.UI;
using System.Web.UI.WebControls;
using System.Net;
using System.IO;

namespace Experiment
{
public partial class WebForm1 : System.Web.UI.Page
{
protected void Page_Load(object sender, EventArgs e)
{
string url = "http://localhost:1798/WebForm2.aspx";
HttpWebRequest httpWebRequest = (HttpWebRequest)WebRequest.Create(url);
httpWebRequest.Method = "POST";
httpWebRequest.ContentType = "application/x-www-form-urlencoded";

HttpWebResponse httpWebResponse = (HttpWebResponse)httpWebRequest.GetResponse();
Stream responseStream = httpWebResponse.GetResponseStream();
StreamReader streamReader = new StreamReader(responseStream);
string response = streamReader.ReadToEnd();

Response.Write(Response);
}
}
}
Here in the above code you can see I have created a webrequest with system.net name space and then I have typecast that request in HttpWebRequest Class. There are several parameters are available with request like method which HTML submit method you want to use like “Get” or “Post”. After that I have created a object of HTTPResponse and then with the help of stream reader I have print a response we are getting from the URL.

That’s it. It’s very easy. Hope you will find it useful. Stay tuned for more. Happy Programming..

Technorati Tags: ,,,
Shout it
Share:

Support this blog-Buy me a coffee

Buy me a coffeeBuy me a coffee
Search This Blog
Subscribe to my blog


My Mvp Profile
Follow us on facebook
Blog Archive
Total Pageviews