Wednesday, July 6, 2011

CRUD Operation with ASP.NET MVC and EFCodeFirst Part-2

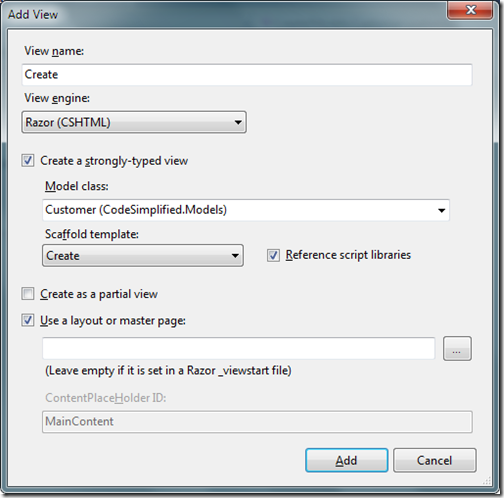
In the previous post I have already explained How we can list data from database easily with the help of EFCodeFirst . In this post I am going to explain How we can complete Create,Edit,Delete and Details operations within 10 minutes. So let’s first Start with Create a new Customer.I am going use same example of customer from previous post. So we have customer controller there so Let’s first create a new view for Create via Selecting View in Create() method of Customer Controller and Clicking on Add View and dialog box will open for add view like following.
CreateView

As you can see in the above template I have selected Customer Model Class for strongly typed view and Selected Scaffold template as Create once you click Add your view will be ready. Now its time to write for code in customer controller to Add Customer. So I have modified Create Method of customer controller which we have created like following.

[HttpPost]
public ActionResult Create(Models.Customer customer)
{
  try
  {
      using (var databaseContext = new Models.MyDataContext())
      {
          databaseContext.Customer.Add(customer);
          databaseContext.SaveChanges();
      }
    
      return RedirectToAction("Index");
  }
  catch
  {
      return View();
  }
}

That's it. We have done with Create Customer now. In the above databasecontext add method will add customer and SaveChanges method will save changed to database.
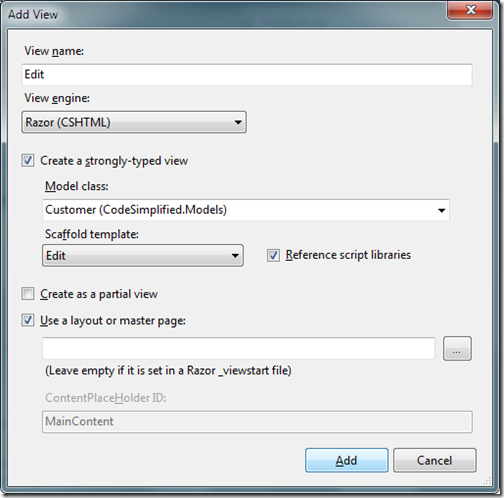
Now once we are done with Add its time to create edit and update functionality. Let’s first Add a view via Selecting view with Edit Method in clicking on Add view. Once you click a dialogbox for add View will open for that like following.
EditView

As you can see you I have selected scaffold template as Edit and I have Created Strongly typed view with Customer class. Once you click add it will create a new view for Edit. Now our Edit View is ready so let’s write code for Edit/Update in database. So first we have to modify Edit(int Id) method like following which will return specific customer with View. Following is a code for that.

public ActionResult Edit(int id)
{
  using (var databaseContext = new Models.MyDataContext())
  {
      return View(databaseContext.Customer.Find(id));
  }
}

Now let write code to update the changes to database. So for that I have modified another ActionResult Edit of customer controller like following.

[HttpPost]
public ActionResult Edit(int id, Models.Customer customer)
{
  try
  {
      using (var databaseContext = new Models.MyDataContext())
      {
          databaseContext.Entry(customer).State= System.Data.EntityState.Modified;
          databaseContext.SaveChanges();
      }
      return RedirectToAction("Index");
  }
  catch
  {
      return View();
  }
}

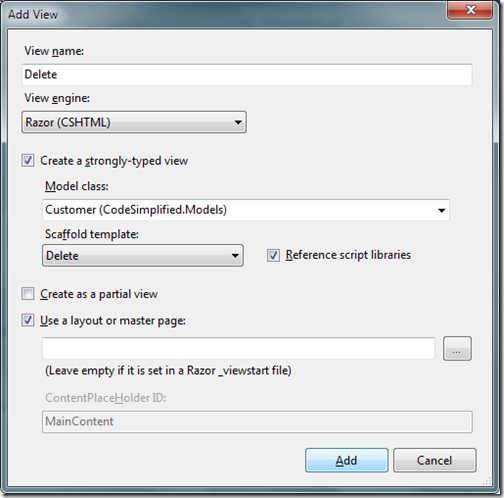
That's it we are done with the edit stuff.In above code the state modified will tell databasecontext that customer details is modified and savechanges will save changed to database. Now its time to create view for delete functionality. So I have clicked on Add View and Created a view for delete like following.
DeleteView

Here I have create Strongly typed view with Delete Scaffold Template. Now let’s modified both Delete Action Result in Customer Controller class. First Action result will return customer which we are going to delete and another delete action result with id will delete the customer from database and then it will return to main customer page. I have modified the code for both as following.

// GET: /Customer/Delete/5

public ActionResult Delete(int id)
{
  using (var databaseContext = new Models.MyDataContext())
  {
      return View(databaseContext.Customer.Find(id));
  }

}

//
// POST: /Customer/Delete/5

[HttpPost]
public ActionResult Delete(int id,Models.Customer customer)
{
  try
  {
      using (var databaseContext = new Models.MyDataContext())
      {
          databaseContext.Entry(databaseContext.Customer.Find(id)).State = System.Data.EntityState.Deleted;
          databaseContext.SaveChanges();
      }

      return RedirectToAction("Index");
  }
  catch
  {
      return View();
  }
}

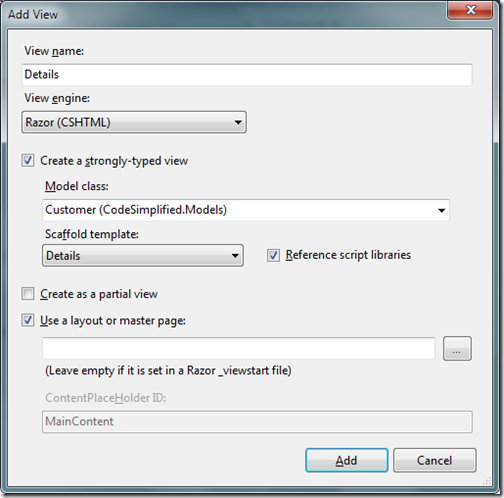
Here I have done something different then editing stuff to demonstrate the feature of Entity framework. You can also use Id for finding the current customer and then change its state to delete and SaveChanges will save that to in database. So now we are done with delete also. It’s now time to create details part. So same as above I have create a view with scaffold template details with customer model like following.
DetailView

Once we are done with creating view . It’s time to change the code for Details Action Result like following to return current customer detail.

public ActionResult Details(int id)
{
  using (var databaseContext = new Models.MyDataContext())
  {
      return View(databaseContext.Customer.Find(id));
  }
}

So that's it. We are done with all the stuff. So with Entity Framework code first. You can create basic CRUD application within 30 minutes without writing so much code. Hope you liked it. Stay tuned for more.. Till that Happy programming.

Shout it

kick it on DotNetKicks.com
Share:
Tuesday, July 5, 2011

CRUD Operation with ASP.NET MVC and EFCodeFirst Part-1

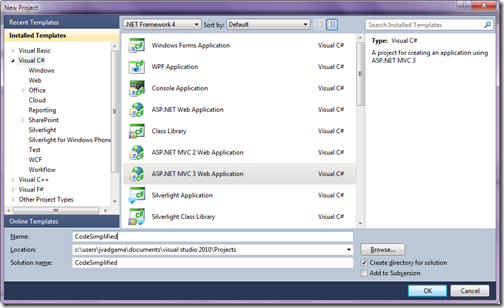
I have been playing with EFCodeFirst now and I found it very interesting with that you could write your application fast and easily. So I have decided to write series of blog posts for CRUD Operations using ASP.NET MVC 3 and EFCodeFirstCTP5.0 . You can very easily create CRUD within some minutes of code. So let’s start first thing is to create an ASP.NET MVC 3 application like following.

ASP.NETMVCApplication

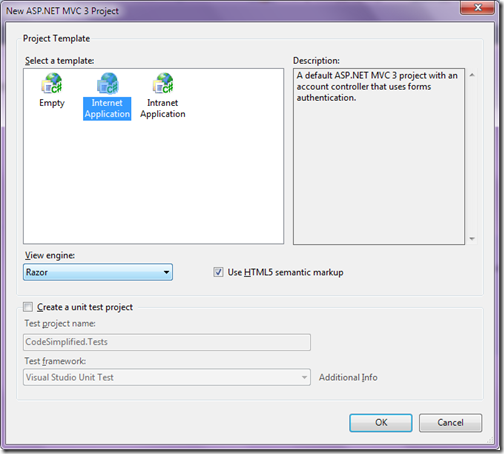
Once you click OK. It will ask for the which type of View your are going to use. I have used Razor and HTML5 Semantic like following.

RazorView

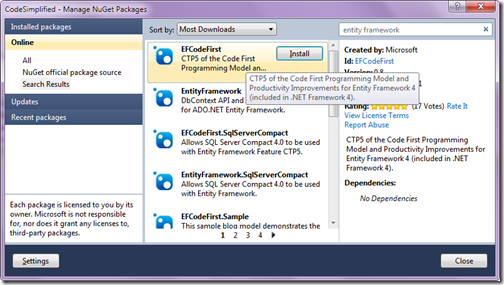
Now once we have create a application Now its time to add EFCodeFirst reference via NuGet. So Go to the Library Package Manager –> Manage Nuget Package Manager. It will open up a dialog like following. Search EFCodeFirst and then it will fine EFCodeFirst package like following.

EFCodeFirst

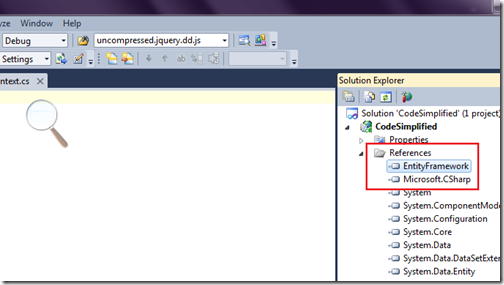
Once you click Install it will add reference to your ASP.NET MVC Application like following.

EntityFrameworkRerence

So now all the things are set Its time to code now. So first I have Create my Table which is very simple table called Customer like I have used in previous post. For your reference I am putting the create table script below.

SET ANSI_NULLS ON
GO

SET QUOTED_IDENTIFIER ON
GO

CREATE TABLE [dbo].[Customer](
   [CustomerId] [int] IDENTITY(1,1) NOT NULL,
   [FirstName] [nvarchar](50) NULL,
   [LastName] [nvarchar](50) NULL,
   [Address] [nvarchar](256) NULL,
   [City] [nvarchar](50) NULL,
CONSTRAINT [PK_Customer] PRIMARY KEY CLUSTERED
(
   [CustomerId] ASC
)WITH (PAD_INDEX  = OFF, STATISTICS_NORECOMPUTE  = OFF, IGNORE_DUP_KEY = OFF, ALLOW_ROW_LOCKS  = ON, ALLOW_PAGE_LOCKS  = ON) ON [PRIMARY]
) ON [PRIMARY

Now let's create our entity class called customer like following.

using System;
using System.Collections.Generic;
using System.Linq;
using System.Web;
using System.ComponentModel.DataAnnotations;

namespace CodeSimplified.Models
{
   public class Customer
   {
       public int CustomerId { get; set; }
       public string FirstName { get; set; }
       public string LastName { get; set; }
       public string Address { get; set; }
       public string City { get; set; }
   }
}

Now Its time to create a our datacontext class So I have created MyDataContext class inherited from the DBContextClass . In that I have defined my customer dbset and Also I override the default plural behaviour in ModelCreating Table. DBSet will tell datacontext which table we need to refer. So following is code for that.

using System;
using System.Collections.Generic;
using System.Data.Entity;
using System.Linq;
using System.Web;
using System.Data.Entity.ModelConfiguration.Conventions.Edm.Db;

namespace CodeSimplified.Models
{
   public class MyDataContext:DbContext
   {
       public DbSet<Customer> Customer { get; set; }

       protected override void OnModelCreating(System.Data.Entity.ModelConfiguration.ModelBuilder modelBuilder)
       {
           modelBuilder.Conventions.Remove<PluralizingTableNameConvention>();
       }
   }
}

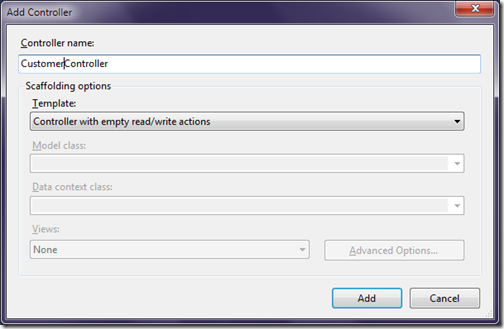
Now our database access stuff is ready now It’s time to create controller. So I have clicked controller folder and click on add new controller so add controller dialog box will appear like following.

AddController

It will create a controller class like following.

using System;
using System.Collections.Generic;
using System.Linq;
using System.Web;
using System.Web.Mvc;

namespace CodeSimplified.Controllers
{
   public class CustomerController : Controller
   {
       //
       // GET: /Customer/

       public ActionResult Index()
       {
           return View();
       }

       //
       // GET: /Customer/Details/5

       public ActionResult Details(int id)
       {
           return View();
       }

       //
       // GET: /Customer/Create

       public ActionResult Create()
       {
           return View();
       }

       //
       // POST: /Customer/Create

       [HttpPost]
       public ActionResult Create(FormCollection collection)
       {
           try
           {
               // TODO: Add insert logic here

               return RedirectToAction("Index");
           }
           catch
           {
               return View();
           }
       }
      
       //
       // GET: /Customer/Edit/5

       public ActionResult Edit(int id)
       {
           return View();
       }

       //
       // POST: /Customer/Edit/5

       [HttpPost]
       public ActionResult Edit(int id, FormCollection collection)
       {
           try
           {
               // TODO: Add update logic here

               return RedirectToAction("Index");
           }
           catch
           {
               return View();
           }
       }

       //
       // GET: /Customer/Delete/5

       public ActionResult Delete(int id)
       {
           return View();
       }

       //
       // POST: /Customer/Delete/5

       [HttpPost]
       public ActionResult Delete(int id, FormCollection collection)
       {
           try
           {
               // TODO: Add delete logic here

               return RedirectToAction("Index");
           }
           catch
           {
               return View();
           }
       }
   }
}

Now once our controller is ready now its time to write some code for Index Action Result which we are going to have a list of customer. So I have changed Index Action Result like following to return customer view.

public ActionResult Index()
{
   using (var databaseContext=new Models.MyDataContext())
   {
       return View(databaseContext.Customer.ToList());
   }
}

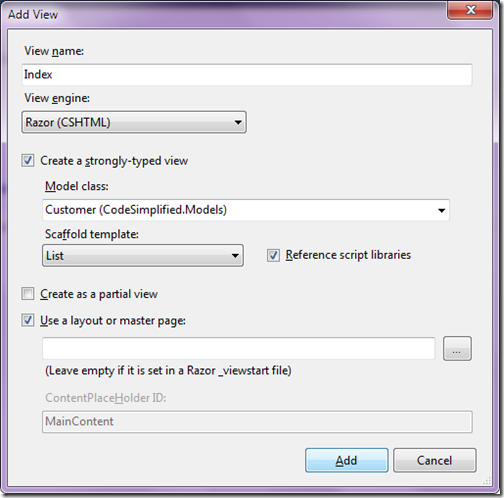
Now let create a view from the controller. So Selected a view in right click Add View from Index Action Result. Here I have selected strongly typed view with Customer Model and selected list Template like following.

AddView

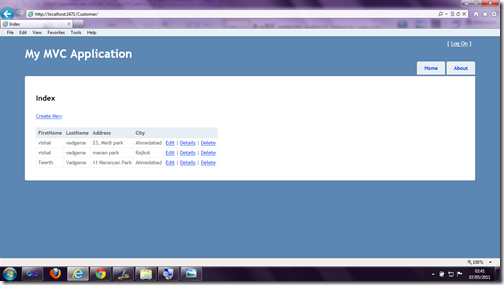
That’s it we are done with listing of the customer. Now its time to run our application and following is the output as expected.

Output

Hoped you like this…Stay tuned for more.. Till that happy programming.
Shout it

kick it on DotNetKicks.com
Share:

Invalid Object Name with Entity framework -EFCodeFirstCTP5

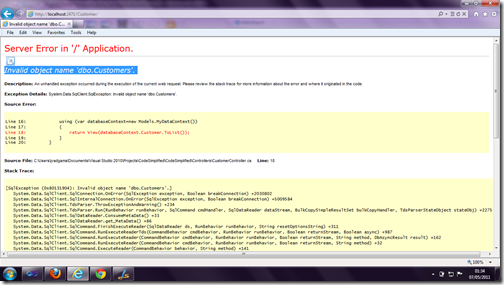
Recently I was working on one sample application with EFCodeFirst with the existing database.After doing all the coding I have found a error “Invalid object name 'dbo.Customers'.”. Following was my code for data context.

using System;
using System.Collections.Generic;
using System.Data.Entity;
using System.Linq;
using System.Web;

namespace CodeSimplified.Models
{
  public class MyDataContext:DbContext
  {
      public DbSet<Customer> Customer { get; set; }

      protected override void OnModelCreating(System.Data.Entity.ModelConfiguration.ModelBuilder modelBuilder)
      {
     
      }
  }
}

And following is code for my entity model class.

public class Customer
{
  public int CustomerId { get; set; }
  public string FirstName { get; set; }
  public string LastName { get; set; }
  public string Address { get; set; }
  public string City { get; set; }
}

Once I run the application I was getting following error.

Error

As you can see from my code that it should be dbo.customer name. So after digging into the issue I have found that I need to remove the plural table name. Here is a forum that is saying the same.

http://social.msdn.microsoft.com/Forums/en-ie/adonetefx/thread/719f3e4d-073b-49fe-9968-945acde27bb7.

Now there are two ways of resolving this issue.
1) Either explicitly map entity class with table attribute like I have changed my code like following.

[Table("Customer",SchemaName="dbo")]
public class Customer
{
  public int CustomerId { get; set; }
  public string FirstName { get; set; }
  public string LastName { get; set; }
  public string Address { get; set; }
  public string City { get; set; }
}

Another one is you need to remove default plural table name via overriding the onModelCreating event like following.

using System;
using System.Collections.Generic;
using System.Data.Entity;
using System.Linq;
using System.Web;
using System.Data.Entity.ModelConfiguration.Conventions.Edm.Db;

namespace CodeSimplified.Models
{
  public class MyDataContext:DbContext
  {
      public DbSet<Customer> Customer { get; set; }

      protected override void OnModelCreating(System.Data.Entity.ModelConfiguration.ModelBuilder modelBuilder)
      {
          modelBuilder.Conventions.Remove<PluralizingTableNameConvention>();
      }
  }
}

That’s it now error is gone. My code is work perfectly!!. Hope this will help you.Stay tuned for more..Till that happy programming.
Shout it

kick it on DotNetKicks.com
Share:
Saturday, July 2, 2011

Wohooooo!!! I got Microsoft MVP award again for Visual C#

Yesterday I got great news from Microsoft. I have been awarded as Microsoft MVP again for year 2011-2012. Yesterday I got following email.


Dear Jalpesh Vadgama,

Congratulations! We are pleased to present you with the 2011 Microsoft® MVP Award! This award is given to exceptional technical community leaders who actively share their high quality, real world expertise with others. We appreciate your outstanding contributions in Visual C# technical communities during the past year.

It is really one of the proudest moment of my professional life. When you get this kind of appreciation its feel great.

On this occasion I would like to thank my Friends,Employer,co-workers, Community friends and readers for providing support for me. I would also like to thank my MVP lead Abhishek Kant for guiding me throughout year. Last but not least my family members who are been there for me for my every ups and down. My father and mother who is inspiration of mine. My lovely brother Vishal who encourage me to do all this and My Lovely wife Reena who is supporting me for this in every possible way and my little champ Teerth from whom I am getting energy to do this.

Once again Thanks Microsoft for this.

Shout it
Share:
Wednesday, June 29, 2011

Code refactoring with Visual Studio 2010 Part-4

I have been writing few post with code refactoring features in Visual Studio 2010. This post also will be part of series and this post will be last of the series. In this post I am going explain two features 1) Encapsulate Field and 2) Extract Interface. Let’s explore both features in details.

Encapsulate Field:


This is a nice code refactoring feature provides by Visual Studio 2010. With help of this feature we can create properties from the existing private field of the class. Let’s take a simple example of Customer Class. In that I there are two private field called firstName and lastName. Below is the code for the class.

public class Customer
{
 private string firstName;
 private string lastName;
 public string Address { get; set; }
 public string City { get; set; }

}

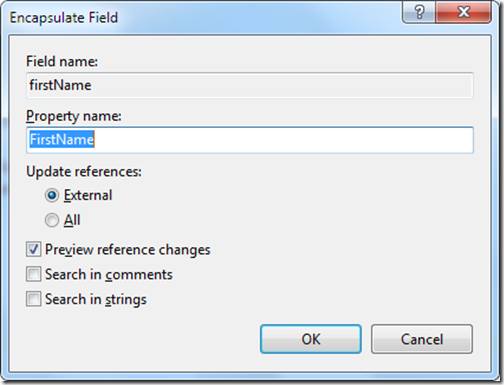
Now lets encapsulate first field firstName with Encapsulate feature. So first select that field and goto refactor menu in Visual Studio 2010 and click on Encapsulate Field. Once you click that a dialog box will appear like following.

EncapsulateField

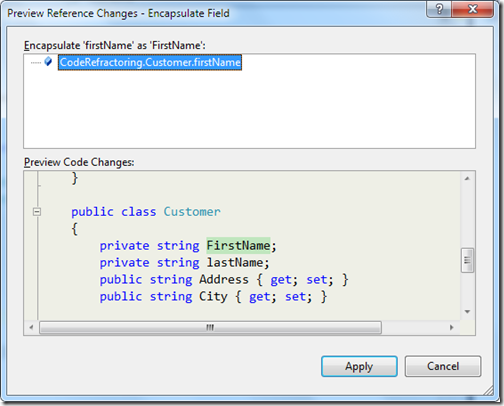
Now once you click OK a preview dialog box will open as we have selected preview reference changes. I think its a good options to check that option to preview code that is being changed by IDE itself. Dialog will look like following.

PreviewEncapsulateField

Once you click apply it create a new property called FirstName. Same way I have done for the lastName and now my customer class code look like following.

public class Customer
{
 private string firstName;

 public string FirstName
 {
     get { return firstName; }
     set { firstName = value; }
 }
 private string lastName;

 public string LastName
 {
     get { return lastName; }
     set { lastName = value; }
 }
 public string Address { get; set; }
 public string City { get; set; }

}

So you can see that its very easy to create properties with existing fields and you don’t have to change anything there in code it will change all the stuff itself.

Extract Interface:


When you are writing software prototype and You don’t know the future implementation of that then its a good practice to use interface there. I am going to explain here that How we can extract interface from the existing code without writing a single line of code with the help of code refactoring feature of Visual Studio 2010. For that I have create a Simple Repository class called CustomerRepository with three methods like following.

public class CustomerRespository
{
public void Add()
{
    // Some code to add customer
}

public void Update()
{
    //some code to update customer
}

public void Delete()
{
    //some code delete customer
}
}

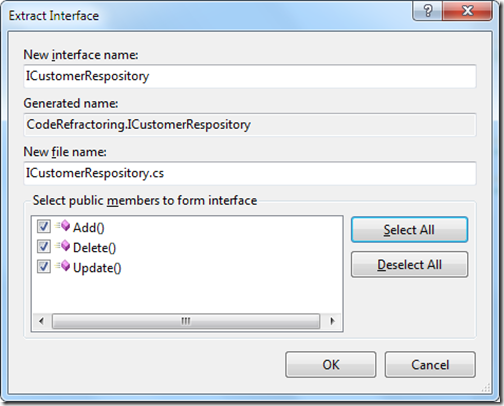
In above class there are three method Add,Update and Delete where we are going to implement some code for each one. Now I want to create a interface which I can use for my other entities in project. So let’s create a interface from the above class with the help of Visual Studio 2010. So first select class and goto refactor menu and click Extract Interface. It will open up dialog box like following.

ExtactInterface

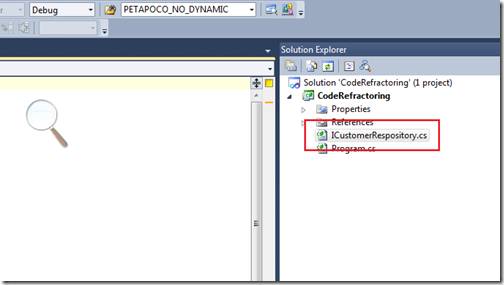
Here I have selected all the method for interface and Once I click OK then it will create a new file called ICustomerRespository where it has created a interface. Just like following.

SolutionExplorer

Here is a code for that interface.

using System;
namespace CodeRefractoring
{
 interface ICustomerRespository
 {
     void Add();
     void Delete();
     void Update();
 }
}

Now let's see the code for the our class. It will also changed like following to implement the interface.

public class CustomerRespository : ICustomerRespository
{
public void Add()
{
    // Some code to add customer
}

public void Update()
{
    //some code to update customer
}

public void Delete()
{
    //some code delete customer
}
}

Isn't that great we have created a interface and implemented it without writing a single line of code. Hope you liked it. Stay tuned for more.. Till that Happy Programming.

Shout it

kick it on DotNetKicks.com
Share:
Tuesday, June 28, 2011

Code refactoring with Visual Studio 2010-Part 3

I have been writing few post about Code refactoring features of visual studio 2010 and This blog post is also one of them. In this post I am going to show you reorder parameters features in visual studio 2010. As a developer you might need to reorder parameter of a method or procedure in code for better readability of the the code and if you do this task manually then it is tedious job to do. But Visual Studio Reorder Parameter code refactoring feature can do this stuff within a minute. So let’s see how its works. For this I have created a simple console application which I have used earlier posts . Following is a code for that.

using System;

namespace CodeRefractoring
{
  class Program
  {
      static void Main(string[] args)
      {
          string firstName = "Jalpesh";
          string lastName = "Vadgama";

          PrintMyName(firstName, lastName);
      }

      private static void PrintMyName(string firstName, string lastName)
      {
          Console.WriteLine(string.Format("FirstName:{0}", firstName));
          Console.WriteLine(string.Format("LastName:{0}", lastName));
          Console.ReadLine();
      }
  }
}

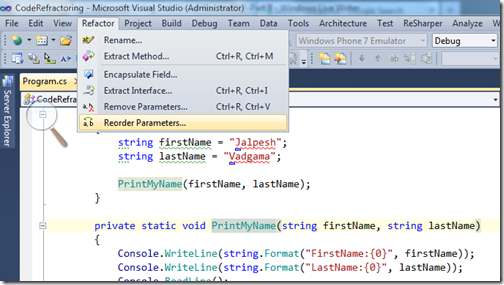
Above code is very simple. It just print a firstname and lastname via PrintMyName method. Now I want to reorder the firstname and lastname parameter of PrintMyName. So for that first I have to select method and then click Refactor Menu-> Reorder parameters like following.

ReOrderParameters

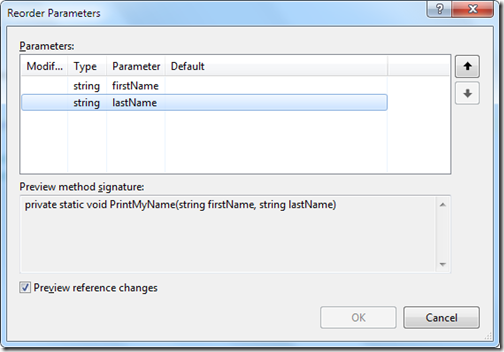
Once you click a dialog box appears like following where it will give options to move parameter with arrow navigation like following.

ReorderParameterDialog

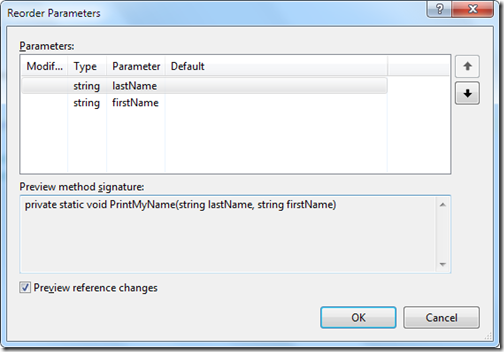
Now I am moving lastname parameter as first parameter like following.

ReOrderParameterAfterReordering

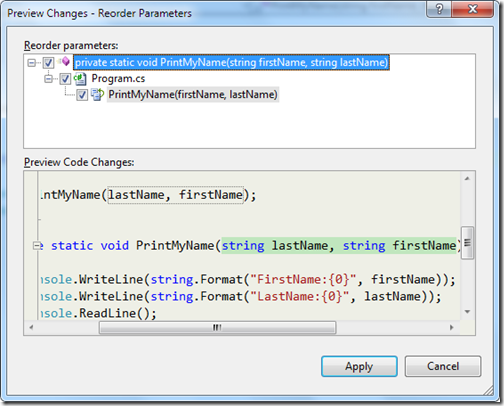
Once you click OK it will show a preview option where I can see the effects of changes like following.

PreviewOption

Once I clicked Apply my code will be changed like following.

using System;

namespace CodeRefractoring
{
  class Program
  {
      static void Main(string[] args)
      {
          string firstName = "Jalpesh";
          string lastName = "Vadgama";

          PrintMyName(lastName, firstName);
      }

      private static void PrintMyName(string lastName, string firstName)
      {
          Console.WriteLine(string.Format("FirstName:{0}", firstName));
          Console.WriteLine(string.Format("LastName:{0}", lastName));
          Console.ReadLine();
      }
  }
}

As you can see its very easy to use this feature. Hoped you liked it.. Stay tuned for more.. Till that happy programming.
Shout it

kick it on DotNetKicks.com
Share:
Monday, June 27, 2011

Code refactoring with Visual Studio 2010 Part-2

In previous post I have written about Extract Method Code refactoring option. In this post I am going to some other code refactoring features of Visual Studio 2010. Renaming variables and methods is one of the most difficult task for a developer. Normally we do like this. First we will rename method or variable and then we will find all the references then do remaining over that stuff. This will be become difficult if your variable or method are referenced at so many files and so many place. But once you use refactor menu rename it will be bit Easy. I am going to use same code which I have created in my previous post. I am just once again putting that code here for your reference.

using System;

namespace CodeRefractoring
{
  class Program
  {
      static void Main(string[] args)
      {
          string firstName = "Jalpesh";
          string lastName = "Vadgama";

          Print(firstName, lastName);
      }

      private static void Print(string firstName, string lastName)
      {
          Console.WriteLine(string.Format("FirstName:{0}", firstName));
          Console.WriteLine(string.Format("LastName:{0}", lastName));
          Console.ReadLine();
      }
  }
}

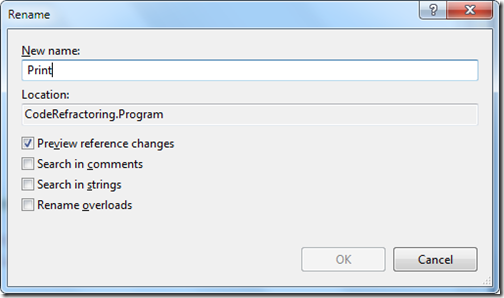
Now I want to rename print method in this code. To rename the method you can select method name and then select Refactor-> Rename . Once I selected Print method and then click on rename a dialog box will appear like following.

Print

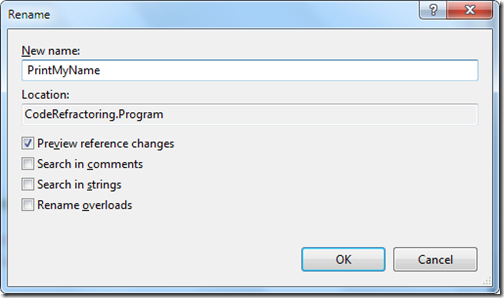
Now I am renaming this Print method to PrintMyName like following.

PrintMyName

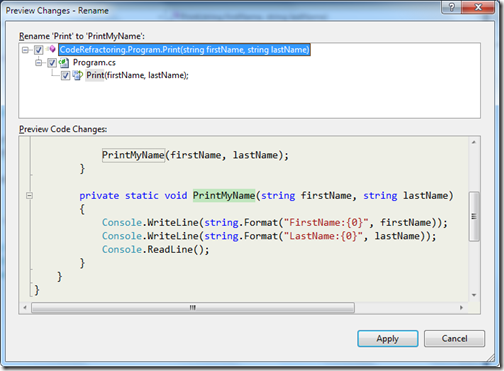
Now once you click OK a dialog will appear with preview of code like following. It will show preview of code.

PreviewCode

Now once you click apply. You code will be changed like following.

using System;

namespace CodeRefractoring
{
  class Program
  {
      static void Main(string[] args)
      {
          string firstName = "Jalpesh";
          string lastName = "Vadgama";

          PrintMyName(firstName, lastName);
      }

      private static void PrintMyName(string firstName, string lastName)
      {
          Console.WriteLine(string.Format("FirstName:{0}", firstName));
          Console.WriteLine(string.Format("LastName:{0}", lastName));
          Console.ReadLine();
      }
  }
}
So that’s it. This will work in multiple files also. Hope you liked it.. Stay tuned for more.. Till that Happy Programming.

Shout it

kick it on DotNetKicks.com
Share:

Support this blog-Buy me a coffee

Buy me a coffeeBuy me a coffee
Search This Blog
Subscribe to my blog


My Mvp Profile
Follow us on facebook
Blog Archive
Total Pageviews