Friday, May 20, 2011

Edit/Update with dapper ORM and ASP.NET MVC 3

In last two post I have already written about Getting data and adding data with Dapper Micro ORM. In this post I will explain how we can use the dapper ORM for data update. For reference following is the two post links for the Dapper ORM Series.
Playing with dapper Micro ORM and ASP.NET MVC 3.0
Insert with Dapper Micro ORM and ASP.NET MVC 3
Now as you we have already created CustomerDB Class. In this database operation class we will add two more methods GetCustomerById and Update to get Customer based on CustomerId passed and another one is for updating data. Following is modified Customer DB Code.
public class CustomerDB
{
  public string Connectionstring = @"Data Source=DotNetJalps\SQLExpress;Initial Catalog=CodeBase;Integrated Security=True";

  public IEnumerable<Customer> GetCustomers()
  {
      using (System.Data.SqlClient.SqlConnection sqlConnection = new System.Data.SqlClient.SqlConnection(Connectionstring))
      {
          sqlConnection.Open();
          var customer = sqlConnection.Query<Customer>("Select * from Customer");
          return customer;

      }
  }

  public Customer GetCustomerByID(int customerId)
  {
      using (System.Data.SqlClient.SqlConnection sqlConnection = new System.Data.SqlClient.SqlConnection(Connectionstring))
      {
          sqlConnection.Open();
          string strQuery = string.Format("Select * from Customer where CustomerId={0}", customerId);
          var customer = sqlConnection.Query<Customer>(strQuery).Single<Customer>();
          return customer;

      }
  }
  public bool Update( Customer customerEntity)
  {
      try
      {
          using (System.Data.SqlClient.SqlConnection sqlConnection = new System.Data.SqlClient.SqlConnection(Connectionstring))
          {
              sqlConnection.Open();
              string sqlQuery = "UPDATE [dbo].[Customer] SET [FirstName] =@FirstName, [LastName] =@LastName,[Address] =@Address,[City] = @City WHERE CustomerId=@CustomerId";
              sqlConnection.Execute(sqlQuery, new {
                                                      customerEntity.FirstName, customerEntity.LastName, customerEntity.Address, customerEntity.City, customerEntity.CustomerId
                                          });
              sqlConnection.Close();

          }
          return true;
      }
      catch (Exception exception)
      {
          return false;
      }
  }
  public string  Create(Customer customerEntity)
  {
      try
      {
          using (System.Data.SqlClient.SqlConnection sqlConnection = new System.Data.SqlClient.SqlConnection(Connectionstring))
          {
              sqlConnection.Open();
           
              string sqlQuery = "INSERT INTO [dbo].[Customer]([FirstName],[LastName],[Address],[City]) VALUES (@FirstName,@LastName,@Address,@City)";
              sqlConnection.Execute(sqlQuery,
                                    new
                                        {
                                            customerEntity.FirstName,
                                            customerEntity.LastName,
                                            customerEntity.Address,
                                            customerEntity.City
                                        });

             
              sqlConnection.Close();

          }
          return "Created";
      }
      catch (Exception ex)
      {
          return ex.Message;
      }

  }

}


Now It’s time to modify Customer Controller. I have added two more Action Result Result like following. One for fetching data and populating view and then another one for the updating data and redirecting it to Index action result. Just like following.
public ActionResult Edit(int id)
{

 var customerEntities = new CustomerDB();
 return View(customerEntities.GetCustomerByID(id));
}

//
// POST: /Customer/Edit/5

[HttpPost]
public ActionResult Edit( Customer customer)
{
 try
 {
     // TODO: Add update logic here
     var customerEntities = new CustomerDB();
     customerEntities.Update(customer);
     return RedirectToAction("Index");
 }
 catch
 {
     return View();
 }
}
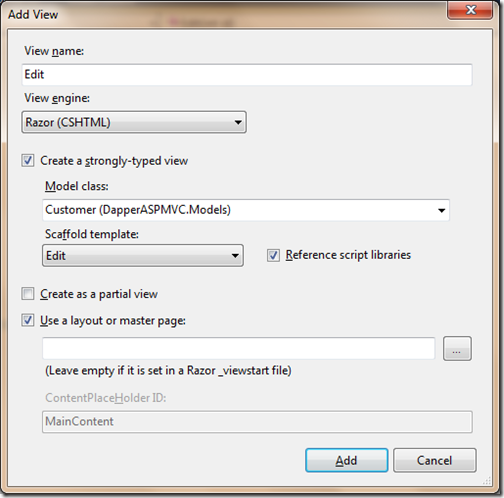
So now our ActionResult is also ready now let’s add time to add Edit View for displaying current edit data. So go edit action result and right click->Add View-> Popup will appear for that. Now let’s create a strongly typed view like following.

EditView
So now we have created view and all other stuff its time to run our application. Let’s run it and go to Customer View like following.
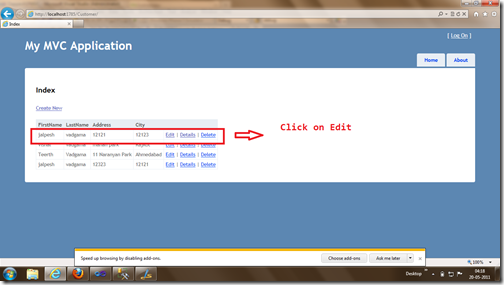
View
Now I am going to click edit and above data will filled in Edit View.
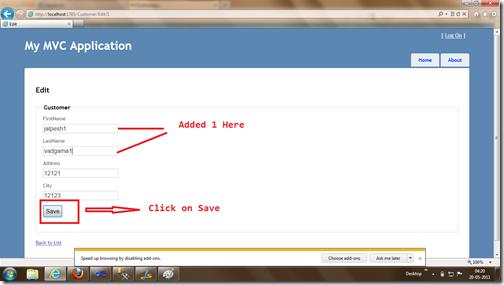
Edit
Now After modifying data I have clicked save and as you can see in below screen data is modified.
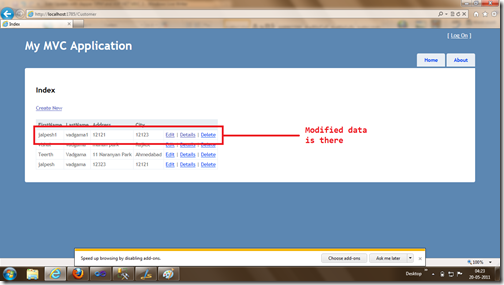
ModifiedView
So that’s it. It’s very easy. Stay tuned for more.. Hope you liked it..

kick it on DotNetKicks.com
Shout it
Share:
Thursday, May 19, 2011

Insert with Dapper Micro ORM and ASP.NET MVC 3

As I have already posted about the how to fetch data in my earlier post for Dapper ORM. In this post I am going to explain how we can insert data with the dapper ORM. So let’s extend the earlier post project. As explained in earlier post I have already created a class called CustomerDB this class will contains all the operation with Dapper Micro ORM. So For inserting data let’s first create CREATE method like following in CutomerDB Class like following. In that I have create a simple Insert Query in string and then using connection.execute method to execute method. Following is code for that.
public class CustomerDB
{
  public string Connectionstring = @"Data Source=DotNetJalps\SQLExpress;Initial Catalog=CodeBase;Integrated Security=True";

  public IEnumerable<Customer> GetCustomers()
  {
      using (System.Data.SqlClient.SqlConnection sqlConnection = new System.Data.SqlClient.SqlConnection(Connectionstring))
      {
          sqlConnection.Open();
          var customer = sqlConnection.Query<Customer>("Select * from Customer");
          return customer;

      }
  }

   
  public string  Create(Customer customerEntity)
  {
      try
      {
          using (System.Data.SqlClient.SqlConnection sqlConnection = new System.Data.SqlClient.SqlConnection(Connectionstring))
          {
              sqlConnection.Open();
           
              string sqlQuery = "INSERT INTO [dbo].[Customer]([FirstName],[LastName],[Address],[City]) VALUES (@FirstName,@LastName,@Address,@City)";
              sqlConnection.Execute(sqlQuery,
                                    new
                                        {
                                            customerEntity.FirstName,
                                            customerEntity.LastName,
                                            customerEntity.Address,
                                            customerEntity.City
                                        });

              sqlConnection.Execute(sqlQuery);
              sqlConnection.Close();

          }
          return "Created";
      }
      catch (Exception ex)
      {
          return ex.Message;
      }

  }

}
Now we are ready with Create Method for database now let’s create two ActionResult for the Creating customer like following in Customer Controller like following.
public ActionResult Create()
{
return View();
}

//
// POST: /Customer/Create

[HttpPost]
public ActionResult Create(Customer customer)
{
try
{
    // TODO: Add insert logic here
    var customerEntities = new CustomerDB();
    customerEntities.Create(customer);
    return RedirectToAction("Index");
}
catch
{
    return View();
}
}
Now we are ready with the both ActionResult. First ActionResult will return simple view of Create which we are going to create now and another ActionResult Create will get customer object from the form submitted and will call our create method of CustomerDB Class. Now it’s time to create a view for adding customer. Right Click return view Statement in Create Action Result and Click Add View and Just Create view like following.

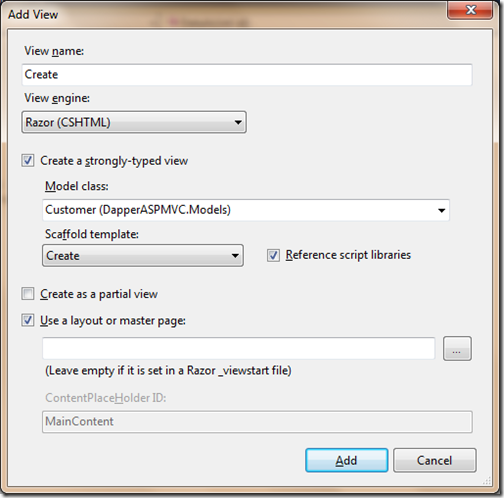
CreateView
That’s it now we are ready. Now let’s test it in browser. Like following.

AddNew
Now let’s click and create and then it will redirect us to customer list page like following. Where you can see the newly added details.

View
So that’s it. Its very easy to Insert data with Dapper Micro ORM. Hope you like it…Stat tuned for more.

Note: For reference of this post you can also see my first post called -Playing with dapper Micro ORM and ASP.NET MVC 3.0.
kick it on DotNetKicks.com
Shout it
Share:
Wednesday, May 18, 2011

Microsoft Community Techdays at Ahmedabad-11th June 2011

Microsoft community TechDays are great events organized by Microsoft and every time I like to be part of it. Now once again this event date is announced  by Microsoft and its going to happen 11th June 2011. I would love to part of it. It’s a free event so you don’t need to pay for it.  It’s a good chance to do some social networking with Microsoft MVPS and professionals like Jacob Sebastian, Pinal Dave, Harish Vaidyanathan. You will also learn lots of new things.

Following is agenda for this event.

AGENDA

09:30am - 10:00am
Registration


10:00am - 10:15am
Welcome Note


LightSwitch On The Cloud! by Mahesh Dhola
10:15am to 11:15pm
The session would give introduction to Visual Studio Light Switch followed by the demo. The demo would give insight of developing Light Switch application and deploying to the Microsoft cloud offerings Windows Azure.


SQL Server Performance Troubleshooting using Waits and Queues by Pinal Dave
11:15am to 12:15pm
Just like a horoscope, SQL Server Waits and Queues can reveal your past, explain your present and predict your future. SQL Server Performance Tuning uses the Waits and Queues as a proven method to identify the best opportunities to improve performance. A glance at Wait Types can tell where there is a bottleneck. Learn how to identify bottlenecks and potential resolutions in this fast paced, advanced performance tuning session.

12:15pm - 01:15pm
Lunch

HTML5 - Future of the Web by Harish Vaidyanathan
01:15pm to 02:15pm
HTML5 will change the Web as we know it today. Join this session to know what's happening behind-the-scenes of this hugely important specification. Get an overview of the new features in HTML5, CSS3, SVG & DOM specifications. Better understand what the open challenges are and where HTML5 is leading to in the future.

TSQL Worst Practices by Jacob Sebastian
02:15pm to 03:15pm
This is an interactive session filled with exciting demos where we will go over a number of "good looking" TSQL usages that are often quite "dangerous" by means of killing performance as well as producting uncorrect and unexpected results.

03:15pm - 03:30pm
Tea Break

ASP.NET Tips and Tricks by Tejas Shah
03:30pm to 04:30pm
The session will focus on understanding of Asp.Net fundamentals and tricks that can be used in development with Demo. This session also covers how to improve application performance.
Demo Extravaganza & Gifts by Community

04:30pm to 05:30pm
Various community speakers will present insight on upcoming technology and interesting demos.
Community session

05:30pm
Thank you Note


Note: The above agenda is subject to change.

I will be there. It will be great fun and learning experience. Hope to see you guys at that event.

Shout it

kick it on DotNetKicks.com
Share:

Support this blog-Buy me a coffee

Buy me a coffeeBuy me a coffee
Search This Blog
Subscribe to my blog


My Mvp Profile
Follow us on facebook
Blog Archive
Total Pageviews