Some time ago Sam Saffron a lead developer from stackoverflow.com has made dapper micro ORM open source. This micro orm is specially developed for stackovewflow.com for keeping performance in mind. It’s very good single file which contains some cool functions which you can directly use in your browser. So I have decided to have a look into it. You can download dapper code from the following location it’s a single static class file called SQLMapper.
http://code.google.com/p/dapper-dot-net/
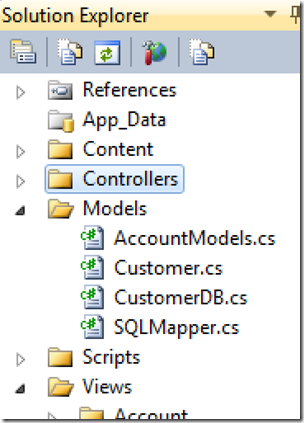
So once you download that file you can use that file into your project. So I have decided to create a sample application with asp.net mvc3. So I have created a simple asp.net mvc 3 project called DapperMVC. Now let’s first add that SQLMapper class file into our project at Model Folder like following.
Now let’s first create sample table from which we will fetch the data with the help of dapper file. I have created sample customer table with following script.
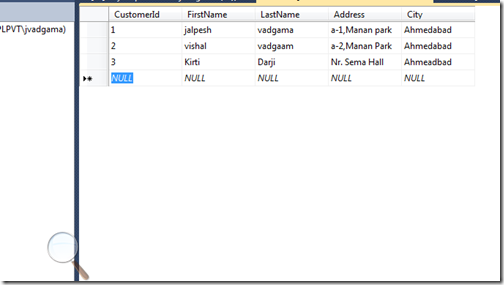
Once I have created table I have populated some test data like following.
Now we are ready with database table Now its time to add a customer entity class. So I have created sample customer class with properties same as Database columns like following.
Now we are done with the Customer Entity class then I have created a new class called CustomerDB and a created a GetCustomer Method where I have used Query Method of Dapper to select all customers with ‘select * from customer’ simple query. I know it’s not a best practice to write ‘select * from customer’ but this is just for demo purpose so I have written like this. Query method accepts query as parameter and returns IEnumerable<T> where T is any valid class. In our case it will be Customer which we have just created before. Following is the code for CustomerDB Class.
Now we are ready with our model classes now It’s time to Create a Controller so I have created a Customer Controller like following.
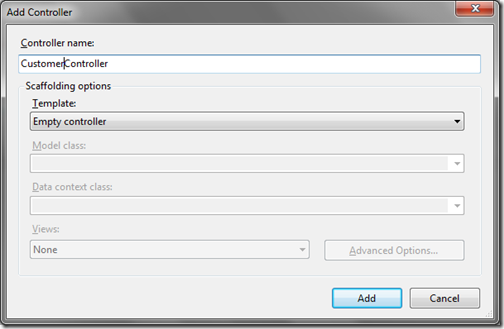
It will create customer controller in controller folder with by default ActionResult Index. I have modified Action Result just like to following to return customerEntities with IndexView.
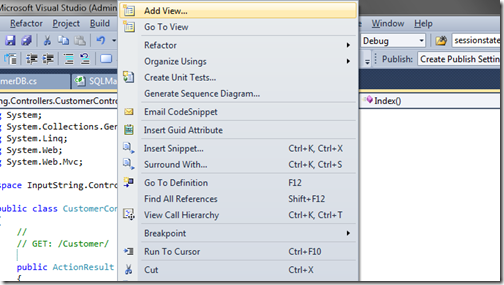
Now we are ready with our Customer Controller and now it’s time to create a view from the customer entities. So I have just right clicked customer entities and Create a View like following.
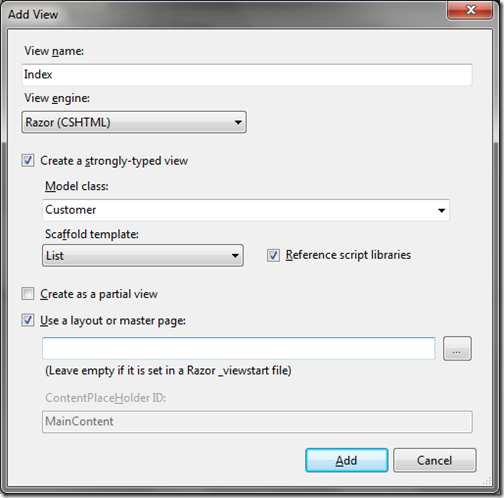
It will popup the following dialogbox where I have selected Razor View with Strongly Typed View. Also I have selected Customer Model class customer and selected list template like following.
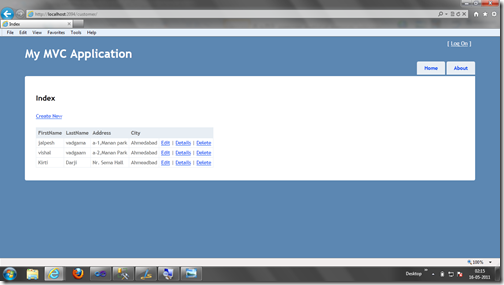
That’s it now we are done with all the coding and It’s now time to run the project and result is as accepted as following.
That’s it. Isn’t that cool? Hope you liked this. Stay tuned for more.. Happy programming

http://code.google.com/p/dapper-dot-net/
So once you download that file you can use that file into your project. So I have decided to create a sample application with asp.net mvc3. So I have created a simple asp.net mvc 3 project called DapperMVC. Now let’s first add that SQLMapper class file into our project at Model Folder like following.

Now let’s first create sample table from which we will fetch the data with the help of dapper file. I have created sample customer table with following script.
SET ANSI_NULLS ON
GO

SET QUOTED_IDENTIFIER ON
GO

CREATE TABLE [dbo].[Customer](
 [CustomerId] [int] NOT NULL,
 [FirstName] [nvarchar](50) NULL,
 [LastName] [nvarchar](50) NULL,
 [Address] [nvarchar](256) NULL,
 [City] [nvarchar](50) NULL,
CONSTRAINT [PK_Customer] PRIMARY KEY CLUSTERED
(
 [CustomerId] ASC
)WITH (PAD_INDEX  = OFF, STATISTICS_NORECOMPUTE  = OFF, IGNORE_DUP_KEY = OFF, ALLOW_ROW_LOCKS  = ON, ALLOW_PAGE_LOCKS  = ON) ON [PRIMARY]
) ON [PRIMARY]

GO
Once I have created table I have populated some test data like following.

Now we are ready with database table Now its time to add a customer entity class. So I have created sample customer class with properties same as Database columns like following.
public class Customer
{
 public int CustomerId { get; set; }
 public string FirstName { get; set; }
 public string LastName { get; set; }
 public string Address { get; set; }
 public string City { get; set; }
}
Now we are done with the Customer Entity class then I have created a new class called CustomerDB and a created a GetCustomer Method where I have used Query Method of Dapper to select all customers with ‘select * from customer’ simple query. I know it’s not a best practice to write ‘select * from customer’ but this is just for demo purpose so I have written like this. Query method accepts query as parameter and returns IEnumerable<T> where T is any valid class. In our case it will be Customer which we have just created before. Following is the code for CustomerDB Class.
using System.Collections.Generic;

public class CustomerDB
{
 public string Connectionstring=@"Data Source=DotNetJalps\SQLExpress;Initial Catalog=CodeBase;Integrated Security=True";

 public  IEnumerable<Customer> GetCustomers()
 {
     using (System.Data.SqlClient.SqlConnection sqlConnection = new System.Data.SqlClient.SqlConnection(Connectionstring))
     {
         sqlConnection.Open();
         var customer = sqlConnection.Query<Customer>("Select * from Customer");
         return customer;

     }
 }

}
Now we are ready with our model classes now It’s time to Create a Controller so I have created a Customer Controller like following.

It will create customer controller in controller folder with by default ActionResult Index. I have modified Action Result just like to following to return customerEntities with IndexView.
public class CustomerController : Controller
{
 //
 // GET: /Customer/

 public ActionResult Index()
 {
     var customerEntities = new CustomerDB();
     return View(customerEntities.GetCustomers());

 }

}
Now we are ready with our Customer Controller and now it’s time to create a view from the customer entities. So I have just right clicked customer entities and Create a View like following.

It will popup the following dialogbox where I have selected Razor View with Strongly Typed View. Also I have selected Customer Model class customer and selected list template like following.

That’s it now we are done with all the coding and It’s now time to run the project and result is as accepted as following.

That’s it. Isn’t that cool? Hope you liked this. Stay tuned for more.. Happy programming


