Thursday, July 24, 2014

HashSet in C#

In this blog post we are going to learn about HashSet collection in C#. It is a cool collection available from C# 3.5. Like any other collection it can be used for representing a set of value. It is an optimized set collection. It helps eliminating duplicate string or elements in collection. Whenever an Item is added in collection it will check whether this items are already there in collection If not then only it will add items.

Let’s take an example for the same.
using System;
using System.Collections.Generic;

namespace CSharpHashSet
{
    class Program
    {
        static void Main(string[] args)
        { 
            HashSet<string> nameHashSet=
                new HashSet<string>
                {
                    "Jalpesh", "Vishal", "Tushar", "Jalpesh"
                };
            foreach (var item in nameHashSet)
            {
                Console.WriteLine(item);
            }
            Console.ReadKey();
        }
    }
}
Now if you see the code carefully I have created HashSet of name(string type) with duplicate name like “Jalpesh” and then enumerate that collection with for loop and print items of collection with Console.WriteLine.

Share:
Wednesday, July 23, 2014

StructureMap–Getting Started

In this post we are going to learn about How we can do dependency injection with StructureMap. Here we are going to take a sample application of shopping cart. This shopping cart can process two type of orders 1. Sales order 2. Purchase Order. We want an abstraction for this. So first we are going to create an interface IOrder which will be implemented by both Purchase Order and Sales Order classes.

Following is a code for that.
public interface IOrder
{
    void Process();
}
And following is a implementation of SalesOrder class.
public class SalesOrder : IOrder
{
    public void Process()
    {
        Console.WriteLine("Sales Order Processed");
    }
}
Same way following is a implementation of PurchaseOrder class.
public class PurchaseOrder : IOrder
{
    public void Process()
    {
        Console.WriteLine("Purchase Order Processed");
    }
}
And following is a code for Shopping Cart.
public class ShoppingCart
{
    private readonly IOrder _order;
    public ShoppingCart(IOrder order)
    {
        _order = order;
    }

    public void CheckOut()
    { 
        _order.Process();
    }
}

Share:
Sunday, July 20, 2014

Entity Framework Code First migrations

In this blog post we are going to learn about entity code first migrations. Entity Framework code first approach will allow you to define model classes as per the domain requirements via POCOs. Hence you have complete control over classes are written. But as application grows and there are some new features to be added and  your classes will change. Entity Framework Code Migrations allows you to handle this migrations.

As we all now that Entity Framework Code First approach allows you to create database based on your classes created. It’s provide you three types of initializers.

CreateDatabaseIfNotExist: This is the default initializer which will create classes if database not exists.

DropCreateDatabasesWhenModelChanges: This initializer is only good when you don’t concern about your database records. If there is any change in class then it will match database will classes and if there is any difference then it will drop and create a new database.

DropCreateDatabaseAlways: This initializer will always create new database whether database exist or not. If database exist then it will drop that database and create it again.

Share:

Visual Studio 2013, Team Explorer and BitBucket

With Visual Studio 2013, Microsoft started supporting Git directly with Team Explorer  and I have written a blog post how we can use git with team explorer and github called Visual Studio 2013, Team Explorer and GitHub. This post gained lots of popularity and also get lots of email about writing a blog post for using Git With BitBucket.org which is similar kind of source code hosting service like GitHub.com. So this post is all about it.

In this post I’m going to use a sample console application where we will put some code and then publish it to BitBucket Git Repository.  In this post I’m going to slightly take different approach then previous post but still you can do same way also previous post also.

In this post first we are going to create repository in BitBucket and then clone it on local. So here people will also get to know how we can create and clone a repository in local.

How to create repository in BitBucket:


If you don’t have account in BitBucket.Org then you need to create a account in BitBucket. You can create account from the following link.

Share:
Thursday, July 17, 2014

How to convert PSD into image file in c# with Magick.NET

Recently in one of project we had a requirement of converting a Adobe Photoshop file (PSD) into image file(.png) file. After digging while on internet I have found a great library which has so many features in can easily convert PSD files into any time of image file.

The Library is Magick.NET. It’s a open source project you can find more information about it from the following codeplex link.
https://magick.codeplex.com/

There are lots of example available for image conversion and other image editing functions. You can find that about that on documentation.
https://magick.codeplex.com/wikipage?title=Convert%20image

There are lots of NuGet package are available also. Following is a one of them.

Share:
Tuesday, July 8, 2014

How to change a profile picture in Visual Studio 2013

With Visual Studio 2013, Microsoft has provided synchronized settings in visual studio 2013 with live account. So all you need to do is to login into your live account and then it will automatically sync the settings of Visual Studio 2013 in different machine. Recently one of the reader of blog has asked me question How I can change the Profile Pic on Visual Studio. So I thought it will be good Idea to write a blog post about it.

Here’s how you can change profile picture of Visual Studio live/outlook account. One you done with sign in with visual studio it will load default image with your firstname first character and last name character like below.

default-pic-on-visual-studio

Now to change the account picture or profile picture click on name load a popup like following.


Share:
Friday, July 4, 2014

Scope to this feature in Solution Explorer- Visual Studio

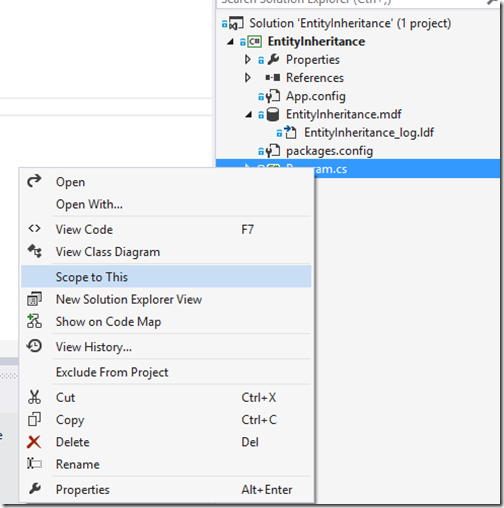
Visual Studio is one of my favourite IDE. I love more and more whenever I’m using it. Recently I have found a very good feature called “Scope to this” so I thought it will be a good idea to write a blog post about it.

This feature comes very handy when you have large solution and you want to work /Concentrate on the only portion of a solution. In solution you can select particular project/folder/file and right click and click on “Scope to this” Menu. It will scope your solution explorer to that particular item.

scope-to-this-visual-studio-solution-explorer

Share:

Support this blog-Buy me a coffee

Buy me a coffeeBuy me a coffee
Search This Blog
Subscribe to my blog


My Mvp Profile
Follow us on facebook
Blog Archive
Total Pageviews