Friday, July 15, 2011

Some important attributes in EFCodeFirst

In today’s post I am going to explain some of the important attributes in EFCodeFirst. Whey you do scaffolding with ASP.NET MVC this all attributes are where much important. So Let’s explore all the attributes.

Key Attribute:

When you put this attribute in the class it tell that this property is part of the primary key and If you use code first when its create table based on this entity then it will be a part of primary key of table. Here is the sample example of that.
[Key]

public int ArticleId { get; set; }
Here article ID will act as primary key.

Foreign Key Attribute:

This attribute is very useful when you deal with interrelated tables You can specify the column in entity which is foreign key for that Like following.
[ForeignKey("CategoryId")]

public ICollection<Category> Categories { get; set; }
In above example CategoryId is a foreign key of category table to article table.

ScaffoldColumn Attribute:

When you Scaffold your application with ASP.NET MVC scaffold feature or dynamic data with asp.net webforms this attribute will tell that this column need to have field for that. You can write that column like following.
[ScaffoldColumn(false)]

public int ArticleId { get; set; }
Here it will tell article id will not have UI in scaffoling.

StringLength Attribute:

This attribute is used to specify the maximum length of a string. This attribute is very usefull in validation and other stuff. This attribute only applied to the Stringlength property like following.
[StringLength(512)]

public string Title { get; set; }
Here in the above code it tell that title could not have more then 512 character string.

There lots of other attributes also. I will blog about it in future posts. Hope you liked this. Stay tuned for more..Happy Programming.

Shout it

kick it on DotNetKicks.com
Share:
Tuesday, July 12, 2011

Parallel for loop in C# 4.0

Now days we are getting our computer equipped with more and more power even now we are getting quad core processor is also at lower price. Since we have multicore processors are now so we can take advantages of multicore processor with parallel execution in C# 4.0. There are some time consuming task for the computer for example a long for loop or similar kind of things. This kind of task can be done parallel with parallel class in C# 4.0.

Now in C# 4.0 you have the Parallel static class with the help of this you can perform task parallel very easily. In this post I am going to explain Parallel for loop. Let’s take a very simple example. First lets create a example with simple for loop. Following is code for that.

using System;
using System.Collections.Generic;
using System.Linq;
using System.Text;
using System.Threading.Tasks;
using System.Diagnostics;

namespace Parallel
{
class Program
{
    static void Main(string[] args)
    {
        for (int i = 0; i <=100000; i++)
        {
            Console.WriteLine(i);
        }
       
    }
}
}

In the above its a normal loop which increments I and then print the that number into the console screen and Here is the output.

Ouput1

Here in the output you can see its sequentially process one by one now lets change this code to parallel for loop like following.

using System;

namespace Parallel
{
class Program
{
    static void Main(string[] args)
    {
        System.Threading.Tasks.Parallel.For(0, 100000, i =>
        {
            Console.WriteLine(i);
        }
        );
        Console.ReadLine();
    }
}
}

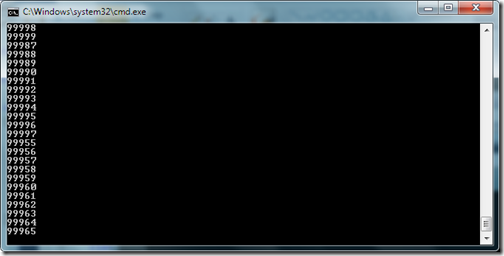
Here in the above code you can see that I have used parallel for which also prints the Incremented integer in console application. Now let’s run that code and see the output as following.

Output2

If you see the output very carefully then you can see that its not processing sequentially one by one but its processing it parallel and its will be much faster if you have multicore processor in your computer. But beware if you are going to run in simple processor computer its going to take more time then normal computer. That’s it. Hope you liked it.. Stay tuned for more.. Till that happy programming..


Share:
Wednesday, July 6, 2011

CRUD Operation with ASP.NET MVC and EFCodeFirst Part-2

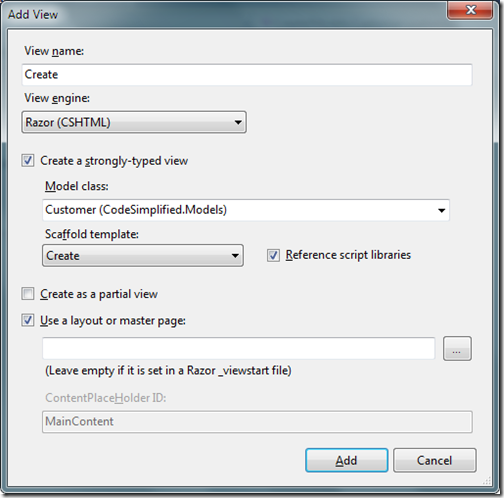
In the previous post I have already explained How we can list data from database easily with the help of EFCodeFirst . In this post I am going to explain How we can complete Create,Edit,Delete and Details operations within 10 minutes. So let’s first Start with Create a new Customer.I am going use same example of customer from previous post. So we have customer controller there so Let’s first create a new view for Create via Selecting View in Create() method of Customer Controller and Clicking on Add View and dialog box will open for add view like following.

CreateView

As you can see in the above template I have selected Customer Model Class for strongly typed view and Selected Scaffold template as Create once you click Add your view will be ready. Now its time to write for code in customer controller to Add Customer. So I have modified Create Method of customer controller which we have created like following.

[HttpPost]
public ActionResult Create(Models.Customer customer)
{
  try
  {
      using (var databaseContext = new Models.MyDataContext())
      {
          databaseContext.Customer.Add(customer);
          databaseContext.SaveChanges();
      }
    
      return RedirectToAction("Index");
  }
  catch
  {
      return View();
  }
}

That's it. We have done with Create Customer now. In the above databasecontext add method will add customer and SaveChanges method will save changed to database.
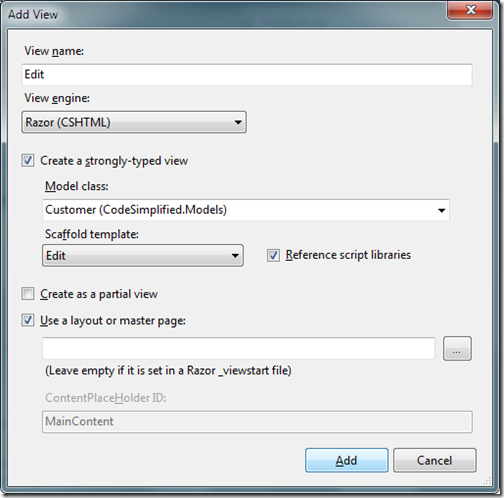
Now once we are done with Add its time to create edit and update functionality. Let’s first Add a view via Selecting view with Edit Method in clicking on Add view. Once you click a dialogbox for add View will open for that like following.

EditView

As you can see you I have selected scaffold template as Edit and I have Created Strongly typed view with Customer class. Once you click add it will create a new view for Edit. Now our Edit View is ready so let’s write code for Edit/Update in database. So first we have to modify Edit(int Id) method like following which will return specific customer with View. Following is a code for that.

public ActionResult Edit(int id)
{
  using (var databaseContext = new Models.MyDataContext())
  {
      return View(databaseContext.Customer.Find(id));
  }
}

Now let write code to update the changes to database. So for that I have modified another ActionResult Edit of customer controller like following.

[HttpPost]
public ActionResult Edit(int id, Models.Customer customer)
{
  try
  {
      using (var databaseContext = new Models.MyDataContext())
      {
          databaseContext.Entry(customer).State= System.Data.EntityState.Modified;
          databaseContext.SaveChanges();
      }
      return RedirectToAction("Index");
  }
  catch
  {
      return View();
  }
}

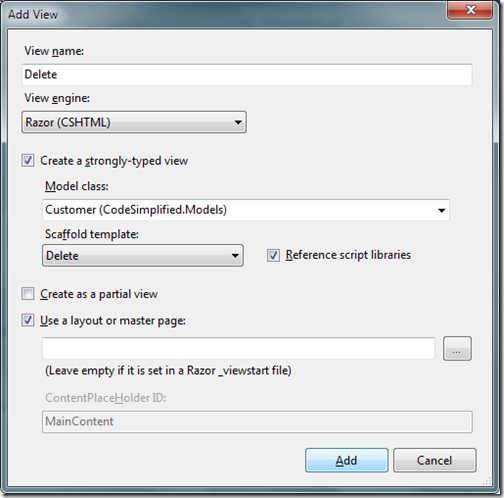
That's it we are done with the edit stuff.In above code the state modified will tell databasecontext that customer details is modified and savechanges will save changed to database. Now its time to create view for delete functionality. So I have clicked on Add View and Created a view for delete like following.

DeleteView

Here I have create Strongly typed view with Delete Scaffold Template. Now let’s modified both Delete Action Result in Customer Controller class. First Action result will return customer which we are going to delete and another delete action result with id will delete the customer from database and then it will return to main customer page. I have modified the code for both as following.

// GET: /Customer/Delete/5

public ActionResult Delete(int id)
{
  using (var databaseContext = new Models.MyDataContext())
  {
      return View(databaseContext.Customer.Find(id));
  }

}

//
// POST: /Customer/Delete/5

[HttpPost]
public ActionResult Delete(int id,Models.Customer customer)
{
  try
  {
      using (var databaseContext = new Models.MyDataContext())
      {
          databaseContext.Entry(databaseContext.Customer.Find(id)).State = System.Data.EntityState.Deleted;
          databaseContext.SaveChanges();
      }

      return RedirectToAction("Index");
  }
  catch
  {
      return View();
  }
}

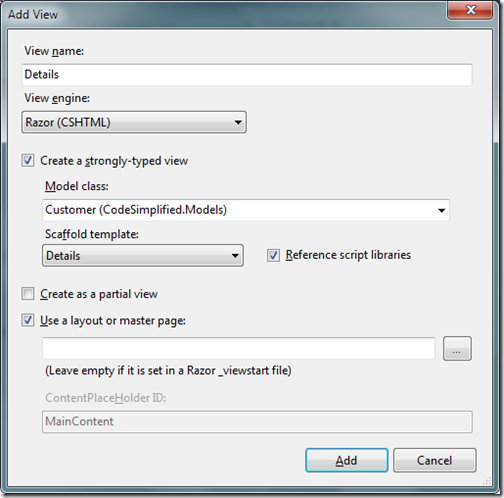
Here I have done something different then editing stuff to demonstrate the feature of Entity framework. You can also use Id for finding the current customer and then change its state to delete and SaveChanges will save that to in database. So now we are done with delete also. It’s now time to create details part. So same as above I have create a view with scaffold template details with customer model like following.

DetailView

Once we are done with creating view . It’s time to change the code for Details Action Result like following to return current customer detail.

public ActionResult Details(int id)
{
  using (var databaseContext = new Models.MyDataContext())
  {
      return View(databaseContext.Customer.Find(id));
  }
}

So that's it. We are done with all the stuff. So with Entity Framework code first. You can create basic CRUD application within 30 minutes without writing so much code. Hope you liked it. Stay tuned for more.. Till that Happy programming.

Shout it

kick it on DotNetKicks.com
Share:

Support this blog-Buy me a coffee

Buy me a coffeeBuy me a coffee
Search This Blog
Subscribe to my blog


My Mvp Profile
Follow us on facebook
Blog Archive
Total Pageviews