Saturday, April 5, 2014

Converting a C# Object into JSON string

Some people might think why I am writing so much about basics but the things but in reality  I got lot of questions through email and other communities about very basic things. So I thought instead of replying them into single thread. It is a good idea to write blog post about it and as a result I am writing this blog post.

In this post we are going to learn how we can convert a object into JSON string It is very simple. Let’s first see how we can convert C# Object into JSON string.

Converting a C# object into JSON string:


So to demo this, I have created a employee class like following.

public class Employee
{
    public string FirstName { get; set; }
    public string LastName { get; set; }
}

Now let’s create object of this class and assign some value like following.

Employee employee=new Employee
                    {FirstName = "Jalpesh",
                    LastName = "Vadgama"};

For this demo we are using console application so we have to add System.Web and System.Web.Extensions  reference to access the JavaScript Searilizer class through which we are going to convert this object into JSON string. We are going to add reference like following.
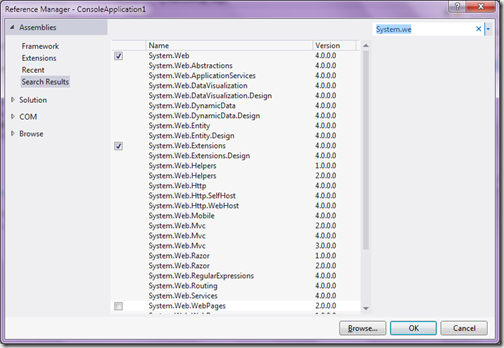
add-reference-serializtion-web-convert-chsarp-object-into-json

Now with JavaScript Searilizer class which belongs to System.Web.Script.Serialization namespace we can easily convert C# object into JSON string. Following is a code for that.

var javaScriptSerializer = new 
    System.Web.Script.Serialization.JavaScriptSerializer();
string jsonString = javaScriptSerializer.Serialize(employee);
Console.WriteLine(jsonString);

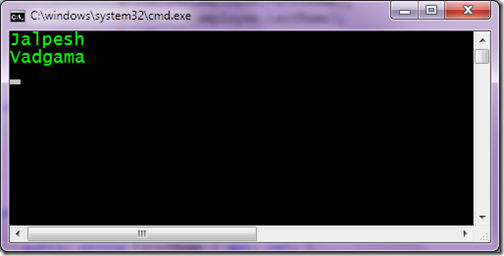
Now when run this console application. Following is a output as expected.
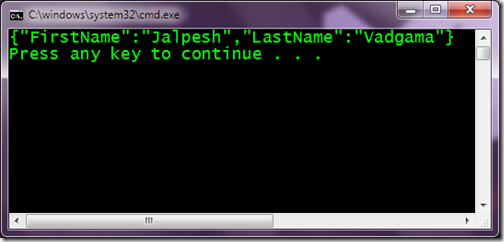
convert-c#-object-to-json-string-javascriptsearializer

Here its serialize object into JSON string. Same you can desterilize the JSON string into C# object with Deserialize function.

That’s it. It’s very easy. Hope you like it. Stay tuned for more..
Share:

ASP.NET Checkbox button Attributes in JavaScript.

This is a follow up post I have just written before some time- Getting tooltip of ASP.NET Radio button in java script. In that post I have explained that to render all properties properly in ASP.NET renders checkbox and radio button surrounded by Span tag. So one of the friend message me on facebook how we can add JavaScript attribute on ASP.NET Controls like checkbox or radio button. So I thought it will be good idea to write a quick blog post about it.

Adding JavaScript attribute to ASP.NET Checkbox and Radio button:


So Let’s see how we can write JavaScript attribute from server side with ASP.NET Checkbox and same will be applied to ASP.NET Radio button also. Following is a HTML code for ASP.NET checkbox.

<asp:CheckBox runat="server" ID="myCheckBox" 
Text="Yes" ToolTip="Yes"/>

Now I want to write a onBlur event for JavaScript so I have written a following function in JavaScript.

function onBlur() {
alert('Onblur Fired');
}

Normally we write JavaScript attribute from server side like below in page load event.

protected void Page_Load(object sender, EventArgs e)
{
myCheckBox.Attributes.Add("onblur", "onBlur();");
}

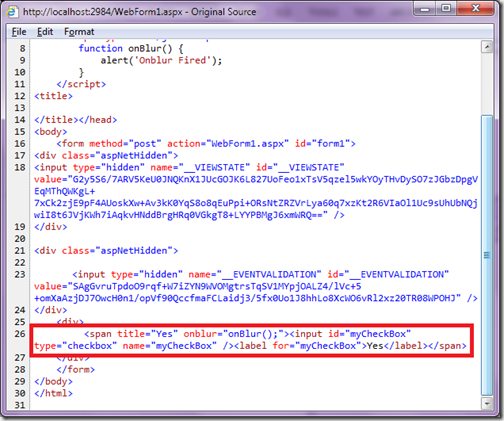
Now when you run this code in browser and see that in browser with View Source it will apply onblur event to span tag.

javascript-css-attribute-of-asp-net-checkbox-control

So it will not fire ‘onblur’ event of checkbox as this event is right now applied to span tag. So what should we do? Here is the fix. ASP.NET Checkbox and Radio Button provides InputAttributes attribute collection. So you can directly assign attributes to checkbox like below.

protected void Page_Load(object sender, EventArgs e)
{
myCheckBox.InputAttributes.Add("onblur", "onBlur();");
}

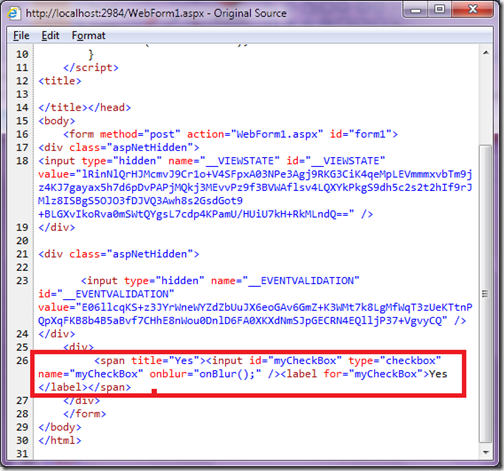
That's it. If you see in view source now it will assign JavaScript attribute in correct way and now it will fire event also.

javascript-css-attribute-of-asp-net-checkbox-control-correct-way

Note: You can add CSS Attribute in the same way as you do with JavaScript attribute.

Hope you like it. Stay tuned for more..
Share:

Getting tooltip of ASP.NET Radio button in java script.

This post in regards to a question that I have answered on stack overflow. Getting Tool tip of the Radio button in JavaScript. Where user asks why he is not able to get tooltip with document.GetElementById and Client Id of ASP.NET Radio button control like following.

document.getElementById('<%= rbSelectedIds.ClientID %>').title

While answering this question, I have found that there are lots of people not aware about this. So I thought it is a good idea to write a blog post about it.

By default ASP.NET Radio button and check box controls rendered under span when you have attribute like tooltip. Because System.Web.UI.WebControls namespace may render differently in  different browsers and to achieve same functionality in all the browsers they are rendering with span.

There is a complete discussion there one in one of the StackOverFlow.com

Why does ASP.Net RadioButton and CheckBox render inside a Span?

Example : Getting ASP.NET Radio button tooltip in JavaScript:


So let’s take same example as mentioned in that question. Following is my HTML Code. Below is radio button HTML code.
<div>
       <ASP:RadioButton runat="server" ID="myRadioButton" 
            Text="Yes" ToolTip="Yes"/>
</div>

Now when you run this in browser it will render this radio button is render with surrounded by span like follow.

how-to-get-tooptip-of-radio-button-in-java-script

You can see that title attribute is given to span tag instead of radio button. Now let’s create a ASP.NET button to get tooltip of that radio button like below.

<asp:Button runat="server" Text="Get Tooltip" 
        OnClientClick="getToopTip();"/>

So we are done with button now it’s time to write a JavaScript. Following is a code for JavaScript.
function getToolTip() {
    var sParentElement = document.getElementById("<%=myRadioButton.ClientID%>").parentElement;
    var tooltip = sParentElement.title;
    alert(tooltip);
}

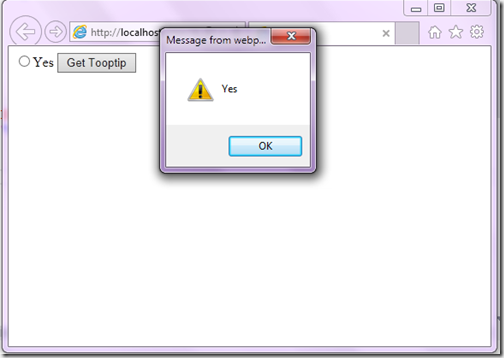
So we are done with code. Now it’s time to run this code in browser. And when you click on button it will show alert with tool tip of radio button.

getting-tooltip-in-javascript-asp-net-radio-button-and-checkbox

That’s it. Hope you like it. Stay tuned for more.
Share:

Overriding/set default button in master page in asp.net

Some time ago I have written a blog post about Default focus and default button in ASP.NET. In that post I have explained how we can set default button for form. Recently I got email related to that post asking that how we can set or override default button on a page with master page. 

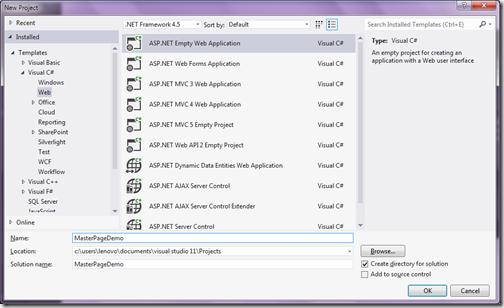
In this page we will learn how we can override default button in master page. So what we are waiting for? Let’s start by creating a an asp.net empty application via File –> New Project –> ASP.NET Empty web application.

overriding-setting-default-button-with-master-page-asp-net

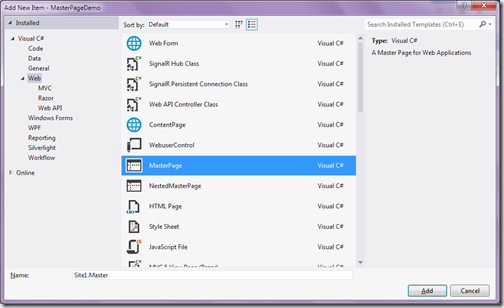
Once You are done with creating project it’s time to add a master page in solution via right click-> Add new Item.

adding-master-page-override-default-button

Following is HTML code ASP.NET master page.

<%@ Master Language="C#" AutoEventWireup="true" CodeBehind="Site1.master.cs"
     Inherits="MasterPageDemo.Site1" %>
<!DOCTYPE html>
<html xmlns="http://www.w3.org/1999/xhtml">
<head runat="server">
    <title></title>
    <asp:ContentPlaceHolder ID="head" runat="server">
    </asp:ContentPlaceHolder>
</head>
<body>
    <form id="form1" runat="server">
    <div>
        <asp:ContentPlaceHolder ID="ContentPlaceHolder1" runat="server">
        
        </asp:ContentPlaceHolder>
    </div>
    </form>
</body>
</html>

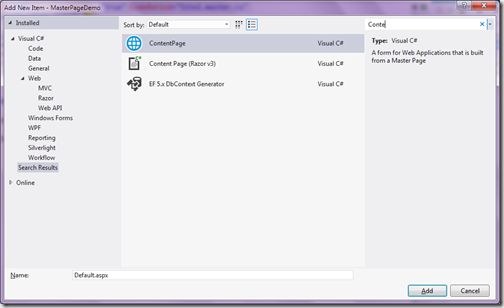
Now it’s time to add new content page with master page and selecting above master page.

adding-content-page-set-default-button-dynamically-master-page

Following is a code for content page.

<%@ Page Title="" Language="C#" MasterPageFile="~/Site1.Master" AutoEventWireup="true"
     CodeBehind="Default.aspx.cs" Inherits="MasterPageDemo.Default" %>
<asp:Content ID="Content1" ContentPlaceHolderID="head" runat="server">
    
</asp:Content>
<asp:Content ID="Content2" ContentPlaceHolderID="ContentPlaceHolder1" runat="server">
    <asp:TextBox runat="server" ID="Message"></asp:TextBox>
    <ASP:Button  runat="server" ID="DefaultButton"
        OnClick="DefaultButton_Click" Text="Default"/>
    <asp:Button runat="server" ID="AnotherButton"
        OnClick="AnotherButton_Click" Text="Another"/>
</asp:Content>
Here I have added two buttons “Default Button” and “Another button” and a textbox. Now I want to make this “Default Button” default dynamically. Below code I have written for both button’s click event. It will only print in textbox which button is clicked.

protected void DefaultButton_Click(object sender, EventArgs e)
{
    Message.Text = "Default Button Clicked";
}

protected void AnotherButton_Click(object sender, EventArgs e)
{
    Message.Text = "Another button clicked";
}

Now I want to make default button as default button of form so whenever I press enter it will fire click event of default button. So to dynamically set / override default button on master page form I have to write following code on content page page_load event.

protected void Page_Load(object sender, EventArgs e)
{
    Form.DefaultButton = DefaultButton.UniqueID;
}

Now when you run and press enter in browser output will be as expected as follows.

default-button-override-asp-net-masterpage-browser

That’s it. Hope you like it. Stay tuned for more..
Share:
Saturday, March 22, 2014

Explicit Keyword in C#

Yesterday, I have written a blog post about Implicit Keyword in C#. In today’s post we are going to learn about Explicit keyword in C#. Like Implicit keyword explicit keyword is also used for typecasting one class into another class. It is also a type conversion operator but rather then directly invoking it will invoke by cast.

As per MSDN, The Explicit keyword declares a user defined type conversation operator that must be invoked with cast.

Usage of explicit operator in C#:

Let’s take a simple example. Following is a code for that.

using System;

namespace ExplicitOperatorDemo
{
    class Program
    {
        static void Main(string[] args)
        {
            User user=new User
            {
                    FirstName = "Jalpesh",
                    LastName = "Vadgama"
            };

            Employee employee = (Employee) user;

            Console.WriteLine(employee.FirstName);
            Console.WriteLine(employee.LastName);
            Console.ReadKey();
        }
    }

    public class Employee
    {
        public string FirstName { get; set; }
        public string LastName { get; set; }
    }

    public class User
    {
        public string FirstName { get; set; }
        public string LastName { get; set; }

        public static explicit operator Employee(User user)
        {
            Employee employee=new Employee
            {
                    FirstName = user.FirstName, 
                    LastName = user.LastName
            };
            return employee;

        }
    }
}

I have written almost same code as we have written for implicit operator. Same two classes “Emplyee” and “User” with first name and last name operator. The only difference is I have written explicit keyword instead of implicit. And same way I have used casting in main function of console application.

In main function I have initialized class “User” with first name and last name and then type cast that in Employee class object.  Following is out put as expected.


That’s it. It is very easy. Hope you like it. Stay tuned for more..
Share:
Friday, March 21, 2014

Launching DotNetJalps Communities

Everyday I got lots of emails asking about technical things and Every time I am trying to give proper answer to them. But due to lack of time it was always not possible to reply all the emails as I have professional commitments also. So that’s why I decided to launch DotNetJalps community where people can ask questions and If I am not there then also another people can answer the question. Another benefit of communities will be the solution given in that particular answer will be visible to all the users of community.
So I have created Google+ community for that. Following is a link for that.

https://plus.google.com/communities/109749681215763540822

I request to ask your questions there instead of sending me emails and I would also encourage you participate in discussion. I am also going to share all my blog post there. You guys can also share your links and discuss various technology related things.

But please make sure there should technology related things only. So please join my community ask question and give answer to people.

Stay tuned for more!!
Share:

Implicit Keyword in C#

In today’s post we are going to learn about implicit operator in C#. Implicit keyword is used for conversation in C#. It is used to declare an implicit user-defined type conversation operator. So with the help of implicit keyword you can convert one class into another class without writing any other syntax.

You can find more information about Implicit from following MSDN link.
http://msdn.microsoft.com/en-us/library/z5z9kes2.aspx

Usage of Implicit Keyword in C#:


Sounds interesting!! Let’s take a example of implicit operator in so that it will be much clear. Following is a code for that.

using System;

namespace ImplicitOpeartorDemo
{
    class Program
    {
        static void Main(string[] args)
        {
            User user=new User
            {
                    FirstName = "Jalpesh",
                    LastName = "Vadgama"
            };

            Employee employee = user;

            Console.WriteLine(employee.FirstName);
            Console.WriteLine(employee.LastName);
            Console.ReadKey();
        }
    }

    public class Employee
    {
        public string FirstName { get; set; }
        public string LastName { get; set; }
    }

    public class User
    {
        public string FirstName { get; set; }
        public string LastName { get; set; }

        public static implicit operator Employee(User user)
        {
            Employee employee=new Employee
            {
                    FirstName = user.FirstName, 
                    LastName = user.LastName
            };
            return employee;

        }
    }
}

In above code I have created two classes “User” and “Employee”. Both contains two properties FirstName and LastName. Also in user class I have defined implicit operator Employee which convert user object into employee object.

In main function I have created object of user with first name as “Jalpesh” and last name as “Vadgama” and then assign it to Employee class. So when you assign object to employee class it will call Employee operator with implicit keyword and convert that user object into employee object.

At the end I have printed first name and last name property of Employee class and following is output as expected.

implicit-operator-c#

That’s it. It’s very easy. Hope you like it. Stay tuned for more.. Happy programming.
Share:

Support this blog-Buy me a coffee

Buy me a coffeeBuy me a coffee
Search This Blog
Subscribe to my blog


My Mvp Profile
Follow us on facebook
Blog Archive
Total Pageviews