Thursday, March 31, 2016

Visual Studio 2015 update 2 is available for download now

Visual studio 2015 is a great IDE and I love that more and more. As we all know that visual studio update 1 was released few months ago, Yesterday at build conference Microsoft has announced  Visual studio 2015 update 2.

From where I can download Visual Studio 2015 update 2:


You can download Visual studio 2015 update 2 different editions from the following links.

Visual Studio 2015 Community Edition:
Web installer : https://go.microsoft.com/fwlink/?LinkId=532606&clcid=0x409
ISO  File: https://go.microsoft.com/fwlink/?LinkId=615448&clcid=0x409

Visual Studio 2015 Professional Edition:
Web Installer: https://go.microsoft.com/fwlink/?LinkId=615435&clcid=0x409
ISO File:https://go.microsoft.com/fwlink/?LinkId=615436&clcid=0x409

Visual Studio 2015 Enterprise Edition:
Web Installer : https://go.microsoft.com/fwlink/?LinkId=615437&clcid=0x409
ISO File: https://go.microsoft.com/fwlink/?LinkId=615436&clcid=0x409

Also, You can download visual studio update 2 only without whole editor from the following link.
https://blogs.msdn.microsoft.com/visualstudio/2016/03/30/visual-studio-15-preview/


There are lots functionalities new features provided for new updates. You can find a complete list of features the following link.

https://www.visualstudio.com/en-us/news/vs2015-update2-vs.aspx

I am going to post about some new features in visual studio update 2 in forthcoming blog posts. Hope you like it and Stay tuned for more!.
Share:
Wednesday, March 30, 2016

Build 2016 Conference Live streaming

Microsoft continues to focus on enabling developers to do amazing work as businesses and industries transform in support of the shift to a cloud-first, mobile-first world. At Build 2016 Microsoft will present the latest tools and technologies and how they can help today’s developers be their most creative and productive.

From here you can see the live streaming  of build conference 2016.

Share:
Friday, March 25, 2016

How to use syntax highlighter with open live writer

Microsoft has open sourced windows live writer as “Open Live Writer” and is now part of .NET Foundation, It was a great move but as a part of modernizing the windows live writer they have started removing the functionality and adding some new functionality. Eventually, they are going to add the plugins but right now there is no support for that. I have been using windows live writer for more than 5 years now and I was using syntax highlighter for highlighting code on this blog. If you are not familiar with syntax highlighter you can find more information on the following link.

http://alexgorbatchev.com/SyntaxHighlighter/

It is a fully functional self-contained code syntax highlighter developed in  JavaScript. As now Open writer does not support plugin for the time being, I have to find another solution to write the blog post and do some syntax highlighting. So, I have found a way to do this and I would like to share this with you. In this blog post, we are going to learn how we can use syntax highlighter other way.

I was using preCode syntax highlighter plugin. It’s an open source plugin and provides a great plugin for syntax highlighter.

http://precode.codeplex.com/

But as Open Live Writer does not support plugin, There is no way to directly Integrate that plugin, But fortunately, precode syntax highlighter plugin comes with a desktop application was so now you can run that desktop application via finding it on windows 10 like below.

precode-syntax-highlighter

Once you run the preCode Code manager desktop app, It will run the application like following.

preCode-code-manager-syntaxhighlighter

Here you can put your code make settings as per your choice on the right side like below.

precode-code-manager-syntaxhighlighter-with-code

Then just click on the copy to clipboard and close. It will copy syntax highlighter code in the memory.  Now click on source tab at the bottom on the open live writer like below.

source-code-plugin

Then paste that code like below.

sourc-code-source

And now publish your post and it will look like below.
function helloWorld{
    alert("hello world");
}
That's it. It is very easy to use precode code manager with the open live writer. Hope you liked it. Stay tuned for more!.
Share:
Friday, November 27, 2015

TypeScript configurations in Visual Studio Code

Before sometime I have blogged about - Why It's the right time to learn Typescript and It does get lot of buzz. Typescript getting every day more popular due to reason I have mentioned in above blog post.  So now in this blog we are going to learn how we can use TypeScript with new Visual Studio Code editor.

TypeScript support in Visual Studio Code:


As you know Visual Studio Code is in beta now and provide great support for typescript. Here you can operate TypeScript in two modes.

1) File Scope:

In this mode Visual Studio Code will treat each typescript file as separate unit. So if you don't reference the typescript files manually with reference or external modules it will not provide intellisense as well as there will not common project context for this.

2) Explicit Scope:

In this scope we are going to create a tsconfig.json which will indicate that folder in which this file exist is a root of TypeScript project. Now you will get full intellisense as well as other common configurations on tsconfig.json file.

You can create a new file via File->New file from Visual Studio Code and add following code about TypeScript configuration under compiler operations.
{
    "compilerOptions": {
        "target": "ES5",
        "module": "amd",
        "sourceMap": true
    }
}

Converting TypeScript into JavaScript files automatically(Transpiling ):

Now as we all know that TypeScript is a super set of JavaScript and this files we can not directly put into html page. As browser will not understand the typescript itself. So we have to convert it into JavaScript. So to convert TypeScript file into JavaScript file we need to configure a in built task runner which will automatically convert all the TypeScript files into JavaScript.

To configure Task Runner you can either press F1 or Ctrl+Shift+P and type task runner. Configure Task runner will popup.

task-runner-vs-code

Once you press enter it will create a .vscode folder and create file called task.json which will have following code.
{
    "version": "0.1.0",

    // The command is tsc. Assumes that tsc has been installed using npm install -g typescript
    "command": "tsc",

    // The command is a shell script
    "isShellCommand": true,

    // Show the output window only if unrecognized errors occur.
    "showOutput": "silent",

    // args is the HelloWorld program to compile.
    "args": ["HelloWorld.ts"],

    // use the standard tsc problem matcher to find compile problems
    // in the output.
    "problemMatcher": "$tsc"
}

Now when you build your project it will create a JavaScript file automatically. Now Let's create a TypeScript file like following.
class HelloWorld{
     PrintMessage(name:string){
        console.log("Hello world:" + name);
    }
}

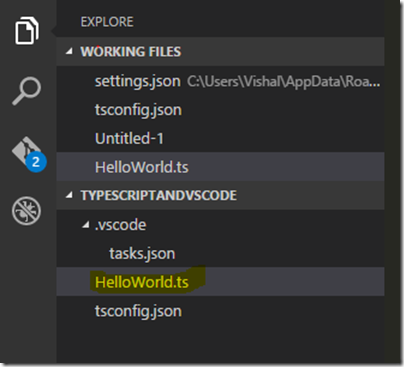
Here you can right now there is only one file there in explore section.

typescript-file-in-visual-studio-code

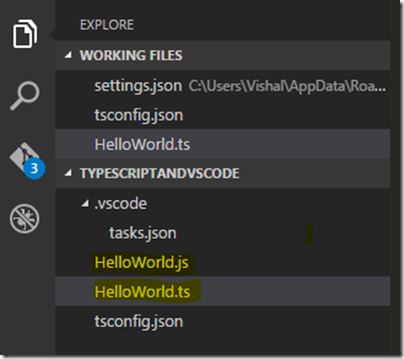
Now when you build the project with Ctrl+Shift+B. It will create a JavaScript file.

typescript-and-javascript-both-vscode

and Following is a code for the same.
var HelloWorld = (function () {
    function HelloWorld() {
    }
    HelloWorld.prototype.PrintMessage = function (name) {
        console.log("Hello world:" + name);
    };
    return HelloWorld;
})();

Hiding JavaScript File from explore area in Visual Studio Code:


I don't like my JavaScript file to show in explore area as we already have TypeScript file. So we don't have to worry about JavaScript file. There is a way to hide JavaScript file and I have to add following code in my user settings file. Which you can get it via File->Preferences->UserSetting
"files.exclude": {
"**/.git": true,
"**/.DS_Store": true,
"**/*.js":{
    "when": "$(basename).ts"
}
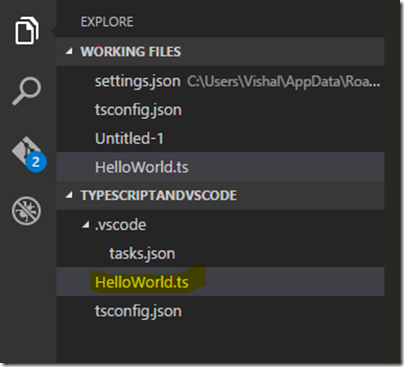
Here in above I have written custom filter for excluding JavaScript file when TypeScript file is present. Now it will not JavaScript file even if they exists on disk.


typescript-file-in-visual-studio-code

That's it. Hope you like it. Stay tuned for more!!. In forthcoming post we are going learn a lot of TypeScript.
Share:
Sunday, November 8, 2015

My Entity framework blog series

Share:
Saturday, November 7, 2015

Working with transaction in Entity Framework 6

In  any Relation database, maintaining the integrity of the database is very important and Transaction is one way of maintaining database integrity. When you have the situation, where you need to insert data into multiple tables and if inserting a data in one of the table fails you should always rollback other inserts transaction becomes very useful. The Same scenario can occur for update or delete operations. If transactions are not there you will end up with lots of junk data in tables. Entity framework is one of most popular ORM in Microsoft.NET World. So in this post, we are going to learn how we can use transactions with Entity Framework 6.

Transaction and Entity Framework 6:


Entity framework internally maintains a transaction when you call SaveChanges() method. So all Inserts, update operation under single save changes method call will be in a single transaction. But when you want to wrap multiple SaveChanges() method under single transaction there was not inbuilt functionality in the earlier version of Entity framework. We have used to use TransactionScope class for the same.

But now with Entity Framework 6.0, We have two inbuilt APIs for Transaction.

DbContext.Database.BeginTransaction:

It allows us to Begin transaction for multiple save changes, You can combine as many operations as you want under the single transaction and hence either all will be performed successfully then the transaction will be committed  and if any exception occurred than transaction will be rollback.

DbContext.Database.UseTransaction :

Sometimes we need to use a transaction which is started outside of the entity framework. In this case, this option allows us to use that transaction with entity framework also.

In this blog post, We are going to use Begin Transaction. I will write a separate blog post about how to use existing transaction with entity framework.

So enough theory, let's create a console application understand it better.

ef6-with-transactions-console-application

We need entity framework. So I have added it via NuGet package.

entity-framework-transaction-nuget-package

In this application, we are going to use two model classes category and product. We will save them both in the single transaction and try to understand how the transaction works with Entity Framework.
namespace EFWithTransactions
{
    public class Category
    {
        public int CategoryId { get; set; }
        public string CategoryName { get; set; }
    }
}
And here is product model.
using System.ComponentModel.DataAnnotations.Schema;

namespace EFWithTransactions
{
    public class Product
    {
        public int ProductId { get; set; }
        public string ProductName { get; set; }
        [ForeignKey("Category")]
        public int CategoryId { get; set; }
        public virtual Category Category { get; set; }
    }
}

Here you can see I have category id there in product and a product is belong to category and I have created my DB context class like following.
using System.Data.Entity;

namespace EFWithTransactions
{
    public class ProductDbContext : DbContext
    {
        public ProductDbContext()
            : base("ProductConnectionString")
        {

        }
        public DbSet<Category> Categories { get; set; }
        public DbSet<Product> Products { get; set; }
    }
}

And following code is for Main method of console application, Which illustrate real times scenario where exception might occurs during multiple save changes().
using System;

namespace EFWithTransactions
{
    class Program
    {
        static void Main(string[] args)
        {
            using (ProductDbContext productDbContext = new ProductDbContext())
            {
                using (var transaction = productDbContext.Database.BeginTransaction())
                {
                    try
                    {
                        //saving category
                        Category category = new Category
                        {
                            CategoryName = "Clothes"
                        };
                        productDbContext.Categories.Add(category);
                        productDbContext.SaveChanges();

                        // Throw some error to check transaction
                        // Comment this to make transactions sucessfull
                        // throw new Exception("Custom Exception");

                        //saving product
                        Product product = new Product
                        {
                            ProductName = "Blue Denim Shirt",
                            CategoryId = category.CategoryId
                        };
                        productDbContext.Products.Add(product);
                        productDbContext.SaveChanges();
                        Console.Write("Cateogry and Product both saved");
                        transaction.Commit();
                    }
                    catch (Exception exception)
                    {
                        transaction.Rollback();
                        Console.WriteLine("Transaction Roll backed due to some exception");
                    }
                }

            }
            Console.ReadKey();
        }
    }
}
If you see above code carefully, you can see I have two save changes method one for category and another for the product. Also, I have used BeginTransaction method to initiate a new transaction. I have put one custom exception to illustrate something is wrong with that transaction. Also, try catch block is there so if any exception occurs catch block will rollback the transaction. If all went well it will commit the transaction.

Now let's run this application and following is an output as expected. As we have thrown an exception.

Transaction-roll-back-entity-framework

And there is no data inserted in database also.

sql-server-database-with-no-data

Now let's comment the throw new exception part.
//throw new Exception("Custom Exception");

And now let's run our application again and here is the output as expected.

transaction-committed-sql-server

And now we have data in the database there.

sql-server-database-with-data-transaction-commited

So now we have a really good way to use transaction in entity framework. Hope you like it. Stay tuned for more!.
You can find complete source code of above blog post on github at - https://github.com/dotnetjalps/EF6WithTransaction
Share:
Friday, November 6, 2015

How to use stored procedure with Entity Framework Code First

I'm getting lots of request from readers of my blog about writing blog post about how to use stored procedure with entity framework code first. So in this blog post we're going to learn about how we can use stored procedure with Entity framework code first.

To demonstrate that we are going to use create a table called Employee like following.

table-entity-framework-code-first-stored-procedure
And here is the create table script for the same.
CREATE TABLE [dbo].[Employee](
[EmployeeId] [int] NOT NULL,
[FirstName] [nvarchar](50) NULL,
[LastName] [nvarchar](50) NULL,
[Designation] [nvarchar](50) NULL,
CONSTRAINT [PK_Employee] PRIMARY KEY CLUSTERED 
(
[EmployeeId] ASC
)WITH (PAD_INDEX = OFF, STATISTICS_NORECOMPUTE = OFF, IGNORE_DUP_KEY = OFF,
ALLOW_ROW_LOCKS = ON, ALLOW_PAGE_LOCKS = ON) ON [PRIMARY]
) ON [PRIMARY]

And following is the data I have inserted there.

entity-framework-table-data

And here is the store procedure we are using for that.
CREATE PROCEDURE usp_GetAllEmployees
AS
SELECT EmployeeId,FirstName,LastName,Designation FROM Employee

Now we have already done with our database side, it's time to write some C# code. I'm going to use simple console application for the same.

console-application-ef-code-first-stored-procedure

Now It's time to add entity framework via nuget package .

nuget-package-entity-framework-code-first

Here is the model class I have created.
namespace CodeFirstStoredProcedure
{
public class Employee
{
public int EmployeeId { get; set; }
public string FirstName { get; set; }
public string LastName { get; set; }
public string Designation { get; set; }
}
}
And then I have created entity framework dbcontext like following.
using System.Data.Entity;

namespace CodeFirstStoredProcedure
{
public class EmployeeDbContext : DbContext
{
public EmployeeDbContext()
: base("EmployeeConnectionString")
{

}
public DbSet<Employee> Employees { get; set; }
}
}
And following is a code for using stored procedure to get data from database via entity framework code first.
using System;
using System.Linq;

namespace CodeFirstStoredProcedure
{
class Program
{
static void Main(string[] args)
{
using (EmployeeDbContext dbContext = new EmployeeDbContext())
{
string commandText = "[dbo].[usp_GetAllEmployees]";
var employees = dbContext.Database.SqlQuery<Employee>(commandText).ToList();

Console.WriteLine("Printing Employee");
foreach (var employee in employees)
{
Console.WriteLine(employee.EmployeeId);
Console.WriteLine(employee.FirstName);
Console.WriteLine(employee.LastName);
Console.WriteLine(employee.Designation);
Console.WriteLine("-----------------");
}
}
Console.ReadKey();
}
}
}

Here in the above code, If you see care fully. I have used SQL Query function to execute stored procedure and that will return a list of employee. Then I have printed this list with console.writeline.  Now when you run this application, output will be as expected.

entity-framework-code-first-stored-procedure

That's it. It's very easy to use stored procedure with entity framework code first. Hope you like it. Stay tuned for more!!.
You can find complete source code of this sample application at - following location - https://github.com/dotnetjalps/EFCodeFirstStoredProcedure
Share:

Support this blog-Buy me a coffee

Buy me a coffeeBuy me a coffee
Search This Blog
Subscribe to my blog


My Mvp Profile
Follow us on facebook
Blog Archive
Total Pageviews