Showing posts with label Node.js. Show all posts
Saturday, May 5, 2018

A minimal web application structure with technologies like node.js, typescript, express

Recently, I have been working the lot with Node.js and TypeScript. And I absolutely love TypeScript due to its features. I was actually looking for a boilerplate code to start which should be very easy to understand. But there was no code there. So I decided to create a minimum web application structure. I have used it in some project and I was quite happy with it.

So I thought why should I make it open source so that people can also get benefited by this. So here I am presenting A minimal Web Application Structure with technologies like Node.js, TypeScript, and Express.

You can find the complete source code on Github at following location - https://github.com/dotnetjalps/minimum-nodejs-typescript-express

How to Run this Project:

To run this project you need to first install all the NPM packages via the following command.
npm install 
Then you can run this project with the following command.
npm start

Directory Structure Of Project:

  • App.ts – Typescript file for creating express application class and where we have initialized the application.
  • routes.ts - Typescript files for creating all the routes under Init() Method.
  • package.json - Contains all the packages and dev dependencies required for this application. You can add more as your requirement.
  • tsconfig.json - Where all the typescript configuration is there and we converting typescript into ES5.
  • Controller Folder - Contains all the classes for the controller of the express application
  • tsconfig.josn  - Contains all the rules for TypeScript linting.
I’m looking for constructive feedback on this and I’m hoping that I will get it.
Share:
Saturday, February 10, 2018

How to install node.js and npm on Debian 9

In this blog, We are going to see how we can install the node.js and npm on the Debian Operating system. So let’s get started.

First of all Either you should use “Sudo” command or use your root users to run all this command so that it will be available to all the users on this machine.

So first we need to install node.js so for that there are multiple ways but I am going to use node source binary distribution so that we can get latest stable version of node.

You can find node source binary distribution at - https://github.com/nodesource/distributions

First, You need to run the following command.
curl -sL https://deb.nodesource.com/setup_8.x | bash -
install-nodejs-debian

After that run the following command.
apt-get install -y nodejs
install-nodejs-debian2

Then you need to install NPM for that you need run the following command.
curl -L https://npmjs.org/install.sh | sudo sh
install-npm-debian

Then you can check node.js version with node -v like shown in below image.

node-version-debian

That’s it. Now create your favorite node.js application. Hope you Enjoyed it. Stay tuned for more!!
Share:
Sunday, December 3, 2017

Creating Rest API with Node.js,Express and MySQL Part-1

With Node.js and express creating a Rest API is a piece of cake. In this blog post, we are going to see how we can create a rest API with Node.js, Express, and MySQL as a database.

Creating Database with MySQL:

So let’s first with creating Database for our APIs. So todo that we need to create a new Schema from MySQL workbench like following.

database-creation-mysql

Here we are going to create a schema(database) called “employee”.  Then it’s time to create a Database Table and Let’s create a table like following.

create-table-mysql

and Here is the SQL Script for creating a table.

database-table-script-mysql

Here we have 4 column of the table EmployeeId(Primary Key), First Name, Last Name and Designation of employee details.

CREATE TABLE `employee` (
  `EmployeeId` int(11) NOT NULL,
  `FirstName` varchar(45) DEFAULT NULL,
  `LastName` varchar(45) DEFAULT NULL,
  `Designation` varchar(45) DEFAULT NULL,
  PRIMARY KEY (`EmployeeId`)
) ENGINE=InnoDB DEFAULT CHARSET=utf8;

I have entered some sample data like following.

table-sample-data

Express Node.js application to create Rest API:

Now we have our database ready for MySQL and It’s time to create a new Node.js Express application. We can start with creating Package.Json with NPM init and run that command in command line.

npm init
It will ask you several questions to create your node an application like below.

npm-init

Once your basic node.js application is ready It’s time to install express via the following command.

npm install express –save
It will install express like below.

express-installer

Now we have created a node.js and express application. I have also installed MySQL and BodParser package and here’s how the package.json looks like.

{
  "name": "nodejsmysql",
  "version": "1.0.0",
  "description": "A Rest API Example with Node.js and MySQL",
  "main": "index.js",
  "scripts": {
    "test": "echo \"Error: no test specified\" && exit 1"
  },
  "author": "Jalpesh",
  "license": "ISC",
  "dependencies": {
    "body-parser": "^1.18.2",
    "express": "^4.16.2",
    "mysql": "^2.15.0"
  }
}
As now we are done with creating and configuring our node.js application It’s time to write code. First I have written following code to create a route of our API which will be a map to our API URL.
var express = require("express");
var app = express();
var bodyParser = require("body-parser");

app.use(bodyParser.urlencoded({ extended: true }));
app.use(bodyParser.json());

var port = process.env.por || 3000;
var router = express.Router();

app.use("/api/employee", router);
Here in the above code, you can see that I have created an express object as required and then I created a body-parse object which will be used for the posting/putting data into our API. Then I have created a port and get router of express and then created a route which will be our URL for API.
Now It’s time to write MySQL Connection code like below.
var mysql = require("mysql");

var con = mysql.createConnection({
    host: "youripformysql",
    user: "usrename",
    password: "password",
    database: "employee"
});
In the above code I have to get MySQL object via require and then I created a MySQL connection.  You need to pass the credentials there for your MySQL Credentials. Then I have written following code to get Employee table data with our get API.
router.get("/", function (req, res, next) {
    con.connect(function (err) {
        if (err) throw err;
        con.query("SELECT * FROM employee", function (err, result, fields) {
            if (err) throw err;
            res.send(JSON.stringify({
                "status": 200,
                "error": null,
                "response": result
            }));
        });
    });
});
Here in the above code, You can see that I have written Route.get method which will be used to get All Employees from the MySQL database and then I have written a Select Query to query data with “Employee” table. Then I have put result data as Json with the response object.
Now we have to start this application with app.use like the following code.
app.listen(port, function () {
    console.log("Express server running on port %d", port);
});
Now we can run the application with the following command.

node index.js
You can see same in above image.

node-run-express-application

Now in a client like postman you can see the output like below.

output-as-json
That’s it. In blog post series we will see that how we can add/update and delete it. Stay tuned for more!!.

You can find complete source code above blog post at following location on github- https://github.com/dotnetjalps/RestAPINodeMySQL
Share:
Sunday, July 9, 2017

Video: How to debug Node.js Application with Visual Studio Code

Visual Studio code is a Great Editor and I like it very much. It support’s a lot of cool features our of box. Node.js Application debugging is one of them. It provides great debugging with node.js just like Visual Studio. I have created a small video demonstrating the same. Please have a look.


Share:
Wednesday, January 25, 2017

How to upload file with Express,Pug and Multer in Node.js

TL;DR;

In this blog post, We are going to learn how to upload a file with Express, Pug, and Multer in Node.js. In this blog post, we will learn how we can upload file with multer middleware in express framework with node.js

Creating Express App, Multer and other common code:

So here in for the demo purpose, we are going to use express application. So here is our package.json for express framework node.js application. It is created via the express generator. I have added Multer and PUG NPM instead of Jade.
{
  "name": "nodejsfileupload",
  "version": "0.0.0",
  "private": true,
  "scripts": {
    "start": "node ./bin/www"
  },
  "dependencies": {
    "body-parser": "~1.15.2",
    "cookie-parser": "~1.4.3",
    "debug": "~2.2.0",
    "express": "~4.14.0",
    "morgan": "~1.7.0",
    "multer": "^1.2.1",
    "pug": "2.0.0-beta6",
    "serve-favicon": "~2.3.0"
  }
}

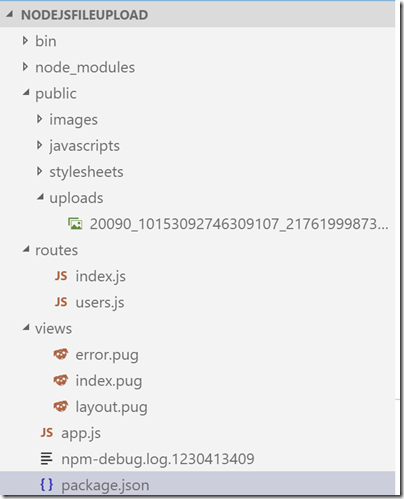
Here in the above code, You can see that there are pug npm and multer npm. Once you do “NPM Install” it will install all the required NPM for the same. Now we are our standard express app ready and here’s how our structure looks in visual studio code.

node-js-structure-express-app-file-upload-node-js

What is Multer:

For those who don’t know what is Multer,

Multer is a node.js middleware for handling multipart/form-data, which is primarily used for uploading files. It is written on top of busboy for maximum efficiency.
It is a middleware that will help you handle multipart/form-data requests and you can upload the file with that middleware with some configuration code.You can find more information about Multer at - https://github.com/expressjs/multer

Common code for Multer:

Now once we are done with Installing node module, It’s time to write some common code for Multer middleware. Here in the above code, we are going to use the index.js router which is a default router for the express app.  The index.js code looks like following.
var express = require('express');
var router = express.Router();

//multer object creation
var multer  = require('multer')
var storage = multer.diskStorage({
    destination: function (req, file, cb) {
        cb(null, 'public/uploads/')
    },
    filename: function (req, file, cb) {
        cb(null, file.originalname)
  }
})

var upload = multer({ storage: storage })

/* GET home page. */
router.get('/', function(req, res, next) {
  res.render('index', { title: 'Express' });
});

router.post('/', upload.single('imageupload'),function(req, res) {
  res.send("File upload sucessfully.");
});

module.exports = router;

Here in the above code, you can see that first I’m creating a multer object with require syntax and then I have put some configuration with multer.diskstorage. Basically, It's said that we are going to store the uploaded files into public/uploads folder and the name of a file will be same which we uploaded. Then in post request, you can see that I have put “upload.single” which handle file upload with post request. And if it uploaded successfully, I’m sending a response back that file is upload successfully.

HTML/PUG code:

Following is an HTML code for the pug.
extends layout

block content
  h1= title
  p Welcome to #{title}
  form(method='post', enctype='multipart/form-data')
    input(type='file', name='imageupload')
    input(type='submit', name='uploadimage', value='Upload Image')

Here you can see I have a file upload control with multi-part data and form and submit button to make a post request.

Final Output:

Once you run this application in the browser it will look like following.

file-upload-node-js

That’s it. It’s pretty easy. Hope you like it. Stay tuned for more!.

You can find complete source code following example on Github at - https://github.com/dotnetjalps/NodeJsFileUpload
Share:
Sunday, January 22, 2017

Building Node.js CRUD Rest APIs with Express and Visual studio code

TL;DR;

In this blog post, we are going to learn how we can create a basic Rest API with Node.js and Express using Visual Studio code editor.  Our API will contain four operations CREATE, READ, EDIT and DELETE.

Creating Basic Node Express application and common code for REST APIs:

The first thing we need to create an empty folder called NodeJSRestPI folder and then right click and select open with code.

open-folder-with-visual-studio-code

Once you open visual studio code create a file called package.JSON and put following JSON content on that.
{
    "name": "node-api",
    "main": "api.js",
    "dependencies": {
        "express": "4.14.0",
        "body-parser": "1.16.0"
    }
}
Here you can see that we are going to use express and body parser npm.  Express is framework for creating Rest APIs and body-parser is to parse body values in JSON. Now once we are done with package.json we need to install node js module via “npm install”. With Visual Studio code, You can directory open command line via clicking on Ctrl + ` Shortcut and then you can run any commands there like following.

npm-install-visual-studio-code-console

Now let’s create a file called API.js and put following JavaScript code into that.
var express = require("express");
var app = express();
var bodyParser = require("body-parser");

app.use(bodyParser.urlencoded({ extended: true }));
app.use(bodyParser.json());

var port = process.env.port || 3000;
var router = express.Router();

app.use('/api/employee', router);
app.listen(port);
Here you can see this code is pretty standard code for any express application. Here we  are creating express object with require syntax and then use that app object to create a router and then we have created a port and our app is listening on that port. So our basic application is ready. Now let’s add some common JavaScript code which we are going to use through out whole application.

Since this application is for demo purpose only we are not going to use any database for that and we are going to use a static JavaScript object for our CRUD operations. Following is code for our employee's object. Here you can see it is an array of JavaScript objects of employees. Basically, it contains an array of employee objects. By default, I have put one record there.
var employees= [
    {
        Id: 1,
        FirstName: "Jalpesh",
        LastName: "Vadgama",
        Designation: "Technical Architect"
    }
];
Another common JavaScript function we are going to use for validation of employee object. Basically, it checks object properties of Employee object. It returns true if the object has all the valid properties otherwise, it will return false. Following is code for the same.
//validation for employee
function isValidEmployee(employee){
    if(!employee.Id){
        return false;
    }
    if(!employee.FirstName){
        return false;
    }
    if(!employee.LastName){
        return false;
    }
    if(!employee.Designation){
        return false;
    }
    return true;
}
Now we are done with all the code. It’s time to write some code for creating actual operations.

ReadAll/GetAll Operation:

Here we are going to return all the employees available. In our case, we are going to return current employees JavaScript Object. Following is code for the same.
// Get all employees
router.get("/",function (req,res){
    res.json(employees);
});
Here in the above code, you can see that we use GET HTTP verb returning all the employees available. and Created a get HTTP operation. Now when you run it in postman it will return like following.
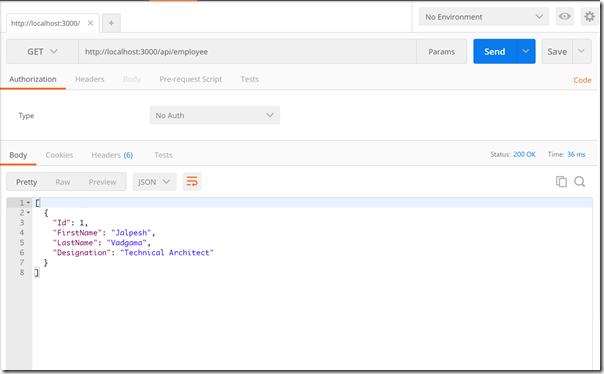
getall-with-nodejs-rest-api

Read specific/Get single operation:

In this specific operation, we are going to pass employee id in URL and it will return an employee object available. Following is a code for that.
//get specific employee based on Id
router.get("/:Id",function(req,res){
    var employeeId = parseInt(req.params.Id);
    var currentEmployee = employees.filter(e=>e.Id==employeeId)[0];

    if(currentEmployee){
        res.json(currentEmployee);
    }else{
        res.sendStatus(404);
    }
});
Here in the above code, you can see that we have created get operation, First, we are getting employee id and based on that we are filtering our employees object and getting a current specific employee. If an employee is there we are returning that employee object as JSON else we are sending 404 statuses not found.

Once you run with the postman. It will look like following.

specific-get-node-js-employee

Add/CREATE Employee:

In this operation, We are going to create a POST operation with express and we are going to have employee object as Request body. We are going to validate the employee object with our common validation function. Based on validation function result if all  required properties are available then we are going to add to our exiting employees collection object or else we are going return internal server status. Following is code for that.
/// Add employee
router.post("/", function (req,res) {
    var employee = req.body;
    var isValid =isValidEmployee(employee);
    if(isValid){
        employees.push(employee);
        res.send(employee);
    } else{
        res.sendStatus(500);
    }
});
Here is how it look in postman.

add-employee-nodejs-api

Update/Edit operation:

Here for an update operation, We are going to use PUT HTTP verb.  In this function, we are going to check that whether this employee exists or not. If exist we will update the properties of particular specific employee object and send code 204 which says operations completed successfully.  If the employee does not exist then it will return 404-Not found. Following is code for that.
router.put("/:Id",function (req,res) {  
    var employeeId = parseInt(req.params.Id);
    var currentEmployee = employees.filter(e=>e.Id==employeeId)[0];
    if(currentEmployee){
        let employee = req.body;
        var isValid = isValidEmployee(employee);
        if(isValid){
            currentEmployee.FirstName = employee.FirstName;
            currentEmployee.LastName = employee.FirstName;
            currentEmployee.Designation = employee.Designation;
            res.sendStatus(204);
        }else{
            res.sendStatus(500);
        }
    }else{
        res.sendStatus(404);
    }
});
And when you run this in postman, It looks like following.

update-employee-nodejs-api

Delete operation:

In this operation, We are going to use DELETE HTTP verb. We are going to check that whether this employee id passed exist or not. If exists, we will delete that employee from our collection object and return 204 statuses. If not found then we are going to have 404 statuses. Following is code for the same.
//delete employee
router.delete("/:Id", function(req,res){
    var employeeId = parseInt(req.params.Id);
    var currentEmployee = employees.filter(e=>e.Id==employeeId)[0];
    if(currentEmployee){
        employees = employees.filter(e=>e.Id!=employeeId);
        res.sendStatus(204);
    }else{
        res.sendStatus(404);
    }
});
Now when you run in postman. It will look like this.
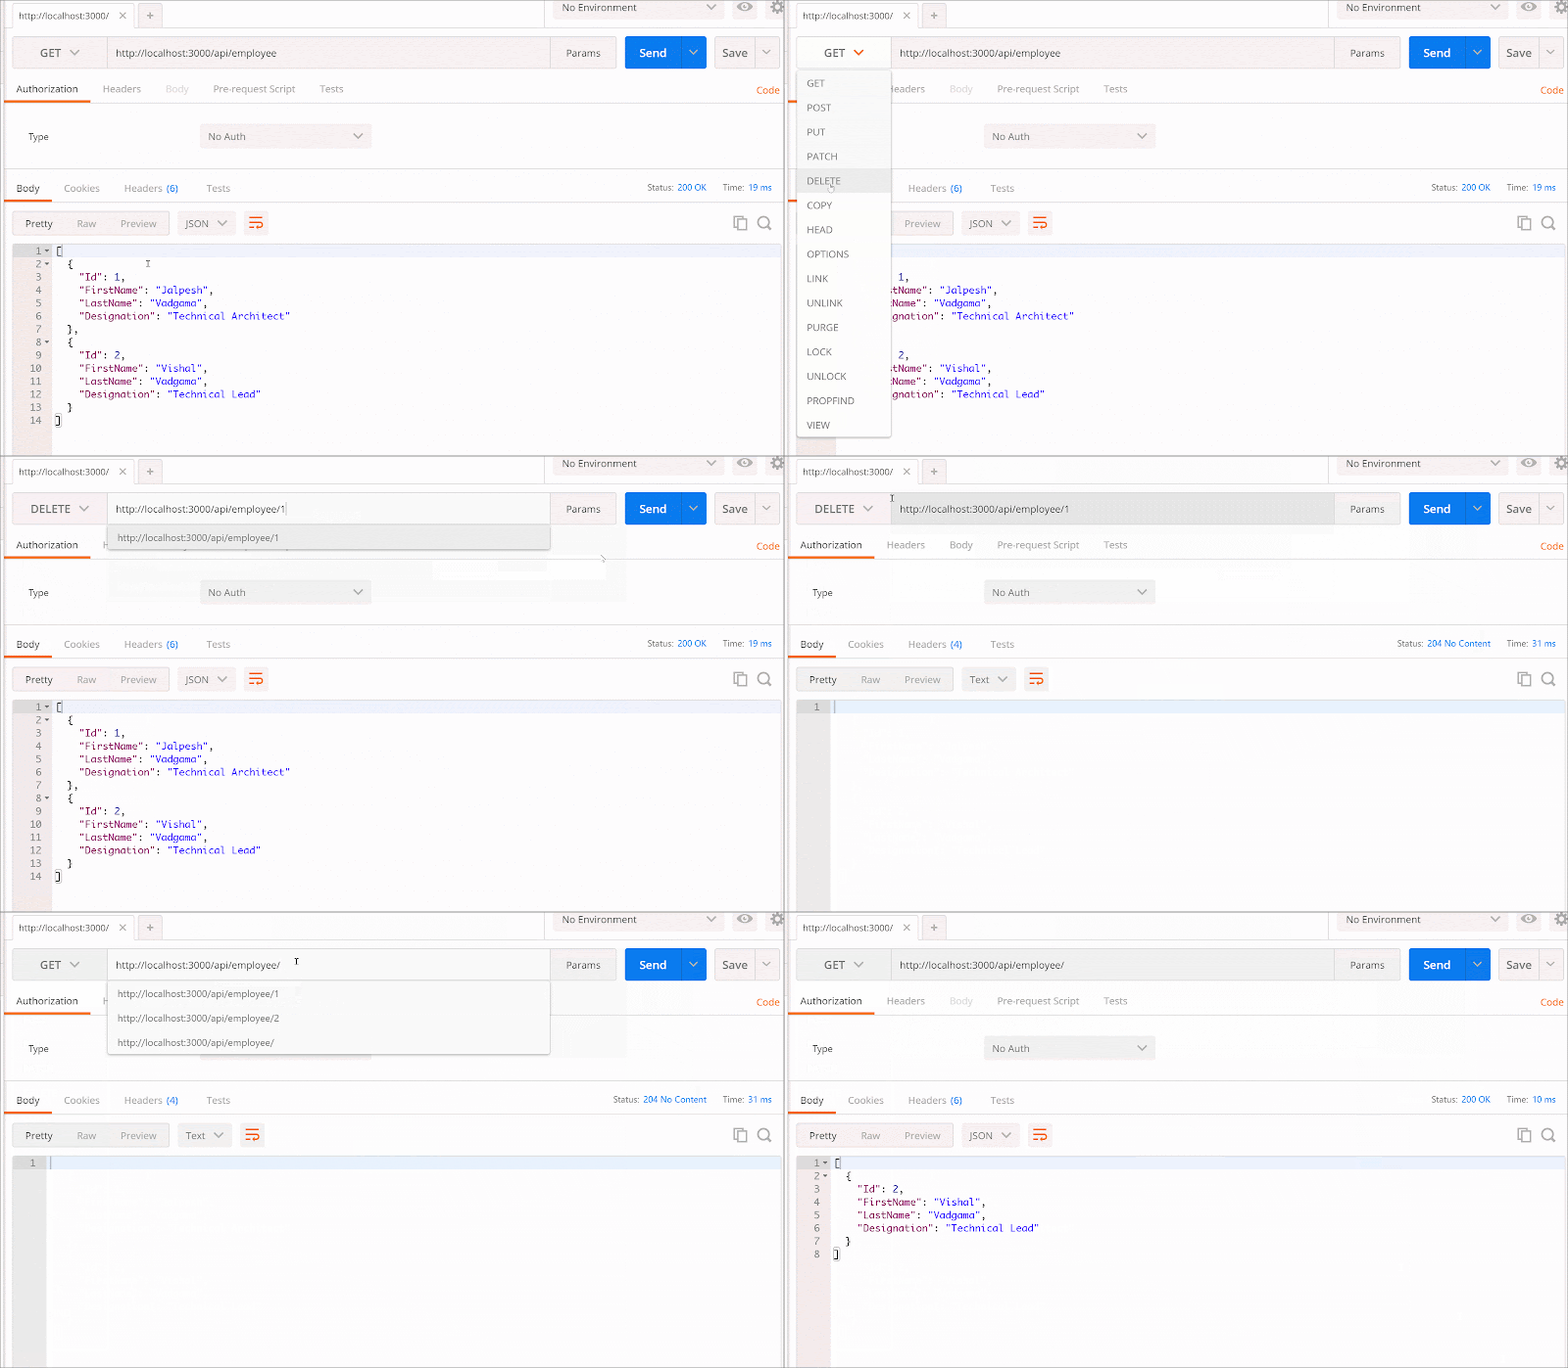
delete-employee-nodejs-api

That’s it. Hope you like it. In this next post, we are going to see how we handle validation in the better way with Node.js APIs.

Complete source code of this blog post is available on Github at following location- https://github.com/dotnetjalps/NodeJsRestAPI

You can run this API with the following command.

node api.js 
Share:
Sunday, January 5, 2014

Node.js tools for visual studio

In this post we are going to look how we can use node.js application in visual studio with node.js tools for visual studio.

What is Node.js?


As per wikipedia Node.js is a software plateform that is used to built scalable network(specially server side application). Node.js utilizes JavaScript as its scripting language and achieved high throughput via non blocking I/0 and single-threaded event loop.Node.js was created by Ryan Dhal in starting 2009.Its development and maintenance is sponsored by Joyent.

Why we should care about Node.js:


  1. It uses JavaScript most popular language of the web.
  2. Fast. Powered by incredible V8 virtual machine. It makes JavaScript execution really fast.
  3. A Great feet for real-time web application.
  4. It’s scales very easily.

Node.js tools for visual studio:


You can download the Node.Js tools from the following link.

https://nodejstools.codeplex.com/

Here are some quick features of Node.Js tools.
  1. NTVS support editing, intellisense, profiling, NPM, debugging locally and remotely(Windows, MAC, Linux) as well as Azure web sites and Cloud services.
  2. Designed, Developed and Supported by Microsoft Community.
It is available for both Visual Studio 2012 and Visual Studio 2013 both.

Installation of Node.js tools for visual Studio:


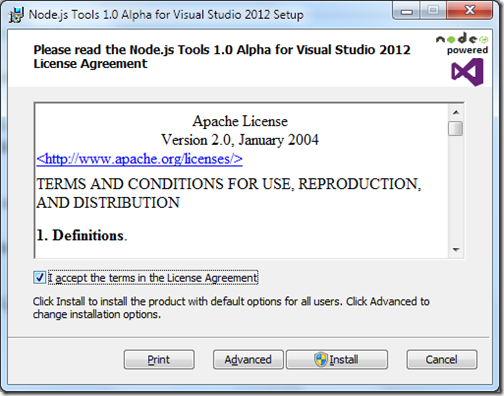
It’s very easy to install download the setup and double click setup.exe it will load following screen.

Node-js-visual-studio-tools-installation1

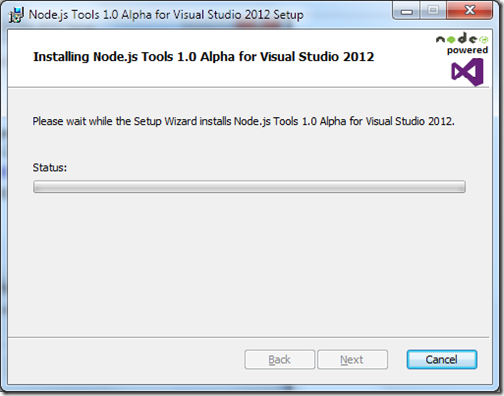
Once you click on install it will load start installing.

Node-js-visual-studio-tools-installation2

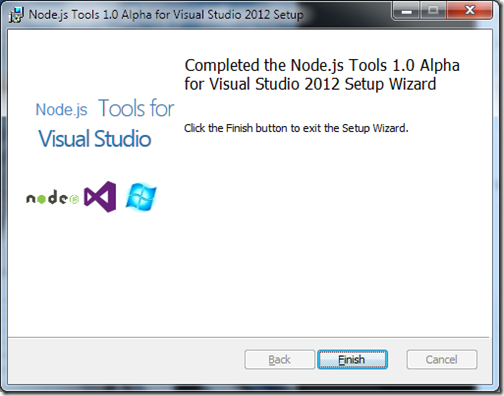
After completing installation it will look like following.

Node-js-visual-studio-tools-installation3

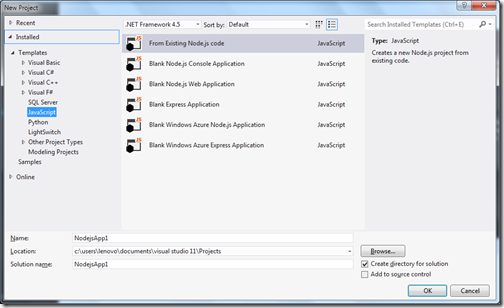
Once you are done with installation open visual studio and go to File-> New Project-> JavaScript and you will see node.js template available.

Blank-Node-Js-Application

That’s it. Hope you like it. In next post We are going to create first node.js application with Visual Studio. Stay tuned for more..
Share:

Support this blog-Buy me a coffee

Buy me a coffeeBuy me a coffee
Search This Blog
Subscribe to my blog


My Mvp Profile
Follow us on facebook
Blog Archive
Total Pageviews