Sunday, April 2, 2017

Explicit loading in Entity Framework Core

In this blog post, We are going to learn about Entity Framework feature. Explicit loading means that related data is explicitly loaded from the database at a later time. As you might know, that lazy loading is still not possible with Entity Framework core but there is a way to explicit load related data in a transparent manner.  We are going explore how we can load data explicitly with entity framework in this blog post in detail.

How to do Explicit loading in Entity Framework Core?

To demonstrate how we can use explicit loading in Entity Framework core. We are going to create a console application with two entities Student and Department. A department can have multiple students. Here we are going to see how we can load students for each department explicitly.

So let’s create a console application like following.

new-console-app-entity-framework-core-explicit-loading

Now once you click “Ok” it will create a console application. Now let’s add nuget package for entity framework core in console application like following. You need to run following command in Package Manager Console.

Install-Package Microsoft.EntityFrameworkCore.SqlServer
entity-framework-core-nuget-package

Now it’s time to create our models for Student and Department like below.

Department:
using System.Collections.Generic;

namespace EFCoreExplicitLoading
{
    public class Department
    {
        public int DepartmentId { get; set; }
        public string Name { get; set; }
        public ICollection<Student> Students { get; set; }
    }
}
Student:
namespace EFCoreExplicitLoading
{
    public class Student
    {
        public int StudentId { get; set; }
        public string FirstName { get; set; }
        public string LastName { get; set; }
        public int DepartMentId { get; set; }
        public Department Department { get; set; }
    }
}
Now let’s create an Entity Framework Core context like below.
using Microsoft.EntityFrameworkCore;

namespace EFCoreExplicitLoading
{
    public class StudentContext: DbContext
    {
        public DbSet<Student> Students { get; set; }
        public DbSet<Department> Departments { get; set; }

        protected override void OnConfiguring(DbContextOptionsBuilder optionsBuilder)
        {
            optionsBuilder.UseSqlServer(@"Data Source=SQLServerName;Initial Catalog=YourDatabase;User ID=UserName;Password=Password;MultipleActiveResultSets=true");
        }
    }
}
Here in the above code, you see that A department can have multiple students and A student can have only one department so there is one to many relationships between department and student.

Now let’s create a migration to create the database for the same. To enable migration we need to install following nuget package for entity framework core tools.
Install-Package Microsoft.EntityFrameworkCore.Tools
entity-framework-core-migration-console-application

Now let’s create a migration with the following command.
Add-Migration InitialDatabase
entity-framework-core-migration-initial-database

Now let’s create a database with “Update-database” in Package manager console. It will create a database.

Now we need some initial data to demonstrate the explicit loading feature so I’ve added following data into Departments table.

department-data-entityframework-core

Same way I have added data into Students table like following.

student-data-entity-framework-core

Now it’s time to write some code that demonstrates the explicit loading feature of entity framework core. Following is a code for the same.
using System;
using System.Linq;

namespace EFCoreExplicitLoading
{
    class Program
    {

        static void Main(string[] args)
        {
            using(StudentContext studentConext= new StudentContext())
            {
                var deaprtments = studentConext.Departments.ToList();
                foreach(var department in deaprtments)
                {
                    Console.WriteLine("Before explicit loading");
                    Console.WriteLine(department.Students==null);

                    //loading student explicitly
                    studentConext.Entry(department).Collection(s => s.Students).Load();

                    Console.WriteLine("After explicit loading");
                    Console.WriteLine(department.Students == null);
                    Console.WriteLine(department.Students.Count);
                    Console.WriteLine("------------------------------------------------");

                }
                Console.ReadLine();
            }
        }
    }
}
Here in the above code, you can see I have created student context object and then I have got all the databases. After that, I have checked that whether each department is having students or not. In the next statement, I have loaded the students explicitly with the student with collection load method and then again I checking whether it got students and also printing count of a student.

Now let’s run this application and here is the output as expected.
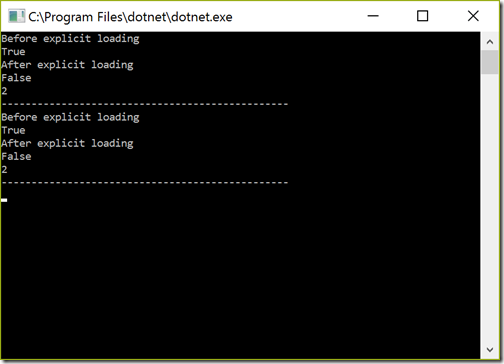
out-put-entity-framework-core-explicit-loading

So it is loading student data after the department is loaded with the help of explicitly. That’s it. Hope you like it. There are so many scenarios where this explicit loading can be quite useful. Stay tuned for the more!!.

The complete source code of this sample application is available on github at - https://github.com/dotnetjalps/EFCodeExplicitLoading
Share:

How to integrate HangFire with ASP.NET Core 1.1

Hangfire is one of the easiest ways to perform background processing in.NET and.NET Core Applications. In this application we are going to learn how we are can integrate Hangfire with ASP.NET Core application.

About Hangfire:

Hangfire allows you to create background task in.NET applications. It’s extremely easy to integrate. It allows you to kick off method calls outside of the request processing pipeline in very easy but reliable way. You can store those jobs in on premise SQL Server, SQL Azure, Redis, MSMQ or Redis.

You can find more information Hangfire on the following link.
http://hangfire.io/

Hangfire also contains one of very maintained documentation at the following link.
http://docs.hangfire.io/en/latest/

Integrating HangFire with ASP.NET Core 1.1:

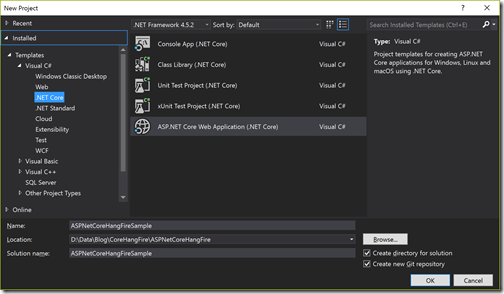
To demonstrate how we can integrate with ASP.NET core, I’m going to create a new ASP.NET Core application in Visual Studio 2017 like below.

new-aspnet-core-application-hangfire

Once click on it will ask for the selection of Application task we are going to select Web Application like below.

aspnet-core-hang-fire-web-application

As our application is not ready, We are going to install Hangfire nuget package in the application.

install-hangfire-nuget-package

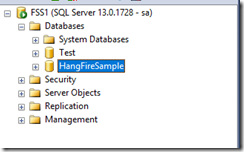
Now we are done with adding Hangfire to our asp.net core application. We need to create a SQL Server database for Hangfire application. Here I’m going to use SQL Server for Job storage but there are various Job Storage options available as mentioned above.

hangfire-sample-database

Now we need to have ConnectionString for the database. Let’s put it on appsetting.json like below.
{
  "ConnectionStrings": {
    "HangFireConnectionString": "Data Source=SQLServer;Initial Catalog=HangFireSample;User ID=YourUserName;Password=YourPassword;MultipleActiveResultSets=true"
  },
  "Logging": {
    "IncludeScopes": false,
    "LogLevel": {
      "Default": "Warning"
    }
  }
}

Now in Startup.cs file configure services method we need to integrate hangfire like below. Here I’ve added hangfire to our application and also indicated that we are going to use SQL Server for Job storage and provided connection string for the same.
public void ConfigureServices(IServiceCollection services)
{
    // Add framework services.
    services.AddMvc();
    services.AddHangfire(config=>config.UseSqlServerStorage(Configuration.GetConnectionString("HangFireConnectionString")));
}
Now Hangfire integration is easy to use. When you run it will automatically create tables related to Hangfire configuration and storage as below.


hangfire-tables-sql-server

Now you can easily add background task like below at any place.
  BackgroundJob.Enqueue(() => Console.WriteLine("BackGroundJob"));
Even you can add recurring job which will run at a specific time like below.
 RecurringJob.AddOrUpdate(() => Console.WriteLine("RecurringJob"), Cron.Daily);
That’s it. You can see it’s very easy to use and You can integrate Hangfire very easily. Hope you like it. Stay tuned for more!.
You can find complete source code of this application at following on github.com : https://github.com/dotnetjalps/ASPNetCoreHangFire
Share:
Wednesday, March 29, 2017

New Features–Out Variables in C# 7.0

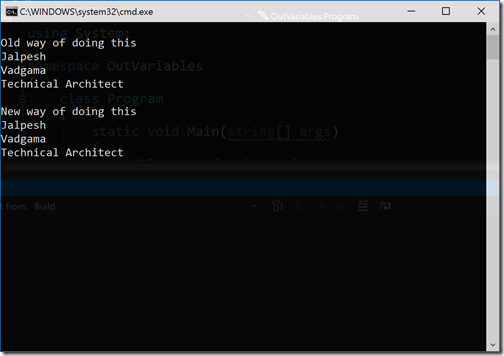
Prior to C# 7.0,  For out keyword, we need to define that variable earlier and then we were able to pass that variable as out reference arguments. But now with C# 7.0, You don’t need to declare the variable but you can use the variable which you have used in arguments.

Following is a code showing both ways passing out variables.

In the above code, You can see that I have created get employee static method which put some values in this out variables. First I have shown the old way of doing this. Where I explicitly defined the variables and then passed it to function while in the new way of doing you don’t need to explicitly define variable. You can write this as an argument and then, later on, you can use the same variable in next statements.  Now when you run the application, the new and old way both produce the same output.


csharp7-out-varibles-example

You can find complete source code of this examples at following location on Github at- https://github.com/dotnetjalps/CSharp7NewFeatures
Share:

Visual Studio 2017 New Features Series

Visual Studio 2017 is recently launched by Microsoft and it is one of great IDE I have ever seen. It contains lots of features and this blog post contains the link to all features post that I have written for Visual Studio 2017.

A new start page for Visual Studio 2017
Code Navigation features in Visual Studio 2017 


Share:

Code Navigation features in Visual Studio 2017

This blog post is a part of Visual Studio 2017 New feature Series

TL;DR:

With Visual Studio 2017 there are lots of new Code Navigation features introduced. We are going to look all the options available in Visual Studio 2017.

Navigation your code with Visual studio 2017:

Visual Studio 2017 have newly refreshed code navigation features which help you moving from point A to B easily and fewer distractions. There are mainly four new features available.

Go to Implementation(Ctrl+F12):

It helps you navigate from any base type to implementation of the concrete type.

GotoImplementation

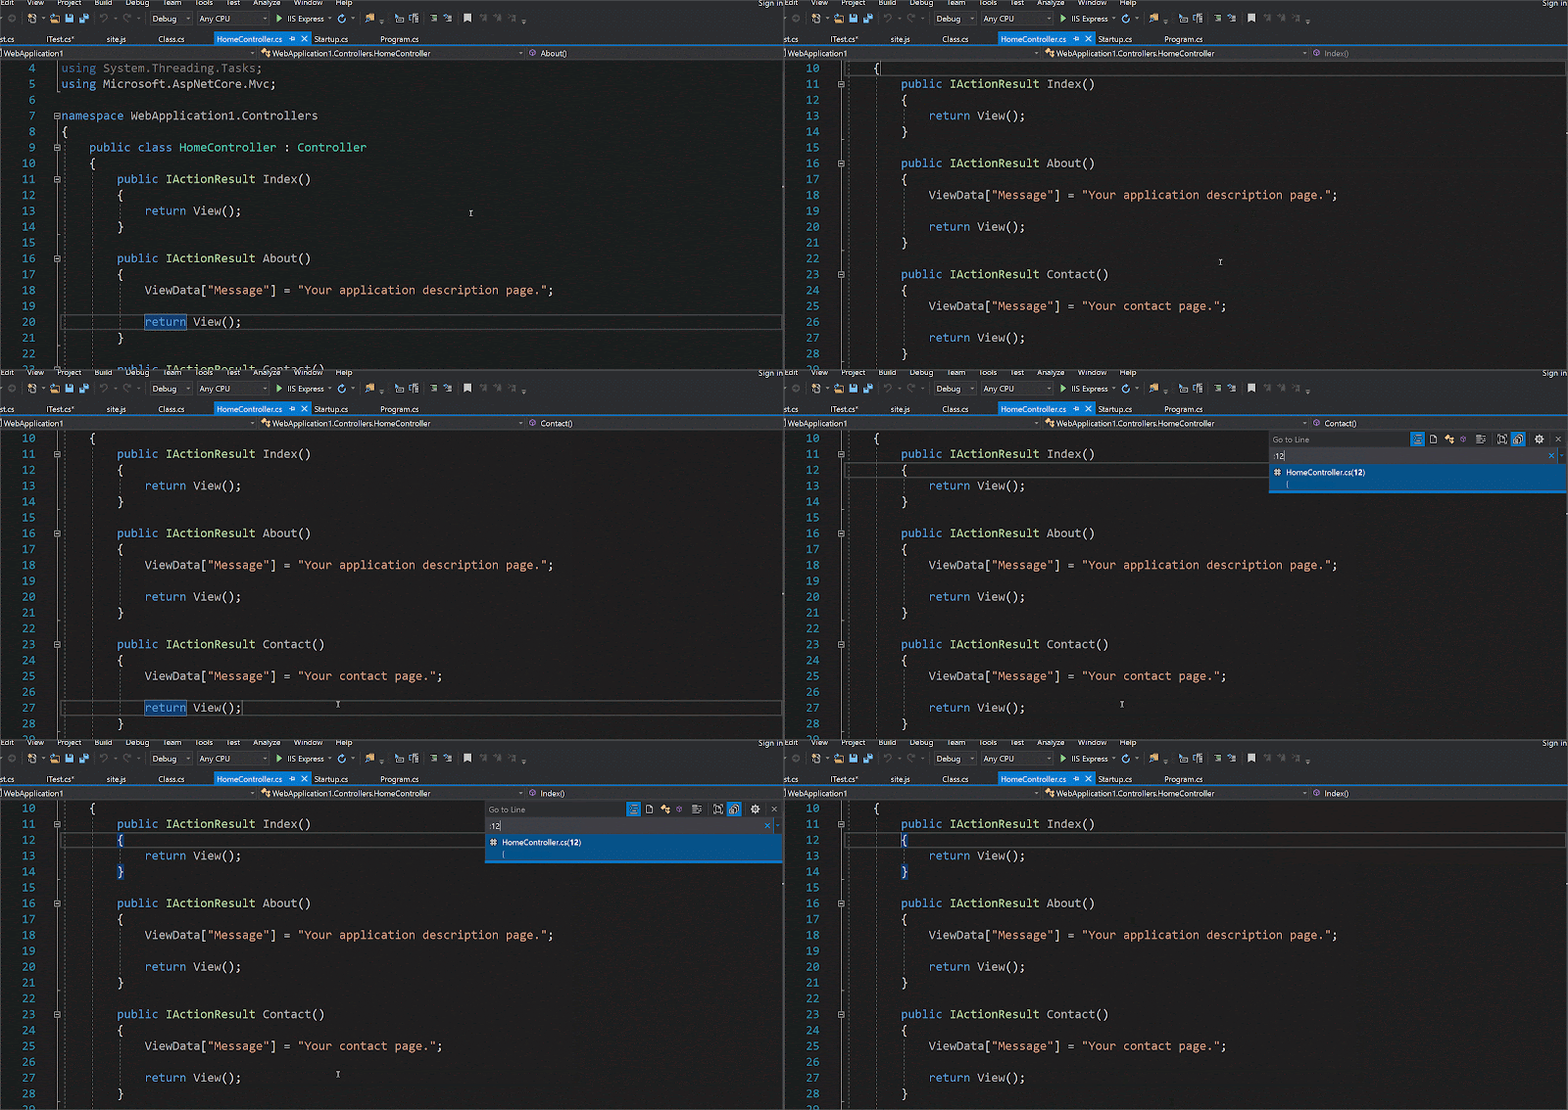
Go To Line(Ctrl+G):

It helps moves cursor from current line to specified line number.

go-to-line-visual-studio-2017

Go To All(Ctrl+T):

It helps you navigate directly to any file/type/symbol/member. You can move from any files to anywhere with this feature easily.

go-to-all-visual-studio-2017

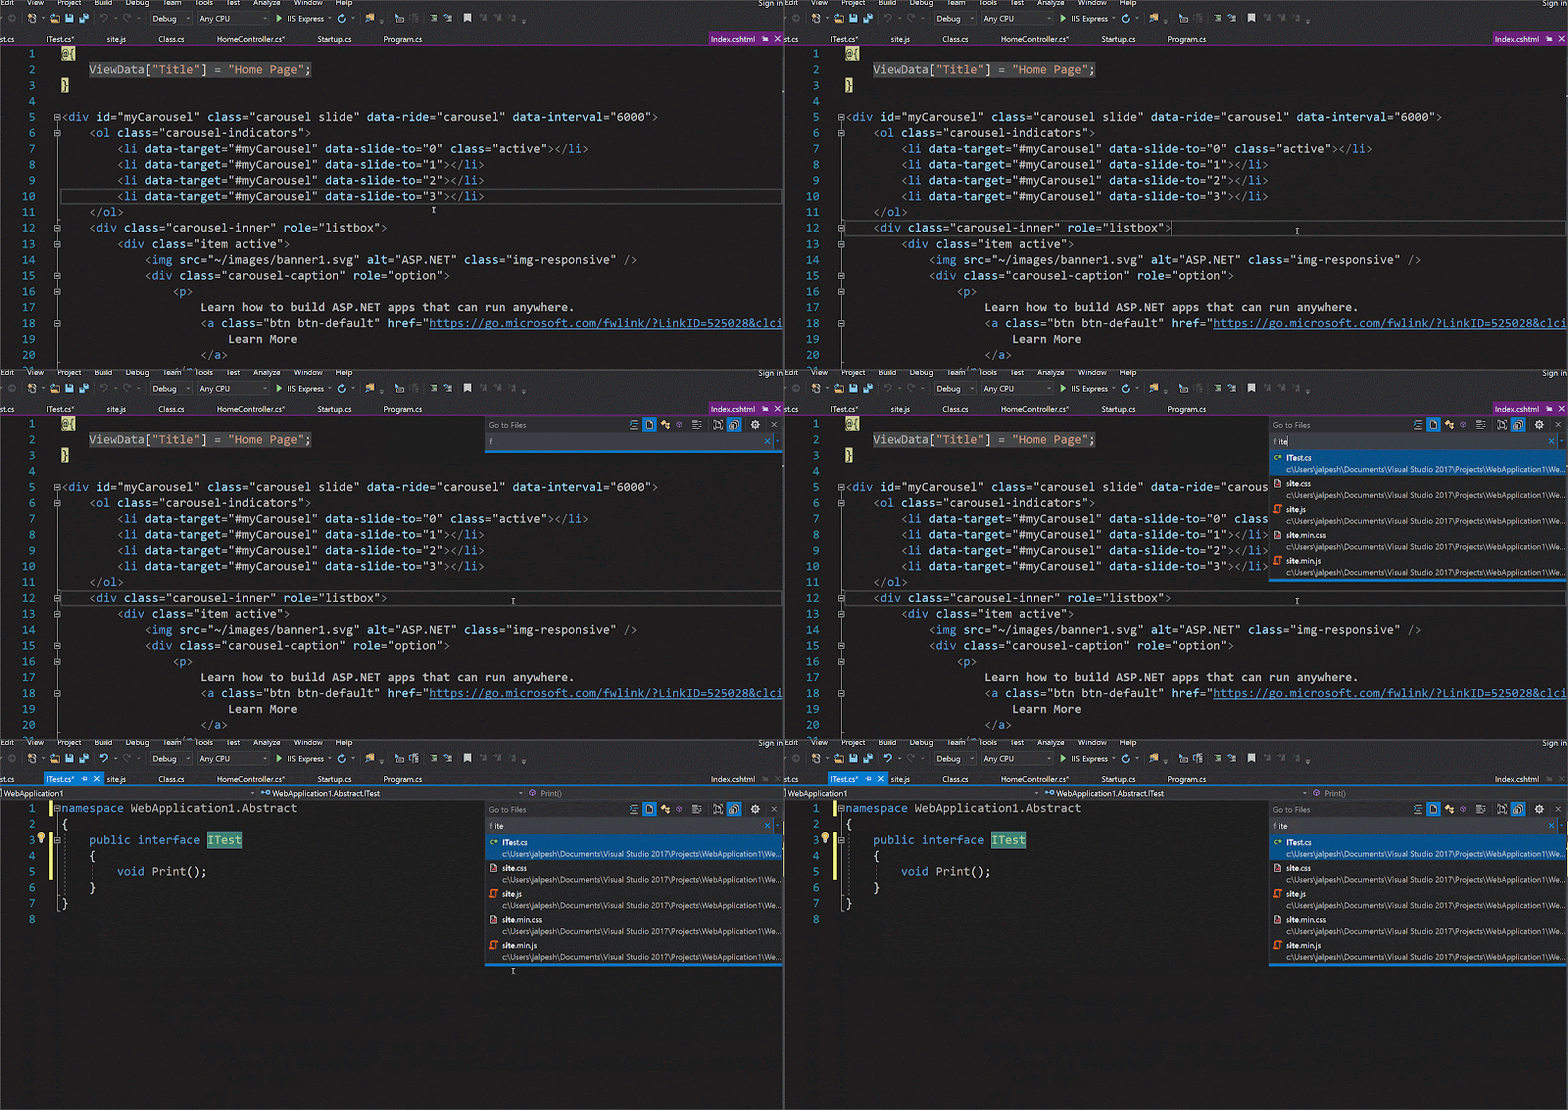
Go To File(Ctrl+ 1, Ctrl + F):

You can easily navigate between files with this feature.

go-to-file-visual-studio-2017

Go To Type(Ctrl+1, Ctrl + F):

You can move to any type with this feature. It searches classes/interfaces/enums and delegates and moves your current cursor selected type.

go-to-type-visual-studio-2017

Go To Member(Ctrl+ 1, Ctrl + M):

You can move between members for a particular class. It searches Global Variables and Global Functions, Class Member variables and member functions, Constants, Enum items, Properties, and events.

go-to-member-visual-studio-2017

Go to Symbol(Ctrl + 1, Ctrl + S):

You can move to any symbols, search result includes Go to Type and Go to Member.

go-to-symbol-visual-studio-2017

Find All References(Shift + F12):

In the earlier version of Visual Studio Find All References was the plain list without any syntax highlighting and coloring. Now with Visual Studio 2017 it has got coloring and splits all the information into their respective columns. This column can be also customized so you will only see what you want to see in Find All References Window.

find-all-references-visual-studio-2017

So Visual Studio 2017 now got lots of features and that will make code navigation very easy. It will definitely increase developer productivity and made life easy.
Share:
Tuesday, March 28, 2017

A new start page for Visual Studio 2017

This blog post is a part of Visual Studio 2017 New feature Series
Recently Microsoft has released a new version of Visual Studio 2017 and as usual, there are tons of features available with Visual Studio 2017. Visual Studio has always been one of my favorite IDE. We are going to look into all the features one by one. The first thing when you launch a New instance of the Visual studio will launch a start page. So in this blog post, we are going to explore what’s new in start page of Visual Studio 2017.

A new start page for visual studio 2017

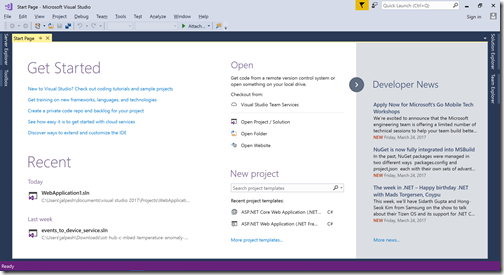
The first thing once you load visual studio 2017 will have a start page. It has been divided into three columns. The first column contains Get Started and Recent sections. The second column contains Open Project and New Project section and the third column contains Developer new section. By default when you load Visual Studio it looks like following.

visual-studio-2017-start-page-default

Get Started and Recent Section of Start Page:
Get Started section of Visual Studio 2017 contains how you can get started with Visual Studio. It contains a variety of links including how to get started with Visual studio to how to extend visual studio.

get-started-section-with-visual-studio-2017

The recent section contains recently open projects. It is divided into two part Today and Last week. Today section contains the link to the project that is opened today in Visual Studio.  Last week section contains projects that are used during last week.

Open and New Project Section:
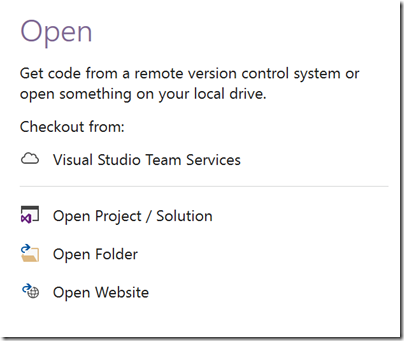
The open section contains four things.
  1. A link to connect Visual Studio team services from where you can directly connect to a team services project and open it from there.
  2. Open Project/Solution: - Open project or solution works in same as the earlier version of Visual Studio. It open project or solution available on your computer.
  3. Open Folder: - It will open a folder available on your computer and then display all the code files available in that particular folder.
  4. Open Web Site: This works same as earlier of Visual Studio. It opens an ASP.NET Web Sites available on your local computer.
open-project-visual-studio-2017

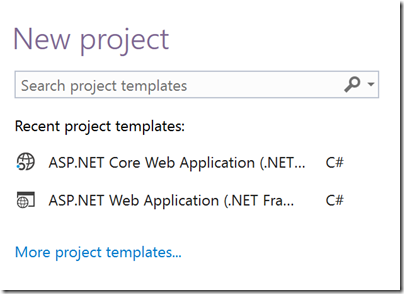
New Project is brand new in Visual Studio 2017. By default, it shows the recent project's templates you recently used and also there is search box to search the templates available in Visual studio 2017.
new-project-in-start-page-visual-studio-2017

Even you search templates via putting some text in the search box like following.
new-project-in-start-page-visual-studio-2017

So now to create a new solution or project you don’t have go to file menu. You can directly create a new project from start page itself.

Developer News Section:
This developer new section contains new feeds from various sites.

developer-new-section-in-start-page-visual-studio-2017

Customize Start page in Visual Studio 2017:

Like earlier edition of Visual Studio, you can also customize the start page of Visual Studio 2017. There is an option available for the same under Tools-> Options menu. Select environment and Goto Startup following dialog will come.

customize-start-page-visual-studio-2017


Here you configure options like At startup what should be shown. You can also setup time to download the content of developer news. Also, you can also use customize start page.

That’s it. Hope you like it. Stay tuned for more!!.
Share:
Monday, March 27, 2017

New Blog theme- new technologies

This blog has been quite for the some time. I was busy doing some professional commitments but now I decided to write blog post regularly. As there are lots of interesting stuff happening in technology world. There are tons of new technologies coming up and lots of new things to learn.

New blogger theme:

Recently blogger.com has launched few new theme and I also decided to have new blogger theme on my blog. I have used “Contempo” theme for my blog. This time I have done some experiments I have not changed anything except the background feature. Let’s see how it goes with SEO and other stuff.  Here is new look of my blog.

image

Hope you will like it.

New Technologies to blog :

There are lots of stuff happening in technology and I started learning those technologies and I’m going to share my learning experience with you guys for sure. So do except blog post on following topics.
  1. Visual Studio 2017
  2. ASP.NET Core 1.1
  3. C# 7.0
  4. Entity Framework Core
  5. .NET Core cross platform
  6. Docker
  7. Node.js
  8. Golang
  9. SQL Server 2016
  10. MongoDB
  11. Azure and Different Azure services
  12. Angular 2/4.
  13. React
  14. Vue.js
I outlines few of technologies there but still there are lots of happening so Please put your comments that what technologies I should learn and blog about.

As always, Again thank you very much for the your support and love. Without your support this blog would have not have been exist. Thanks all as always.

Happy blogging and journey continues.
Share:

Support this blog-Buy me a coffee

Buy me a coffeeBuy me a coffee
Search This Blog
Subscribe to my blog


My Mvp Profile
Follow us on facebook
Blog Archive
Total Pageviews