Saturday, March 22, 2014

Explicit Keyword in C#

Yesterday, I have written a blog post about Implicit Keyword in C#. In today’s post we are going to learn about Explicit keyword in C#. Like Implicit keyword explicit keyword is also used for typecasting one class into another class. It is also a type conversion operator but rather then directly invoking it will invoke by cast.

As per MSDN, The Explicit keyword declares a user defined type conversation operator that must be invoked with cast.

Usage of explicit operator in C#:

Let’s take a simple example. Following is a code for that.

using System;

namespace ExplicitOperatorDemo
{
    class Program
    {
        static void Main(string[] args)
        {
            User user=new User
            {
                    FirstName = "Jalpesh",
                    LastName = "Vadgama"
            };

            Employee employee = (Employee) user;

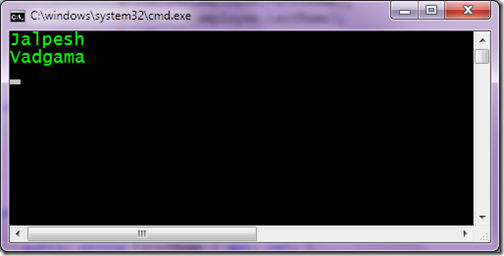
            Console.WriteLine(employee.FirstName);
            Console.WriteLine(employee.LastName);
            Console.ReadKey();
        }
    }

    public class Employee
    {
        public string FirstName { get; set; }
        public string LastName { get; set; }
    }

    public class User
    {
        public string FirstName { get; set; }
        public string LastName { get; set; }

        public static explicit operator Employee(User user)
        {
            Employee employee=new Employee
            {
                    FirstName = user.FirstName, 
                    LastName = user.LastName
            };
            return employee;

        }
    }
}

I have written almost same code as we have written for implicit operator. Same two classes “Emplyee” and “User” with first name and last name operator. The only difference is I have written explicit keyword instead of implicit. And same way I have used casting in main function of console application.

In main function I have initialized class “User” with first name and last name and then type cast that in Employee class object.  Following is out put as expected.


That’s it. It is very easy. Hope you like it. Stay tuned for more..
Share:
Friday, March 21, 2014

Launching DotNetJalps Communities

Everyday I got lots of emails asking about technical things and Every time I am trying to give proper answer to them. But due to lack of time it was always not possible to reply all the emails as I have professional commitments also. So that’s why I decided to launch DotNetJalps community where people can ask questions and If I am not there then also another people can answer the question. Another benefit of communities will be the solution given in that particular answer will be visible to all the users of community.
So I have created Google+ community for that. Following is a link for that.

https://plus.google.com/communities/109749681215763540822

I request to ask your questions there instead of sending me emails and I would also encourage you participate in discussion. I am also going to share all my blog post there. You guys can also share your links and discuss various technology related things.

But please make sure there should technology related things only. So please join my community ask question and give answer to people.

Stay tuned for more!!
Share:

Implicit Keyword in C#

In today’s post we are going to learn about implicit operator in C#. Implicit keyword is used for conversation in C#. It is used to declare an implicit user-defined type conversation operator. So with the help of implicit keyword you can convert one class into another class without writing any other syntax.

You can find more information about Implicit from following MSDN link.
http://msdn.microsoft.com/en-us/library/z5z9kes2.aspx

Usage of Implicit Keyword in C#:


Sounds interesting!! Let’s take a example of implicit operator in so that it will be much clear. Following is a code for that.

using System;

namespace ImplicitOpeartorDemo
{
    class Program
    {
        static void Main(string[] args)
        {
            User user=new User
            {
                    FirstName = "Jalpesh",
                    LastName = "Vadgama"
            };

            Employee employee = user;

            Console.WriteLine(employee.FirstName);
            Console.WriteLine(employee.LastName);
            Console.ReadKey();
        }
    }

    public class Employee
    {
        public string FirstName { get; set; }
        public string LastName { get; set; }
    }

    public class User
    {
        public string FirstName { get; set; }
        public string LastName { get; set; }

        public static implicit operator Employee(User user)
        {
            Employee employee=new Employee
            {
                    FirstName = user.FirstName, 
                    LastName = user.LastName
            };
            return employee;

        }
    }
}

In above code I have created two classes “User” and “Employee”. Both contains two properties FirstName and LastName. Also in user class I have defined implicit operator Employee which convert user object into employee object.

In main function I have created object of user with first name as “Jalpesh” and last name as “Vadgama” and then assign it to Employee class. So when you assign object to employee class it will call Employee operator with implicit keyword and convert that user object into employee object.

At the end I have printed first name and last name property of Employee class and following is output as expected.

implicit-operator-c#

That’s it. It’s very easy. Hope you like it. Stay tuned for more.. Happy programming.
Share:
Thursday, March 20, 2014

Enhanced debugging with DebuggerDisplay in C#

We all need to debug our projects and for that we need to some visualization to see values of debug data C# has a attribute called ‘DebuggerDisplay’ which helps developers to visualize data in the way developer wants .

As per MSDN, DebuggerDisplay attributes allows developers of the type, who specifies and best understands the runtime behaviour of that type, to also specify what that type will look like when it is display in debugger.

How to use DebuggerDisplay attribute:


Display attribute constructor has one argument, a string will displayed in the value column for instances of type. This string will contain {} braces and this text between {} will evaluate as expression. So what we are waiting for lets try it in Visual Studio. I have written following code for that.
using System.Diagnostics;

namespace ConsoleApplication1
{
    class Program
    {
        static void Main(string[] args)
        {
            var employee =new Employee();
        }
    }

    public class Employee
    {

        [DebuggerDisplay("Id={EmployeeId}")]
        public int EmployeeId = 1;

        [DebuggerDisplay("Name={Name}")]
        public string Name = "Jalpesh Vadgama";
    }
}

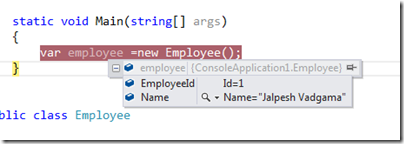
Here you can see I have created a class called “Employee” with two variable with DebuggerDisplay Attribute and from main method I have created a object of employee class. Now let’s create debug the code via pressing F5 and see how its works.

DisplayDeubggerAttribute

As you can see its display data as defined in argument. So now you can format your debugger visualizer screen as per your requirement. That’s it. Hope you like it. Stay tuned for more.
Share:
Wednesday, February 26, 2014

Internet Explorer 11 developer toolbar features

Recently Microsoft has launched new developer tool bar with Internet Explorer 11 with some cool features. In this post we are going to learn about the new features of Internet Explorer Developer toolbar. Microsoft has rewritten whole toolbar and now it loaded with bunch of features.

DOM Explorer:

When you launch Internet Explorer Developer toolbar with F12 by default it will load DOM Explorer and this will have all html and style sheet. You can select any element and modify or change style sheet of live site.

dom-explorer-toolbar-internet-explorer

You modify the existing HTML on left side of pane and you add/modify the style sheet of selected element on the right side of the pane. There is also find functionality given to find any specific element.

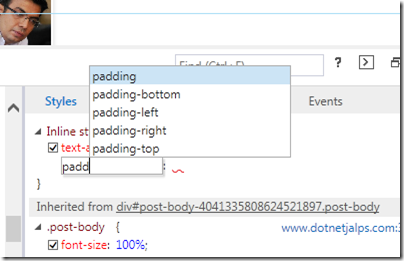
It also provides intellisense for modifying and changing HTML and style sheet.

intellisense-html-css-developer-toolbar


Console tool:

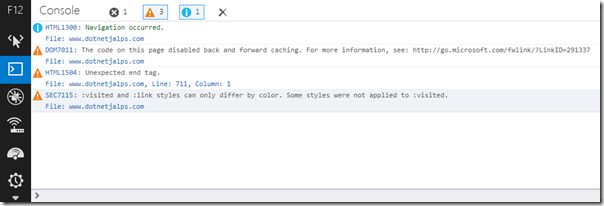
Second one on left side is console tool where you can have whole history running JavaScript with console.log statement

console-log-toolbar-internet-explorer

Here it will show whole errors and exception related to client side code executed for this page.

Debugger tool:

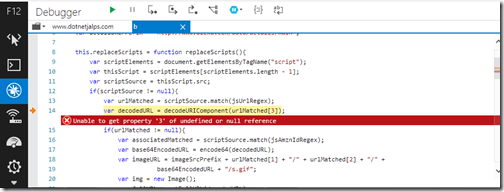
This tool is used for the debugging the your client side code when application running and you can easily debug your code with the help of this tool.

Here you can set your breakpoints just like in your IDE and easily debug loop or any client code.You can also debug the compressed JavaScript here. It’s a great way to debug and find errors.

debugger-tool-internet-explorer-developer-tools

Network tool:

Network tool is used for the performance measurement for a web page. It will give you a details of any request network involved in your web page loading. It will tell request completion time in mili seconds. Here you can also find amount data and bandwidth being transferred when your web page loads.

Network-tool-internet-explorer-developer-toolbar

The UI Responsiveness tool:

Next is UI responsiveness tool where you can find if your web page is running slow then what happened which part is consumed more CPU .It will help you identify different source CPU utilization which causes your web page to load slowly in browser.

ui-responsiveness-tool-internet-explorer
With help of this tool you can optimize your web pages performance via changing part/code which causes more CPU Utilization.

Profiler tool:

Profiler tool is used for measuring JavaScript performance. It will show you number of function called during profiling session. From here you can isolate JavaScript which makes your web page slow.

profiler-tool-internet-explorer-toolbar-developer

Memory tool:

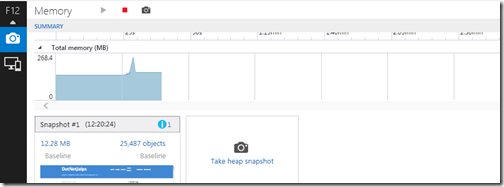
With the help of this Memory tool you can easily find the memory leak issues of your web page. The memory tool track memory usage of web page and help you identify where more memory is consumed and where memory leak is happening.

memory-usage-memory-tool-internet-explorer-developer-toolbar

Here is also allows you to take heap snapshot at regular interval and then can analyse via clicking on it.

memory-usage-memory-tool-internet-explorer-developer-toolbar2

With the help of this you can easily identify memory leaks in your code.

Emulation tool:

The emulation tools help you testing your web page on different screen size and hardware's. You can easily emulate different screen size and emulations.

emulation-tool-internet-explorer-developer-toolbar

That’s it. All this awesome features which is provided by developer tool for internet explorer 11. It will definitely going to make your life very easy. Highly recommend this.

Stay tuned for more.. 

Share:
Saturday, February 22, 2014

CodeMaid extension for visual studio

Till now I'm a resharper fan boy and I still love using it. It is a great productivity tool. But it is not free for commercial use. So lots of my friends tell me that they want something open source or free which provide some kind of productivity over normal visual studio things and recently I came across CodeMaid extension of visual studio. It is a great plugin. It's not replacement of resharper but it will surely increase your productivity and make your code clean.

What is CodeMaid?

CodeMaid is an open source Visual Studio extension to cleanup, dig through and simplify our C#, C++, F#, VB, XAML, XML, ASP, HTML, CSS, LESS, JavaScript and TypeScript coding.

You can download that from following link.

http://visualstudiogallery.msdn.microsoft.com/76293c4d-8c16-4f4a-aee6-21f83a571496.

It also got  a separate site for that from where you can see and learn all the features. Following is a link for that.

http://www.codemaid.net/

 Here you can find latest news, feature list and documentation for code maid.

Installing CodeMaid

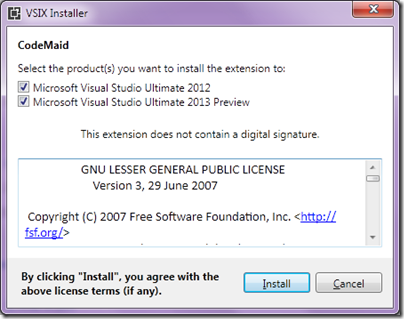
Installing CodeMaid is really easy download .vsix file from the above link and then double click on that. It will automatically start installing it.. It will ask for list of Visual Studio available like following.

CodeMaid

Once you click on install it will install CodeMaid plugin in Visual Studio.

Features of CodeMaid Extension of Visual Studio:

There are lots of features available with CodeMaid Extension of Visual Studio.

Code Cleaning:

This feature will automatically run on save. It will do following things.
  1. Removed unused using statement and sort them
  2. Add unspecified access modifier.
  3. Add Blank line padding.
  4. Remove blank lines adjacent to braces.
  5. Run Visual Studio formatting
  6. Remove Constructive blank lines.
  7. Remove End of Line white spaces.
  8. Update region tags.
You find more about this at -http://www.codemaid.net/documentation/#cleaning

Code Digging:

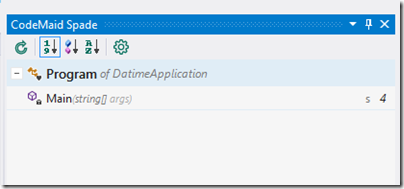
Once you install CodeMaid it will add a CodeMaid spade where you can navigate and digg code. Here you can alphabetically sort everything drag and drop members etc.

CodeMaidSpade

There are tons of features available like Joining, Formatting, Collapsing, Configuring, Switching etc. You can find that for the following feature documentation list.

http://www.codemaid.net/documentation/

I have used it for few days and highly recommend it it saves lot of time. Hope you like it. Stay tuned for more.
Share:
Thursday, February 20, 2014

PetaPoco series–DotNetJalps

Recently one of the friend ask to create list of post that I have written about PetaPoco this post is a complete list of all my PetaPoco related post.

What is PetaPoco?

PetaPoco is a Microsoft ORM developed by Top Ten Software. It was inpired by Massive and Dapper Micro ORM. Following is a link where you can get all information about PetaPoco.

http://www.toptensoftware.com/petapoco/

PetaPoco related blog posts on DotNetJalps:

Following is a complete list of PetaPoco posts that I have written on my blog. I will keep updating this list also for future posts about PetaPoco.

Get started with ASP.NET MVC and PetaPoco
PetaPoco with stored procedures
PetaPoco with parameterised stored procedure and Asp.Net MVC
CRUD operations with PetaPoco and ASP.NET MVC

Hope you like it. Stay tuned for more.
Share:

Support this blog-Buy me a coffee

Buy me a coffeeBuy me a coffee
Search This Blog
Subscribe to my blog


My Mvp Profile
Follow us on facebook
Blog Archive
Total Pageviews