Friday, May 21, 2010

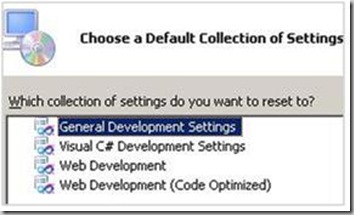
Two new profile in new visual studio 2010.

Visual studio 2010 is a great tool and i have become fan of visual studio 2010. I have found two new code profile in visual studio 2010.

  1. Web Development Profile
  2. Web Development Code Optimized Profile.

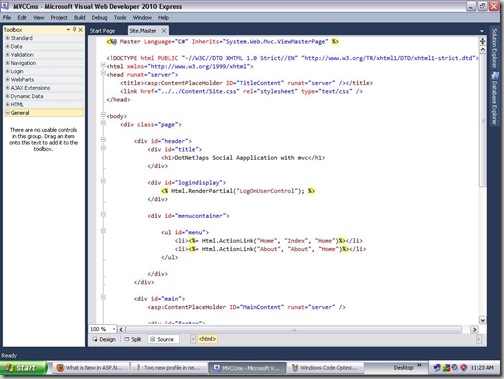
Profile

Web Development profile will hide the top bar which contains the client object and and event dropdowns. So it will have more spaces.

WebDevelopment

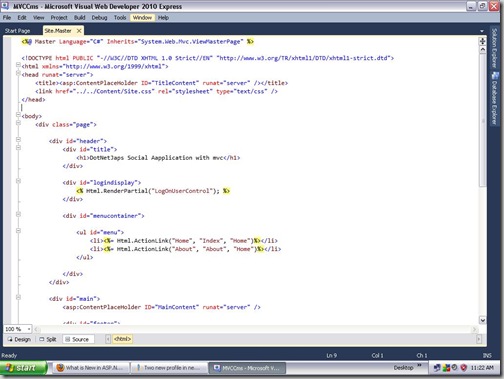
Another one web development code optimized which will hide all the things except main windows. It will hide Toolbox,CSS properties and all other things so you will have more spaces to play with your html.

Windows Code Optimized

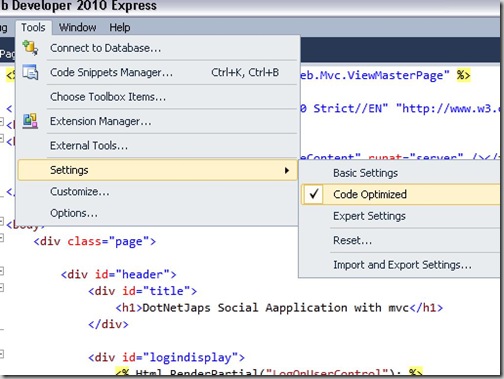
So as a web developer you can use this two great new profile as per your convenience when you only want to play with your html then use webdevelopement code optimized profile and another interesting thing is that you don’t have to reset your settings you can also just do with Tools->Settings menu like below. This will swap different profile like below.

Settigns

Hope this will help you..

Shout it
kick it on DotNetKicks.com
Share:
Thursday, May 20, 2010

Using transactions with LINQ-to-SQL

Today one of my colleague asked that how we can use transactions with the LINQ-to-SQL Classes when we use more then one entities updated at same time. It was a good question. Here is my answer for that.For ASP.NET 2.0 or higher version have a new class called TransactionScope which can be used to manage transaction with the LINQ.

Let’s take a simple scenario we are having a shopping cart application in which we are storing details or particular order placed into the database using LINQ-to-SQL. There are two tables Order and OrderDetails which will have all the information related to order. Order will store particular information about orders while OrderDetails table will have product and quantity of product for particular order.We need to insert data in both tables as same time and if any errors comes then it should rollback the transaction.

To use TransactionScope in above scenario first we have add a reference to System.Transactions like below.

TransactionScope,System.Transactions

After adding the transaction we need to drag and drop the Order and Order Details tables into Linq-To-SQL Classes it will create entities for that. Below is the code for transaction scope to use mange transaction with Linq Context.

 MyContextDataContext objContext = new MyContextDataContext();
using (System.Transactions.TransactionScope tScope
= new System.Transactions.TransactionScope(TransactionScopeOption.Required))
{
objContext.Order.InsertOnSubmit(Order);
objContext.OrderDetails.InsertOnSumbit(OrderDetails);
objContext.SubmitChanges();
tScope.Complete();
}
Here it will commit transaction only if using blocks will run successfully. Hope this will help you.

Shout it
kick it on DotNetKicks.com
Share:
Tuesday, May 18, 2010

Google Translation API Integration in .NET

Language localization is one of important thing of site of application nowadays. If you want your site or application more popular then other then it should support more then language. Some time it becomes difficult to translate all the sites into other languages so for i have found a great solution. Now you can use Google Translation API to translate your site or application dynamically. Here are steps you required to follow to integrate Google Translation API into Microsoft.NET Applications.

First you need download class library dlls from the following site.

http://code.google.com/p/google-language-api-for-dotnet/

Go this site and download GoogleTranslateAPI_0.1.zip.

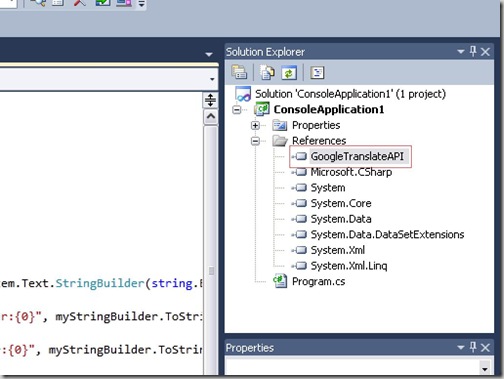
Then once you have done that you need to add reference GoogleTranslateAPI.dll like following.

AddReference,Google,

Now you are ready to use the translation API from Google. Here is the code for that.

string Text = "This is a string to translate";
Console.WriteLine("Before Translation:{0}", Text);
Text=Google.API.Translate.Translator.Translate(Text,Google.API.Translate.Language.English,Google.API.Translate.Language.French);        
Console.WriteLine("Before Translation:{0}", Text);
That’s it it will return the string translated from English to French. But make you are connected to internet :)… Happy Programming

Technorati Tags: ,
Shout it
kick it on DotNetKicks.com
Share:
Wednesday, April 21, 2010

Visual Studio 2010 New Feature-Generate From usage.

Visual Studio 2010 is Great IDE and I am exploring everyday a new things. Recently I was working with it and I have found a great features called Generate from usage. This feature is allow us to create a class from the generation from usage. Let’s take a sample example for that. Let’s Create a simple example where we will use a product class which is not there in project. Then from generate from usage feature we will create a product class. Here is code where product class does not exist in my console application project.

namespace ConsoleApplication1
{
class Program
{
static void Main(string[] args)
{
Product objProduct = new Product();
}
}
}
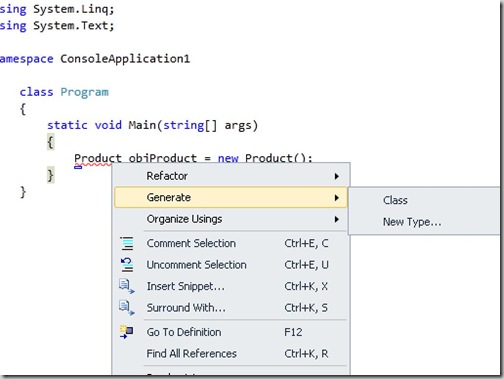
Now lets create a new class from this new feature like following. Goto Product class line right click and then click generate->Class as shown in image below.GenerateClass

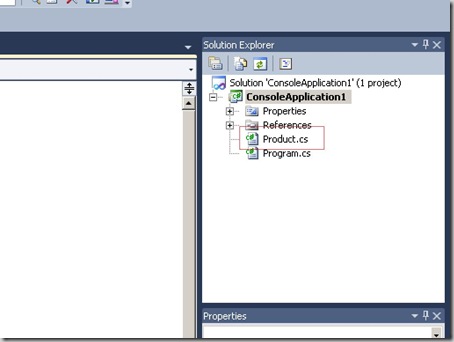
That’s is it will create a new class there in your solution like this.

ProductClass

So with this feature you will create as per you usage in class. Hope this will help you.Happy programming..

Shout it
kick it on DotNetKicks.com
Share:
Monday, April 19, 2010

Playing with Update Panel in asp.net

While taking interview for asp.net I often asked questions regarding update panel and how they works and how we can asynchronous post back using update panel without post backing whole page. To my surprise most of people don’t know how to use update panel using triggers. Let’s create simple example to demonstrate use of trigger.

We will take one button and then we will use a textbox control and when button’s click event fires its will change textbox text value and fill textbox with that value. But lot’s people here believes that button should be inside update panel but that’s is not true you can use trigger of a update panel for any control outside update panel.

First let’s take look of server side code of button click. Following is a code for that.

protected void btnHelloWorld_Click(object sender, EventArgs e)
{
    txtHello.Text = "This is without postback";
}

here it will simple fill the textbox with string “This is without post back”. Now lets create trigger like following.

<asp:ScriptManager ID="myScriptManager" runat="server">
</asp:ScriptManager>
<asp:UpdatePanel ID="updTextbox" runat="server">
<ContentTemplate>
    <asp:TextBox ID="txtHello" runat="server"></asp:TextBox>
</ContentTemplate>
<Triggers>
    <asp:AsyncPostBackTrigger ControlID="btnHelloWorld" EventName="Click" />
</Triggers>
</asp:UpdatePanel>
<asp:Button ID="btnHelloWorld" runat="server" Text="Submit" onclick="btnHelloWorld_Click"/>

It’s simple and you don’t need button insides the update panel. Hope this will help you.

Technorati Tags: ,,,

Shout it

kick it on DotNetKicks.com
Share:
Thursday, April 15, 2010

Better View State Management in ASP.NET 4.0

ASP.NET is a great platform to develop any web applications. From ASP.NET 1.1 we are having one feature called View State which store the data in hidden field during page post back. Any Serializable data can be stored in View State. It’s scope is limited to page post backs.View state is great if you use it wisely otherwise it may create problem with performance page. I have seen that there were some page which contains lots of view state. It will increase your Kilo bytes of page and increase page rendering time.

In ASP.NET 4.0 we have more control over maintaining view state for page let’s see how we can manage View State more efficiently in asp.net 4.0. In the earlier version of asp.net we have View State optional that means we can turn View State view EnableViewState property. If we made it true then it will enabled other wise it will be disabled for that page. All controls that are derived from control class will have EnableViewstate property. Now in earlier version of ASP.NET this property will be ignored for the child controls. For example if you enabled this property for page and now you have three textboxes on page then that textbox’s value will be stored in View State regardless of textbox’s EnableViewState Property is true or not.

But with ASP.NET 4.0 things are different with respect to above scenario. Now we have one more property called ViewStateMode Property. This property help us greatly in managing View State. It has there values Enabled,Disabled,Inherit. With this property you can enable View State of control even if View State is disabled. So now we will have facility to turn off the View State of parent controls like page and then we can decide which control will have View State enabled.

In ASP.NET 4.0 ViewStateMode property will accept following values.

  • Enabled- This will enable View State for particular control and also for any child control which have ‘Inherit’ value for this property or nothing set for this property.
  • Disabled- This will disable View State for that particular control.
  • Inherit- This will specify that control will use the parent control ViewStateMode property.

Hope this will help you understanding View State Management in ASP.NET 4.0.

Technorati Tags: ,
Shout it
kick it on DotNetKicks.com
Share:
Tuesday, April 6, 2010

ASP.NET 4.0 –List View Control Enhancement

With asp.net 3.5 we are having a great control called list view its provide almost all the functionality like grid view and its rendering is also easy but in asp.net 3.5 you need to specify a layout template where in asp.net 4.0 layout template is not required. So no need to include one extra placeholder as layout template. Like in asp.net 3.5 you nee do render formview control like following.

<asp:ListView ID="myListView" runat="server">
<LayoutTemplate>
<asp:PlaceHolder ID="LayoutPlaceHolder" runat="server"></asp:PlaceHolder>
</LayoutTemplate>
<ItemTemplate>
<% Eval("myDataBaseColumn")%>
</ItemTemplate>
</asp:ListView>
This can be replaced by following in asp.net 4.0. Now no need to for layout template like following.
<asp:ListView ID="myListView" runat="server">
<ItemTemplate>
<% Eval("myDataBaseColumn")%>
</ItemTemplate>
</asp:ListView>
Hope this will help you..Happy coding..

Technorati Tags: ,
Shout it
kick it on DotNetKicks.com
Share:

Support this blog-Buy me a coffee

Buy me a coffeeBuy me a coffee
Search This Blog
Subscribe to my blog


My Mvp Profile
Follow us on facebook
Blog Archive
Total Pageviews